


舉報
![[Laser cut and engrave] Laser Cut Wooden Valentine's Day Card Holder with Engraved Love Message](https://storage-us.atomm.com/resource/xtool/community/attachment/xtool-community/3fcaea32-5f5d-44d4-ab9d-217f662018a2.png?x-oss-process=image/resize,w_1200,h_900,limit_0/interlace,1/format,webp/auto-orient,1)
![[Laser cut and engrave] Laser Cut Wooden Valentine's Day Card Holder with Engraved Love Message](data:image/png;base64,iVBORw0KGgoAAAANSUhEUgAAAAoAAAAKCAYAAACNMs+9AAAAAXNSR0IArs4c6QAAABdJREFUKFNjZCASMBKpjmFUId6QIjp4AAppAAuXjCs4AAAAAElFTkSuQmCC)
![[Laser cut and engrave] Laser Cut Wooden Valentine's Day Card Holder with Engraved Love Message](https://storage-us.atomm.com/resource/xtool/community/attachment/xtool-community/3fcaea32-5f5d-44d4-ab9d-217f662018a2.png?x-oss-process=image/resize,w_200,h_150,limit_0/interlace,1/format,webp/auto-orient,1)
![[Laser cut and engrave] Laser Cut Wooden Valentine's Day Card Holder with Engraved Love Message](https://storage-us.atomm.com/resource/xtool/community/attachment/xtool-community/692b8ce9-580c-4581-be1b-6266405ada13.jpg?x-oss-process=image/resize,w_200,h_150,limit_0/interlace,1/format,webp/auto-orient,1)
雷射切割木製情人節卡片-滑動拼圖設計
 教程
教程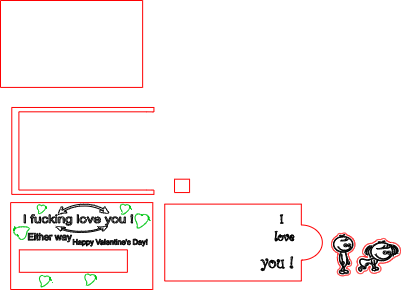
Valentine's card
.xcs
顯示剩餘(1項)
應用場景
激光加工 (15min)
機器與模組
xTool M1
10W兼容的 · 13
使用的材料

3mm椴木膠合板
24
248
教程
1
步驟1
準備
1。材料準備
使用適合雷射切割的平板、乾式膠合板或實木(建議3–4毫米)。
確保表面乾淨且無灰塵。
遮罩是可選的;只有想要雕刻邊緣更乾淨時才使用。
步驟 1 – 軟體設定(xTool 創意空間)
1.匯入並排列
在 XCS 中開啟你的 SVG 檔案。
保留原始顏色:
黑色線條→雕刻
紅色線條→切割
不要將顏色轉換成灰階。
2. 圖層設定
按顏色設定操作:
黑色(雕刻)
模式:雕刻
功率:60–70%
速度:3000–3600 mm/min
每公分線數:120
條紅色(切割)
模式:切割
功率:100%
速度:300–500 mm/min
通過次數:1 次(木材密度調整)
使用新木材時,務必進行小切斷測試。
步驟2 – 雕刻與切割順序
先雕刻(黑線)。
第二切(紅線)。
這樣可以防止零件移位,並確保細節乾淨俐落。
開始前用框架確認對齊。
步驟3 – 組裝
1。基底結構
切割後,取底層。
把中間的U型墊片黏在底部的墊片上。
確保完美對齊;此部分定義滑動間隙。
2. 頂層
在間隔邊緣塗上膠水。
小心地將最上層固定,保持壓力均勻。
讓結構穩定幾分鐘。
3. 滑動機構
將可抽出的內片插入已組裝的卡片中。
把小間隔方塊黏在滑動件上(當作塞動/把手)。
在膠水完全固化前測試移動。
4. 最後細節 將
兩個裝飾人物黏合到指定位置。
確保它們不會干擾滑動的動作。
最後說明:
使用木工膠或快凝工藝膠,擠壓量最小。
邊緣輕度打磨是可選的,以獲得高級效果。
在包裝或贈送前,請預留充分的固化時間
評論


