
![[Laser cut and engrave] Material Test Grid](https://image-res.atomm.com/ali-res/community/making/72a4a483-e636-40ad-81f9-0fdad18b883f/Grid.jpg?x-oss-process=image/resize,w_1200,h_900,limit_0/interlace,1/format,webp/auto-orient,1)
![[Laser cut and engrave] Material Test Grid](data:image/png;base64,iVBORw0KGgoAAAANSUhEUgAAAAoAAAAKCAYAAACNMs+9AAAAAXNSR0IArs4c6QAAABdJREFUKFNjZCASMBKpjmFUId6QIjp4AAppAAuXjCs4AAAAAElFTkSuQmCC)
![[Laser cut and engrave] Material Test Grid](https://image-res.atomm.com/ali-res/community/making/72a4a483-e636-40ad-81f9-0fdad18b883f/Grid.jpg?x-oss-process=image/resize,w_200,h_150,limit_0/interlace,1/format,webp/auto-orient,1)
![[Laser cut and engrave] Material Test Grid](https://image-res.atomm.com/ali-res/community/making/0f186920-a62e-4b91-b8f6-bfc9c1df6d84/Grid.jpg?x-oss-process=image/resize,w_200,h_150,limit_0/interlace,1/format,webp/auto-orient,1)
Material Test Grid
 Instruction


Information
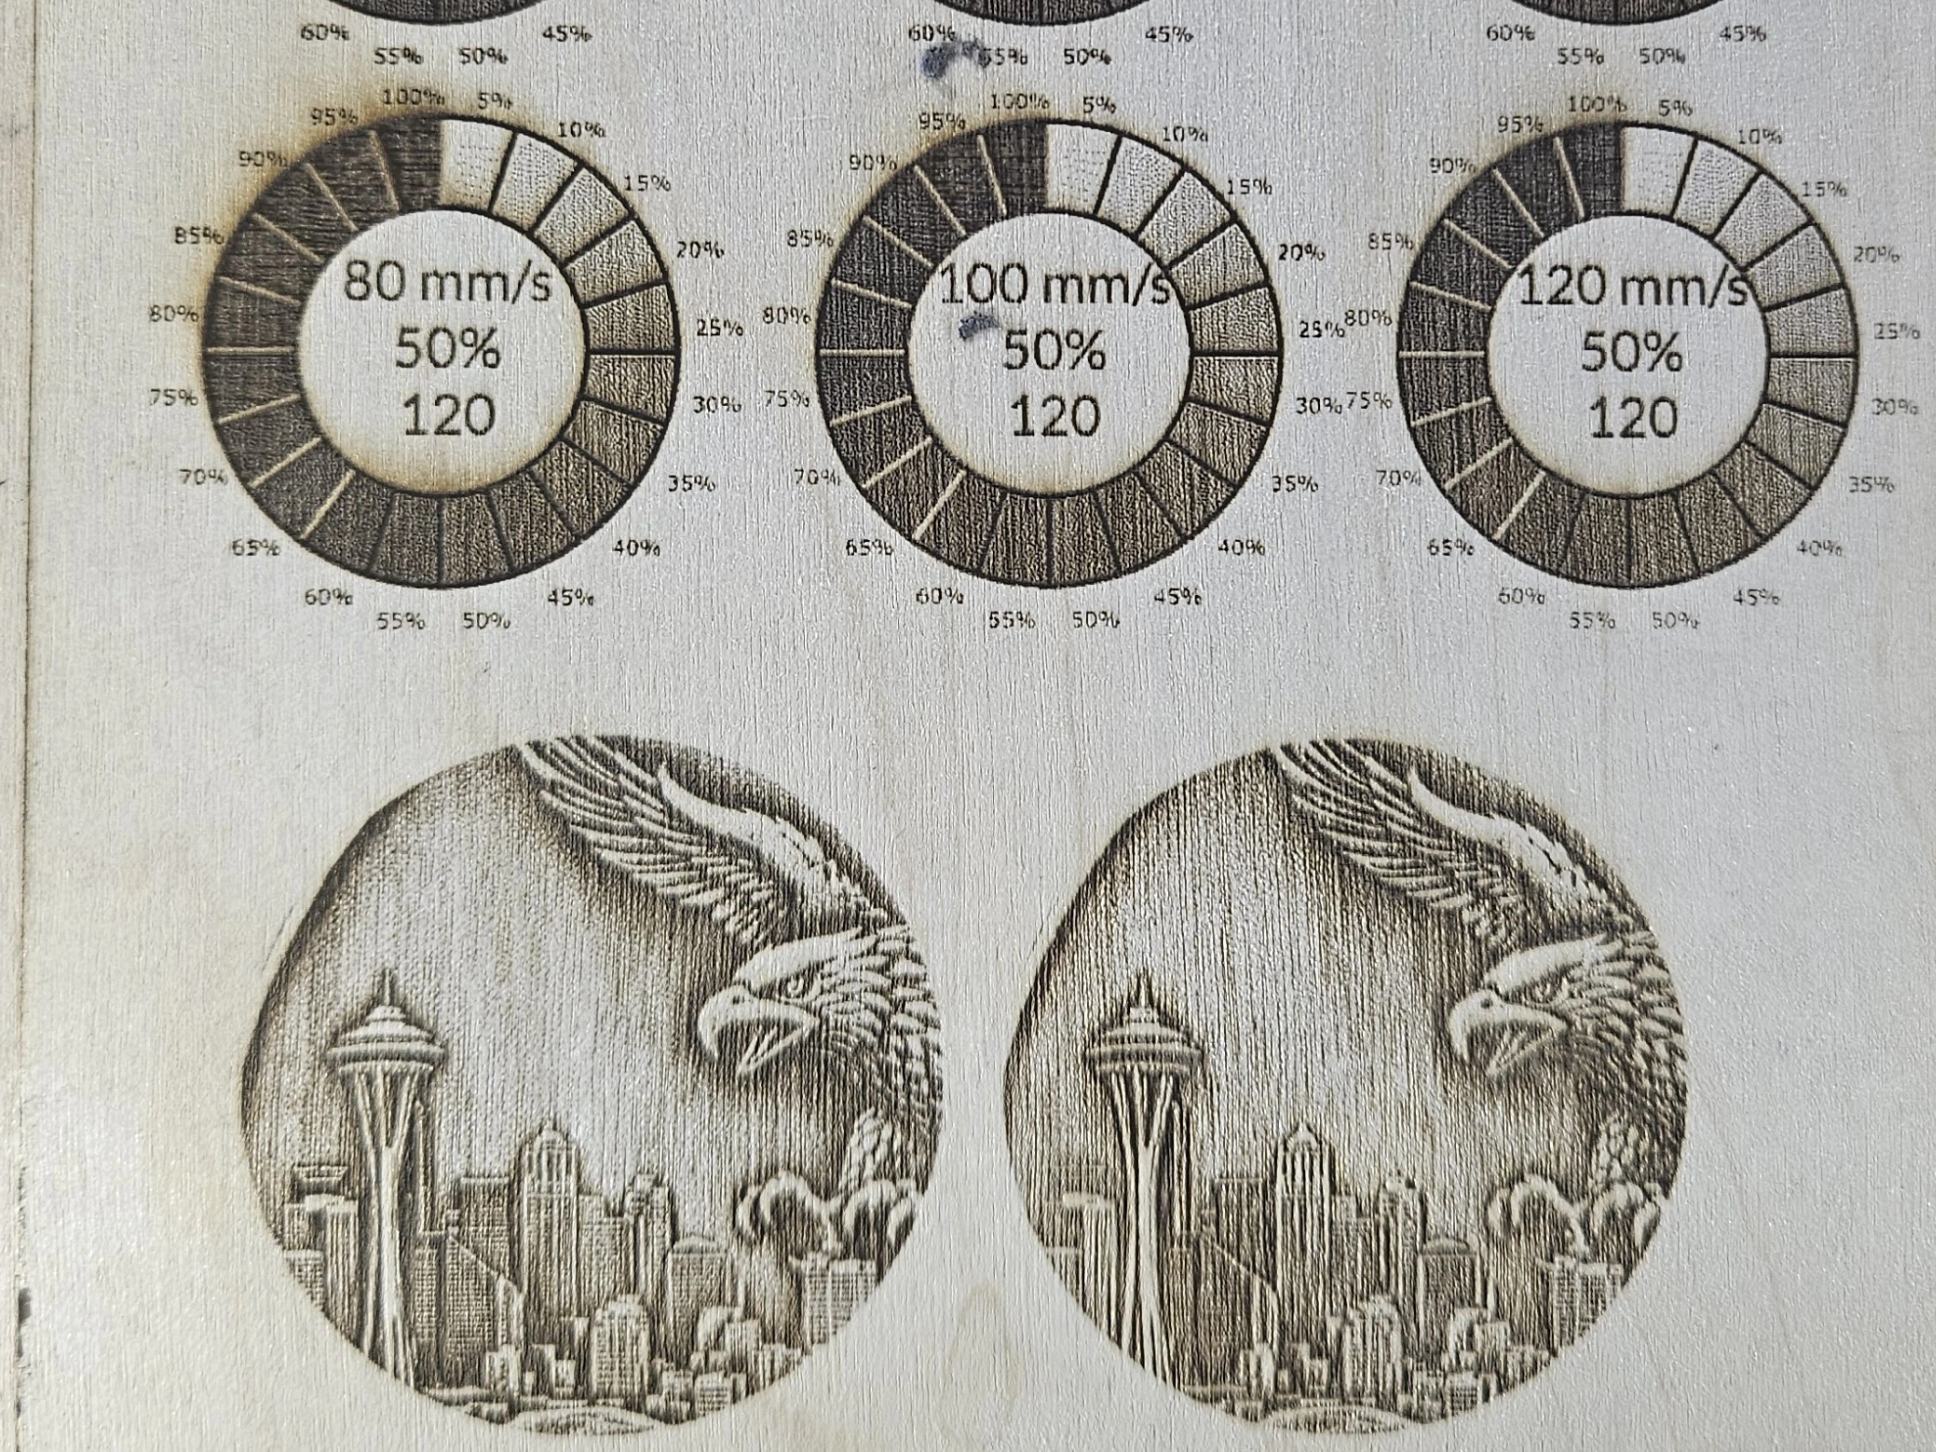
Having trouble dialing in the right settings to use? Tired of wasting materials? Use a test grid to figure out the right balance of speed vs power that you need for your project.
Instruction
Step1: Material Placement
Place your material into your P2 machine. Ensure that it is stable for cutting, lighter materials may need to be clamped down. Materials should be no smaller that 2" x 2.5" (larger will let you see more detail in the end result).
Step2: Load and Position Grid
- Now load the file MaterialTestGrid.xcs file into xTool Creative Space.
- Refresh your camera and position the grid over your material.
- Resize the grid as needed (be sure to lock the aspect ratio before resizing.
Step3: Customize the Grid
Now is the time to start to customize the grid for your particular needs!
- Click on numbers for each speed and power row and column header and edit them to be in-line with your material (do some searching on your materials to find ranges other folks have used, you don't want too slow or high power for some materials as it could start a fire. When in doubt, start with the fastest speed and lowest power and work up from there.)
- Once you figure out what ranges of speed vs power you want to test, you now need to set the boxes to score, engrave, or cut at those settings.
- Using your selector highlight all the top boxes in the first row and set those to the speed you labeled that row. Repeat for rest of the rows.
- Now highlight all the boxes in the first column, and set power to what you labeled for that column. Repeat for the rest of the columns.
- Feel free to add or delete rows and columns as needed.
Step4: Setup the other elements
The file has two other elements: the text and the bounding box.
- Click the layer of the text elements, it should highlight all the text.
- Set this layer to Score or Engrave at a fairly decent speed and lower power.
- Now select the layer with the bounding box. This layer is optional if you want to cut out your grid from the material to save later. If you choose to do this (and your material can be cut with the machine), set this ‘Cut’ and choose a setting that is appropriate to make the cut (note I had to run a grid without this option to figure out what my cut was for the material).
- If you don't want this simply select it and either delete it or choose ‘Ignore’ in the object settings.
Step5: Calibrate Material
Before you send the job to the P2, be sure to calibrate the material thickness. With no element selected, on the right side, you should see an option for thickness. The button to the right of it will allow the machine to auto-calculate this.
Remember this setting for your material!! When you go to use the material again, you'll want to ensure this is set the same otherwise you may get different results from when you did the grid test.
Step6: Process and Review
Now send it to your P2 for processing. Watch this process carefully as the lower speed / higher power tests could cause your material to burn or start fire.
Once done, review the grid. It should start in the upper left corner with your top speed and lowest power, which should be barely visible on your material down to your slowest speed and highest power in the bottom right corner which most likely cut all the way through. If the upper left is too dark, or the bottom right didn't cut through (or didn't engrave very dark) then you may want to adjust the grid with higher/lower settings to dial it in more.
Hope this helps you get your machine dialed in for your materials!
Remixes


You may also like

S1 20w Basswood Test Grids


Leather test grid


2 Watt - Metall - Test Grid mit Sprühfolie Schwarz-Matt / 2 watt metal test grid with black matt spray film


F2 - IR Material Grid Test Acrylic


M1 Ultra Color Test Grid


XTOOL F1 General metals test grid with power and dot duration


xTool M1 Ultra Slate Test Grid

P2 Black Granite Test Grid


Depth test grid for making sliding lid boxes


Laser test grid for s1, d1, and m1

Bitmap/Image Material Test


Extra Large Color Stainless Steel testing - Fiber Laser Color Test 30kHz to 60kHz


2 Watt Kunstleder Test Grid für S1 - Faux leather
Material test on Kapton tape


test grid plywood


Xtool Grid


Burn Free Cut Test Grid - CO2 or Diode - Material Grid Test For Wood/Plywood


XTool Opaque Glossy Black Acrylic Test Array (IR)