


신고
![[Laser cut and engrave] Black Laser Cut Wooden Remote Control Holder](data:image/png;base64,iVBORw0KGgoAAAANSUhEUgAAAAoAAAAKCAYAAACNMs+9AAAAAXNSR0IArs4c6QAAABdJREFUKFNjZCASMBKpjmFUId6QIjp4AAppAAuXjCs4AAAAAElFTkSuQmCC)
![[Laser cut and engrave] Black Laser Cut Wooden Remote Control Holder](https://storage-us.atomm.com/resource/xtool/community/attachment/xtool-community/f908d442-ab43-47d6-bc72-9175c591ea7e.jpg?x-oss-process=image/resize,w_200,h_150,limit_0/interlace,1/format,webp/auto-orient,1)
![[Laser cut and engrave] Black Laser Cut Wooden Remote Control Holder](https://storage-us.atomm.com/resource/xtool/community/attachment/xtool-community/0e58d659-54ed-41e9-9fa7-14e8ffc91c52.jpg?x-oss-process=image/resize,w_200,h_150,limit_0/interlace,1/format,webp/auto-orient,1)
![[Laser cut and engrave] Black Laser Cut Wooden Remote Control Holder](https://storage-us.atomm.com/resource/xtool/community/attachment/xtool-community/afbdf688-bfa5-403e-84ea-decb9022fae1.jpg?x-oss-process=image/resize,w_200,h_150,limit_0/interlace,1/format,webp/auto-orient,1)
스튜디오 라이트 폴용 리모컨 홀더
 지침
지침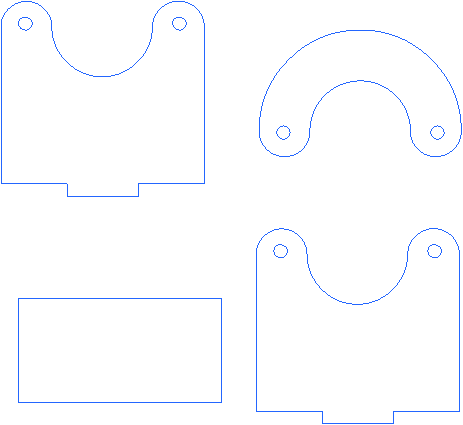
Remotebracket
.xcs
1개 더 보기
응용 시나리오
레이저 가공 (10min)
기계 및 모듈
xTool S1
40W호환되는 · 9
사용된 재료

1/4" (6mm) 소나무 합판
1
243
정보
스튜디오 조명 기둥에 부착할 리모컨 홀더를 만들었는데, 그래야 리모컨을 잃어버리지 않게 됐어요. 홀더는 1/8" [3mm] 소나무 합판으로, 내구성을 위해 브래킷은 1/4" [6mm] 합판으로 만들어졌습니다.
지침
1
단계1: 원격 박스 절단 및 조립

미리보기

미리보기
리모컨 홀더용 3mm 부품을 잘라낸 후 CA 접착제나 목공 접착제로 붙이세요.
2
단계2: 브래킷을 잘라서 홀더에 조립하는 과정.

미리보기

미리보기

미리보기

미리보기
브
래킷을 잘라내면, 탭 근처의 평평한 부분도 직사각형 조각을 첫 번째 브래킷 조각에 접착하세요. 다음 단계는 골판지 스페이서 조각을 붙이는 거예요. 시리얼 박스 일부를 사용해서 곡선 조각을 홀더에 고정한 후에 넣을 수 있어요. 다음으로 홀더와 접하는 부분과 탭 옆면에 본드를 바르세요. 다음 단계는 이 부품을 홀더의 슬롯에 끼우는 것입니다. 마지막 조각을 붙여서 홀더에 접착제를 넣으세요.
3
단계3: 리모컨 홀더를 조명에 연결하기.

미리보기

미리보기
이 시점에서는 전체 작품을 칠하거나 스테인을 칠할 생각입니다. 그 후 #8x3/4" 나사 중 하나를 나사로 고정해 두 조각을 고정하세요. 그다음 가로등에 브래킷을 붙이고 마지막 나사를 넣으세요.
댓글


