
![[Laser cut and engrave] Laser Cut Wooden Bunny Egg Holder for Kitchen Decor](https://storage-us.atomm.com/resource/xtool/community/attachment/xtool-community/b605a71a-f153-41fc-abf0-796cb55c6854.jpeg?x-oss-process=image/resize,w_1200,h_900,limit_0/interlace,1/format,webp/auto-orient,1)
Easter Bunny Egg Holder – Single & Double-Sided Version
 Instruction
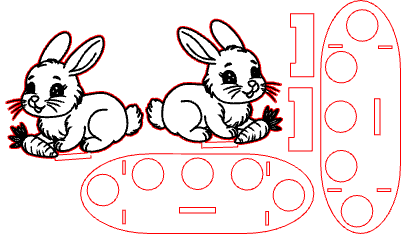


Information
      This Easter-themed wooden egg holder features a cute engraved bunny holding a carrot, designed as a decorative tabletop display for real eggs. The project is prepared in xTool and includes two separate working canvases:
Single-sided version (simple construction)
Double-sided version with dual egg holder base
The single-sided version consists of one engraved bunny panel and a base with egg slots.
The double-sided version includes two mirrored bunny panels and a reinforced double egg holder base. The double version requires gluing to create a stable and symmetrical construction.
Perfect as an Easter table decoration, seasonal home decor, or handmade gift.
Instruction
Step1
File Structure (xTool Project)
The project contains two separate canvases:
Canvas 1 – Single-Sided Version
1x engraved bunny panel
1x egg holder base
Canvas 2 – Double-Sided Version
2x mirrored bunny panels
2x egg holder base plates (to be glued together for extra strength)
All elements are prepared and positioned for laser cutting.
Assembly Instructions
Single-Sided Version
Cut all parts from 3 mm plywood.
Lightly sand edges if needed.
Insert the bunny panel into the base slot.
Place eggs into the holder slots.
✔ No glue required.
Double-Sided Version
Cut all parts from 3 mm plywood.
Glue both base plates together to create a thicker, stable egg holder.
Glue the two mirrored bunny panels back-to-back.
Allow glue to fully dry.
Insert the assembled bunny into the glued base.
Place eggs into the slots.
✔ Wood glue is required for this version.
✔ Ensure alignment before pressing parts together.
