


![[Laser cut and engrave] Laser Cut Wooden Dragon Model Puzzle Toy](https://storage-us.atomm.com/resource/xtool/community/attachment/xtool-community/02f53644-c73a-4695-8ab1-d12bccd208e2.jpg?x-oss-process=image/resize,w_1200,h_900,limit_0/interlace,1/format,webp/auto-orient,1)
![[Laser cut and engrave] Laser Cut Wooden Dragon Model Puzzle Toy](data:image/png;base64,iVBORw0KGgoAAAANSUhEUgAAAAoAAAAKCAYAAACNMs+9AAAAAXNSR0IArs4c6QAAABdJREFUKFNjZCASMBKpjmFUId6QIjp4AAppAAuXjCs4AAAAAElFTkSuQmCC)
![[Laser cut and engrave] Laser Cut Wooden Dragon Model Puzzle Toy](https://storage-us.atomm.com/resource/xtool/community/attachment/xtool-community/02f53644-c73a-4695-8ab1-d12bccd208e2.jpg?x-oss-process=image/resize,w_200,h_150,limit_0/interlace,1/format,webp/auto-orient,1)
![[Laser cut and engrave] Laser Cut Wooden Dragon Model Puzzle Toy](https://storage-us.atomm.com/resource/xtool/community/attachment/xtool-community/d553ec1c-f3dc-4c83-aa61-b83ccf199994.jpg?x-oss-process=image/resize,w_200,h_150,limit_0/interlace,1/format,webp/auto-orient,1)
![[Laser cut and engrave] Laser Cut Wooden Dragon Model Puzzle Toy](https://storage-us.atomm.com/resource/xtool/community/attachment/xtool-community/b7931587-17df-436b-916f-54e5445f6e5e.jpg?x-oss-process=image/resize,w_200,h_150,limit_0/interlace,1/format,webp/auto-orient,1)
![[Laser cut and engrave] Laser Cut Wooden Dragon Model Puzzle Toy](https://storage-us.atomm.com/resource/xtool/community/attachment/xtool-community/bca2da94-4780-4ae2-9476-c998634aa291.jpg?x-oss-process=image/resize,w_200,h_150,limit_0/interlace,1/format,webp/auto-orient,1)
Bezzębny smok
 Instrukcja
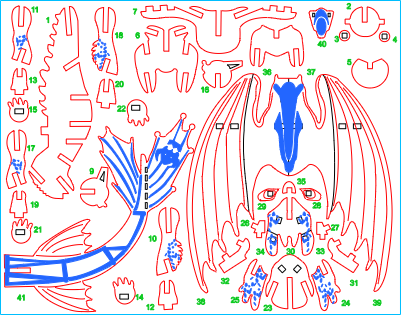

Informacja
Znalazłem wzór w sieci i go poprawiłem
Instrukcja
Krok1: Wzór wycięć

Wytnij wszystkie kawałki
Krok2: Montaż części nadwozia


Pierwszy kawałek wkłada się do gardła. Ma dwa kwadratowe zaczepki wystające z boków. Przyklej na miejsce, a potem przyklej te dwa małe okrągłe kawałki po bokach.
Kolejnym elementem jest dysk z wycięciem w kształcie litery V.
Następnie jest część nogi z literą V na górze (skrzydła włożę w szczeliny w późniejszym etapie).
Teraz sklej uchwyt na skrzydło w następnym szczelinie.
Ostatnim elementem jest uchwyt na tylne nogi.
Krok3: Assemble Legacy


Z przodu są dwie sekcje nóg i dwie z tyłu.
Przednie nogi mają ułożenie, tylne nie.
Grawer rozciąga się na zewnątrz. Trzymaj wszystkie grupy nóg osobno.
Przyklej nogi, potem podtrzymywacz na stopę, a na końcu stopę.
Krok4: Zespół głowicy


Przyklej nauszki na policzkach do dolnej szczęki/twarzy.
Włóż to do głównego elementu bode.
Są dwa małe uchwyty na oczy, które przyklejają się do części szczęki.
Przyklej oczy do tych kawałków. Dodaj nos do przodu.
Weź górną część naklejki głowy i przyklej uchwyty na doł.
Przyklej uszy do zakładek, które wystają pod kątem.
Włóż ten element do szczeliny z tyłu głowy.
Krok5: Dodaj skrzydła i ogon


Wsuwaj wewnętrzne skrzydła tak, aby przylegały do głównego elementu korpusu.
Przyklej dwa zewnętrzne elementy skrzydeł.
Przyklej ogon w pozostałym szczelinie z tyłu korpusu.
Krok6: Ukończone


Jesteś skończony!
Mam nadzieję, że Ci się spodoba!


