
Zgłoś
![[Laser cut and engrave] Laser Cut LOVE Multilayers](https://image-res.atomm.com/resource/xtool/community/attachment/xtool-community/061abca9-b15a-4e19-9c04-bc71f208d710.jpg?x-oss-process=image/resize,w_1200,h_900,limit_0/interlace,1/format,webp/auto-orient,1)
![[Laser cut and engrave] Laser Cut LOVE Multilayers](data:image/png;base64,iVBORw0KGgoAAAANSUhEUgAAAAoAAAAKCAYAAACNMs+9AAAAAXNSR0IArs4c6QAAABdJREFUKFNjZCASMBKpjmFUId6QIjp4AAppAAuXjCs4AAAAAElFTkSuQmCC)
![[Laser cut and engrave] Laser Cut LOVE Multilayers](https://image-res.atomm.com/resource/xtool/community/attachment/xtool-community/061abca9-b15a-4e19-9c04-bc71f208d710.jpg?x-oss-process=image/resize,w_200,h_150,limit_0/interlace,1/format,webp/auto-orient,1)
![[Laser cut and engrave] Laser Cut LOVE Multilayers](https://image-res.atomm.com/resource/xtool/community/attachment/xtool-community/a2baa9b5-971a-447b-902b-9dd9acd82d30.png?x-oss-process=image/resize,w_200,h_150,limit_0/interlace,1/format,webp/auto-orient,1)
![[Laser cut and engrave] Laser Cut LOVE Multilayers](https://image-res.atomm.com/resource/xtool/community/attachment/xtool-community/cec88bea-6255-4540-aabd-90c524fdf9f6.jpg?x-oss-process=image/resize,w_200,h_150,limit_0/interlace,1/format,webp/auto-orient,1)
![[Laser cut and engrave] Laser Cut LOVE Multilayers](https://image-res.atomm.com/resource/xtool/community/attachment/xtool-community/102e35ee-9702-499b-b685-233e1427bc09.jpg?x-oss-process=image/resize,w_200,h_150,limit_0/interlace,1/format,webp/auto-orient,1)
![[Laser cut and engrave] Laser Cut LOVE Multilayers](https://image-res.atomm.com/resource/xtool/community/attachment/xtool-community/a3d672cf-9521-44cd-979f-b1c99f3bb8e4.jpg?x-oss-process=image/resize,w_200,h_150,limit_0/interlace,1/format,webp/auto-orient,1)
![[Laser cut and engrave] Laser Cut LOVE Multilayers](https://image-res.atomm.com/resource/xtool/community/attachment/xtool-community/c83ee9f7-2f86-4776-9eb6-0030d2809163.jpg?x-oss-process=image/resize,w_200,h_150,limit_0/interlace,1/format,webp/auto-orient,1)
![[Laser cut and engrave] Laser Cut LOVE Multilayers](https://image-res.atomm.com/resource/xtool/community/attachment/xtool-community/2ad0e762-fd50-44a6-bb5d-4cb9c8e4075e.jpg?x-oss-process=image/resize,w_200,h_150,limit_0/interlace,1/format,webp/auto-orient,1)
Wielowarstwowe cięcie laserowe LOVE
 Instrukcja
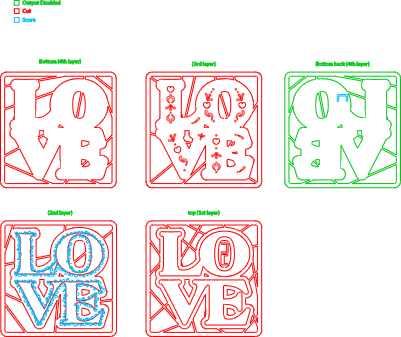
frame-LOVE-multilayer
.xcs
Pokaż jeszcze 1
Scenariusz zastosowania
Przetwarzanie laserowe (60min)
Maszyna & moduł
xTool S1
40WKompatybilna maszyna xTool
Nowy
M2
10W, 20WF2 Ultra UV
5WF1 Ultra
20WM1
5W, 10WD1
5W, 10W, 20WD1 Pro
5W, 10W, 20W, 40WP2
55WF1
10WS1
10W, 20WM1 Ultra
10W, 20WP2S
55WUżyty materiał

Płyta sklejka topolowa 3mm
Płytka MDF 1/8"(3mm)

150
2265
Informacja
      W tym projekcie chciałam przedstawić miłość w różnych "warstwach". Nie ma żadnego szczególnego wspomnienia, które zainspirowałoby mnie do stworzenia tego walentynkowego prezentu, tylko przejaw miłości w formach i kształtach.

Rozmiar: 30x30cm (12x12in) – dostosuj rozmiar do dowolnego rozmiaru, który odpowiada

Sugestia materiału: MDF, sklejka lub akryl.
Instrukcja
1
Krok1: Wybierz / Przygotuj materiał

Podgląd
- Jeśli trzeba, przeszlifuj/maluj/bejcuj materiał, a przed obróbką oczyść powierzchnię.
Miałem pomalowany MDF o wymiarach 30x30cm (12x12in), więc właśnie tego użyłem. Możesz użyć dowolnego innego materiału, jaki masz pod ręką, kilka sugestii: akryl w różnych kolorach, różne rodzaje sklejki lub bejc.
2
Krok2: Wytnij / Ciąż wszystkie warstwy

Podgląd

Podgląd

Podgląd
3 More images
Jeśli nie chcesz nacinać/grawerować drugiej warstwy, po prostu ją usuń lub wyłącz wyjście*
Wskazówka: Po przycięciu dolnej (czwartej warstwy) zachowaj przecięty element wewnątrz maszyny i po prostu odwróć materiał, żeby naciąć pozycję wieszaka z tyłu (dużo łatwiej niż później próbować wyrównywać).
- Wybierz dolny tył (czwarta warstwa) i umieść nad dolnym (czwarta warstwa)
- Usuń dolną (4. warstwę) oraz odwróconą warstwę używaną do pozycjonowania lub po prostu wyłącz wyjście elementów
- Zrenożuj pozycję hangera
3
Krok3: Klejenie

Podgląd

Podgląd

Podgląd
- Usuń ślady przypalenia z przodu i z tyłu elementów przed klejeniem.
- Użyj odpowiedniego lub preferowanego kleju do materiału (w moim przypadku kleju do drewna).
- Wnętrze litery "O" trzeba przykleić osobno, bo to jedyna część nieprzymocowana do głównego wzoru.
- Pozwól wyschnąć
4
Krok4: Popraw wieszak z tyłu

Podgląd

Podgląd
- Przyklej części wieszaka na nacięte miejsce z tyłu
5
Krok5: Gotowe!!

Podgląd

Podgląd

Podgląd
2 More images
Komentarze
Remiksy


Możesz również polubić

Walentynkowa Róża w kształcie serca - Laser Cut

40
177

'/%3e%3cdefs%3e%3clinearGradient%20id='paint0_linear_1433_15726'%20x1='12'%20y1='5.25'%20x2='12'%20y2='18.75'%20gradientUnits='userSpaceOnUse'%3e%3cstop%20stop-color='%23FFC654'/%3e%3cstop%20offset='1'%20stop-color='%23FF8D12'/%3e%3c/linearGradient%3e%3c/defs%3e%3c/svg%3e)
Laserowo wycięta drewniana sztuka ścienna z romantyczną parą i serduszkiem

4
18

Gdy miłość jest wszystkim, co jest

2
7

ZNAK MIŁOŚCI SVG | Drewniana dekoracja miłości | Laserowo wycięty romantyczny znak na półce | Plik dekoracji ślubów i domów

0
20

Wieczna Miłość – akrylowa grafika z laserowo grawerowanym sercem

4
37

Scena z laserowym cięciem romantycznej pierwszej randki w Paryżu – Shadow Box z Wieżą Eiffla

86
437

Laserowo wycięta drewniana tabliczka z cytatami miłosnymi z dekoracjami w kształcie serca

0
11

Drewniany szyld wycięty laserowo

3
11

$1.40
$1.40
$7.00
Twórcy140
Laser Cut Hug Me Valentine – kwiatowy plakat ścienny

0

Dla mojej ukochanej
6
20

Walentynki – z diodą LED lub bez niej

6
10

Trójwymiarowa warstwowa dekoracja ścienna na Walentynki. Walentynkowe zdjęcie ścienne wycięte laserowo. Wiszące tabliczki svg. Drewniane dekoracje do domu. Wieszak ścienny z balonami w kształcie serca

3
26

Laserowo wycięta ramka w kształcie serca z tekstem You Are My Missing Piece
4
13

Walentynkowy znak z miksturą miłości na kawę z serduszkiem – montaż ścienny

18
79

Laserowo grawerowany drewniany szyld LOVE z kwiatowymi wzorami – kartka walentynkowa
.png?x-oss-process=image/resize,m_fill,w_240,h_240,limit_0/interlace,1/format,webp/auto-orient,1)
40
314

Laserowo wycinane drewniane i pleksiglasowe serce z grafiką ścienną zakochanych z inspirującym cytatem

21
34

Laserowo grawerowany drewniany szyld pocztówkowy z romantycznym przesłaniem
4
14

Miłość w powietrzu, miłość wszędzie dekoracja paneli zasłonowych
2
2