


![[Laser cut and engrave] From Bean to Cup Coffee Decor](https://storage-us.atomm.com/resource/xtool/community/attachment/xtool-community/bc20a14a-74ae-4ea6-9099-f2bcb65800fb.jpeg?x-oss-process=image/resize,w_1200,h_900,limit_0/interlace,1/format,webp/auto-orient,1)
![[Laser cut and engrave] From Bean to Cup Coffee Decor](data:image/png;base64,iVBORw0KGgoAAAANSUhEUgAAAAoAAAAKCAYAAACNMs+9AAAAAXNSR0IArs4c6QAAABdJREFUKFNjZCASMBKpjmFUId6QIjp4AAppAAuXjCs4AAAAAElFTkSuQmCC)
![[Laser cut and engrave] From Bean to Cup Coffee Decor](https://storage-us.atomm.com/resource/xtool/community/attachment/xtool-community/bc20a14a-74ae-4ea6-9099-f2bcb65800fb.jpeg?x-oss-process=image/resize,w_200,h_150,limit_0/interlace,1/format,webp/auto-orient,1)
![[Laser cut and engrave] From Bean to Cup Coffee Decor](https://storage-us.atomm.com/resource/xtool/community/attachment/xtool-community/4312c784-b440-451b-b7f3-d1f25a40b5c4.jpg?x-oss-process=image/resize,w_200,h_150,limit_0/interlace,1/format,webp/auto-orient,1)
![[Laser cut and engrave] From Bean to Cup Coffee Decor](https://storage-us.atomm.com/resource/xtool/community/attachment/xtool-community/bd5212cd-9659-43ea-acee-4393a8fc2525.jpg?x-oss-process=image/resize,w_200,h_150,limit_0/interlace,1/format,webp/auto-orient,1)
From Bean to Cup Coffee Decor
 Instruction
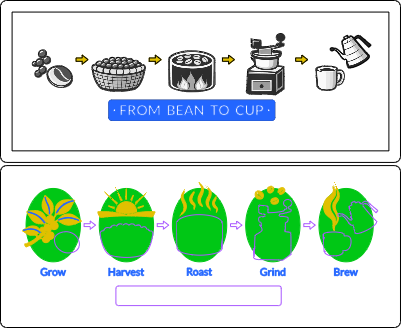

Information
This piece highlights the journey of a coffee bean from growing to brewing. The detailed engravings add visual depth without the need for multiple layers, giving it a refined, modern look. Simple to create and assemble, it makes a perfect accent for a coffee bar, kitchen, or any space inspired by a love of coffee.
Instruction
Step1


This project uses 3mm basswood plywood. If you use a different material you may need to adjust the settings. It is important that the layers on the base piece get engraved in the correct order. The green layer is the lightest engraving and needs to be done first. The yellow layer should be next followed by the blue layer. Make sure your layers are in the correct order and your process setting are set at shown in the image. Engrave and cut the base piece. Be sure to check your piece before you move it. If needed, you can run the darker layers again. Cut and engrave the rest of the pieces that will go on top of your base.
Step2: Assemble


Dark walnut stain was used on the frame in this project. You make paint or stain the frame as desired. Glue the frame in place. Next, glue the remaining pieces using the score lines as guides. Finish with a polyurethane or clear coat of choice. You may also had hanging hardware.


