


![[Laser cut and engrave] Defocus Grid Test - Defocussing Engrave Test - Plywood Basswood Birch](https://storage-us.atomm.com/resource/xtool/community/attachment/xtool-community/c65dda0d-af48-475c-9bff-fc5bb9b43b41.jpeg?x-oss-process=image/resize,w_1200,h_900,limit_0/interlace,1/format,webp/auto-orient,1)
![[Laser cut and engrave] Defocus Grid Test - Defocussing Engrave Test - Plywood Basswood Birch](data:image/png;base64,iVBORw0KGgoAAAANSUhEUgAAAAoAAAAKCAYAAACNMs+9AAAAAXNSR0IArs4c6QAAABdJREFUKFNjZCASMBKpjmFUId6QIjp4AAppAAuXjCs4AAAAAElFTkSuQmCC)
![[Laser cut and engrave] Defocus Grid Test - Defocussing Engrave Test - Plywood Basswood Birch](https://storage-us.atomm.com/resource/xtool/community/attachment/xtool-community/c65dda0d-af48-475c-9bff-fc5bb9b43b41.jpeg?x-oss-process=image/resize,w_200,h_150,limit_0/interlace,1/format,webp/auto-orient,1)
![[Laser cut and engrave] Defocus Grid Test - Defocussing Engrave Test - Plywood Basswood Birch](https://storage-us.atomm.com/resource/xtool/community/attachment/xtool-community/818dbf67-887b-4df5-a1d7-7e000d0874af.jpeg?x-oss-process=image/resize,w_200,h_150,limit_0/interlace,1/format,webp/auto-orient,1)
![[Laser cut and engrave] Defocus Grid Test - Defocussing Engrave Test - Plywood Basswood Birch](https://storage-us.atomm.com/resource/xtool/community/attachment/xtool-community/b14d1cc8-239a-472a-91ed-29fe9bcd6ce6.jpeg?x-oss-process=image/resize,w_200,h_150,limit_0/interlace,1/format,webp/auto-orient,1)
![[Laser cut and engrave] Defocus Grid Test - Defocussing Engrave Test - Plywood Basswood Birch](https://storage-us.atomm.com/resource/xtool/community/attachment/xtool-community/a4c58487-36bf-4b6d-a09e-3a2cce76c711.jpeg?x-oss-process=image/resize,w_200,h_150,limit_0/interlace,1/format,webp/auto-orient,1)
Defocus Grid Test - Defocussing Engrave Test - Plywood Basswood Birch
 Instruction
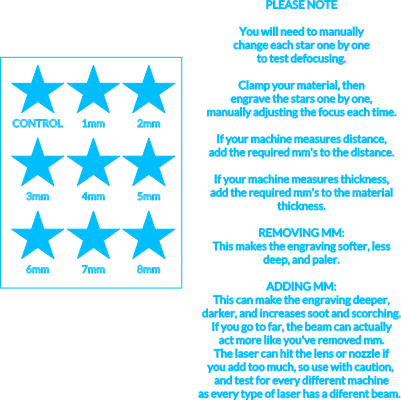

Information
Test how you laser looks defocussed (+ or -) with our easy grid test. Full instructions are included within the XCS file to teach you how defocussing will imapct your engravings using both +mm and -mm to get different effects.
Instruction
Step1
Sand with 120 + 180 grit to prep your material
Step2
Add your material to the laser bed
Step3
Use the material map or camera to show the software where your material is
Step4
Centre the grid test, then ensure your exhaust is vented outside
Step5
Only engrave one star at a time, as you need to manually adjust the focus for each one. Start with the first star, and add or subtract the mm's depending on your desired effect. We've gone into detail within the file about how each method impacts your engravings.
Once ready, hit start in the software, then hit the button on the laser to okay the job
Step6
After completing the first star, turn it off so it won't engrave again, and turn on the next. Change the defocus amount to the value the chart says, then engrave.
Step7
Repeat until all stars are engraved one by one, with the correct values changed for each defocus test
Step8
Once finished, remove your material, and sand if needed to remove char


