


![[Laser cut and engrave] Ceramic Mug with Vintage Skull](https://storage-us.atomm.com/resource/xtool/community/attachment/xtool-community/1895918e-5ef1-4060-bbfa-4d6b9bbdeaa8.jpg?x-oss-process=image/resize,w_1200,h_900,limit_0/interlace,1/format,webp/auto-orient,1)
![[Laser cut and engrave] Ceramic Mug with Vintage Skull](data:image/png;base64,iVBORw0KGgoAAAANSUhEUgAAAAoAAAAKCAYAAACNMs+9AAAAAXNSR0IArs4c6QAAABdJREFUKFNjZCASMBKpjmFUId6QIjp4AAppAAuXjCs4AAAAAElFTkSuQmCC)
![[Laser cut and engrave] Ceramic Mug with Vintage Skull](https://storage-us.atomm.com/resource/xtool/community/attachment/xtool-community/1895918e-5ef1-4060-bbfa-4d6b9bbdeaa8.jpg?x-oss-process=image/resize,w_200,h_150,limit_0/interlace,1/format,webp/auto-orient,1)
![[Laser cut and engrave] Ceramic Mug with Vintage Skull](https://storage-us.atomm.com/resource/xtool/community/attachment/xtool-community/7fdb6ace-1d3e-43cb-9a19-88483b70d5ef.jpg?x-oss-process=image/resize,w_200,h_150,limit_0/interlace,1/format,webp/auto-orient,1)
![[Laser cut and engrave] Ceramic Mug with Vintage Skull](https://storage-us.atomm.com/resource/xtool/community/attachment/xtool-community/69a7422e-1392-40c6-a816-c518de182506.jpg?x-oss-process=image/resize,w_200,h_150,limit_0/interlace,1/format,webp/auto-orient,1)
![[Laser cut and engrave] Ceramic Mug with Vintage Skull](https://storage-us.atomm.com/resource/xtool/community/attachment/xtool-community/562e13b3-824a-4f78-b482-c95511dcecc5.jpg?x-oss-process=image/resize,w_200,h_150,limit_0/interlace,1/format,webp/auto-orient,1)
![[Laser cut and engrave] Ceramic Mug with Vintage Skull](https://storage-us.atomm.com/resource/xtool/community/attachment/xtool-community/3e7c4fc2-715e-410d-88bb-71cf53e7f07d.jpg?x-oss-process=image/resize,w_200,h_150,limit_0/interlace,1/format,webp/auto-orient,1)
![[Laser cut and engrave] Ceramic Mug with Vintage Skull](https://storage-us.atomm.com/resource/xtool/community/attachment/xtool-community/3ded5c5f-3426-43ac-8157-b66fb4bdb1e5.jpg?x-oss-process=image/resize,w_200,h_150,limit_0/interlace,1/format,webp/auto-orient,1)
![[Laser cut and engrave] Ceramic Mug with Vintage Skull](https://storage-us.atomm.com/resource/xtool/community/attachment/xtool-community/a2c43d6d-449e-4554-96cd-53aa86fc0d43.jpg?x-oss-process=image/resize,w_200,h_150,limit_0/interlace,1/format,webp/auto-orient,1)
![[Laser cut and engrave] Ceramic Mug with Vintage Skull](https://storage-us.atomm.com/resource/xtool/community/attachment/xtool-community/bd2fe931-6de1-4225-b5ac-8e71f28c1dee.jpg?x-oss-process=image/resize,w_200,h_150,limit_0/interlace,1/format,webp/auto-orient,1)
![[Laser cut and engrave] Ceramic Mug with Vintage Skull](https://storage-us.atomm.com/resource/xtool/community/attachment/xtool-community/e656f1dc-e1b0-4ff6-a2f1-8b155ac036c1.jpg?x-oss-process=image/resize,w_200,h_150,limit_0/interlace,1/format,webp/auto-orient,1)
![[Laser cut and engrave] Ceramic Mug with Vintage Skull](https://storage-us.atomm.com/resource/xtool/community/attachment/xtool-community/6516b382-49e3-4e32-ba5c-7c13f997646c.jpg?x-oss-process=image/resize,w_200,h_150,limit_0/interlace,1/format,webp/auto-orient,1)
![[Laser cut and engrave] Ceramic Mug with Vintage Skull](https://storage-us.atomm.com/resource/xtool/community/attachment/xtool-community/4080467b-fb09-4b9a-86f9-829dac0729d6.jpg?x-oss-process=image/resize,w_200,h_150,limit_0/interlace,1/format,webp/auto-orient,1)
![[Laser cut and engrave] Ceramic Mug with Vintage Skull](https://storage-us.atomm.com/resource/xtool/community/attachment/xtool-community/37f9000d-681e-46ba-8d45-b3b21d8a7201.jpg?x-oss-process=image/resize,w_200,h_150,limit_0/interlace,1/format,webp/auto-orient,1)
![[Laser cut and engrave] Ceramic Mug with Vintage Skull](https://storage-us.atomm.com/resource/xtool/community/attachment/xtool-community/7bc07ddc-fca7-4a5b-8742-e2bad39dd75e.jpg?x-oss-process=image/resize,w_200,h_150,limit_0/interlace,1/format,webp/auto-orient,1)
![[Laser cut and engrave] Ceramic Mug with Vintage Skull](https://storage-us.atomm.com/resource/xtool/community/attachment/xtool-community/01aee512-dc23-4cc2-a098-c76d50b32acd.jpg?x-oss-process=image/resize,w_200,h_150,limit_0/interlace,1/format,webp/auto-orient,1)
Ceramic Mug with Vintage Skull
 Instruction
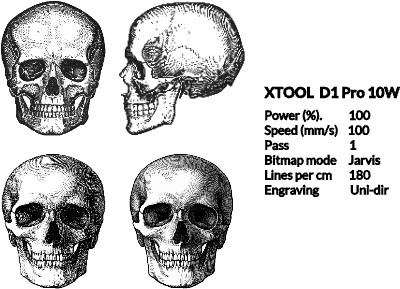
Information
      Laser engraving ceramic glaze is easy. At least in theory. All you have to do is cover the piece with a titanium dioxide-based paint and you're ready to go. You can see the results quickly. The problem is simply how high your standards are. Is gray enough? Or does it matter if the details in the shadows simply turn black and disappear? I wanted the skull on an espresso cup to be as perfect and detailed as possible. The motif is 46 mm high, which is less than 2 inches. With very thin lines. After a few attempts, I got the hang of it. Then I replaced the 20W with the 10W head because it draws in a little more detail. But of course, it's also slower.

My settings for the 10W laser: 100% power | 100 mm/s | 180 l/cm | Jarvis | Uni-directional
For the 20W laser the same except speed:  | 200 mm/s

I have two different skulls in my file. One has extremely fine lines. If you engrave it very small, the lines become too thin for the laser and disappear. As a result, there is no nice transition between black and white areas. The second skull is a little more rustic. The lines are thicker and also work well on small formats.
Instruction
Step1: Prepare and paint
Clean the cup thoroughly. I use isopropanol, the main thing is that the cup is free of grease. Then spray on a thin layer of white titanium oxide paint and leave to dry. You can also use a brush. Make sure that the surface is nice and even. Any uneven brush strokes will be visible on the engraving afterwards.
Step2: Clamp and engrave
Clamp the cup into the Rotary Tool and enter the circumference in the program. That's all there is to it, and then you're ready to go.
In order to clamp small espresso cups securely in the Rotary Tool and print right up to the edge, I replaced the supplied big holders with my own tiny system. The STL file for 3D printers is also available on this page.
You can find handy support for larger cups in my other ceramic project.
Step3: Remove and clean
Once the masterpiece is complete, you need to remove the sprayed-on layer of paint. With my paint, this can be done with hot water. Other paints require paint thinner or brush cleaner. Et voilà – standing ovation!
Step4: Adjust and optimize
If it doesn't look the way you want it to, you just have to tweak the parameters. I always run at 100% power and adjust the speed. The skull was made even more detailed with Jarvis Dithering and Uni-directional engraving. I set the sharpness in the Xtool program to -5 to make it a little darker in the bright areas. Yes, life is complicated!
Step5: Maintenance and care
Because no air assist is required, some dust accumulates on the laser head. Mainly on the outside. However, this only occurs after many laser operations. It should be cleaned from time to time to ensure that the hole is clear again.


