


![[Laser cut and engrave] inlayed cutting board with cherry blossoms](https://storage-us.atomm.com/resource/xtool/community/attachment/xtool-community/0ff09c9e-bd67-40a0-9c56-579599572b10.jpg?x-oss-process=image/resize,w_1200,h_900,limit_0/interlace,1/format,webp/auto-orient,1)
![[Laser cut and engrave] inlayed cutting board with cherry blossoms](data:image/png;base64,iVBORw0KGgoAAAANSUhEUgAAAAoAAAAKCAYAAACNMs+9AAAAAXNSR0IArs4c6QAAABdJREFUKFNjZCASMBKpjmFUId6QIjp4AAppAAuXjCs4AAAAAElFTkSuQmCC)
![[Laser cut and engrave] inlayed cutting board with cherry blossoms](https://storage-us.atomm.com/resource/xtool/community/attachment/xtool-community/0ff09c9e-bd67-40a0-9c56-579599572b10.jpg?x-oss-process=image/resize,w_200,h_150,limit_0/interlace,1/format,webp/auto-orient,1)
![[Laser cut and engrave] inlayed cutting board with cherry blossoms](https://storage-us.atomm.com/resource/xtool/community/attachment/xtool-community/7a0608cd-5d8d-49cb-a3f7-0ecaa99d1a27.jpg?x-oss-process=image/resize,w_200,h_150,limit_0/interlace,1/format,webp/auto-orient,1)
inlayed cutting board with cherry blossoms
 Instruction
Information
      I made this because I don't like the traditional engraving on cutting boards causing a groove making it so food and other things can get caught in the engraving or not be quite dark enough for my liking. So I decided to do an inlay because that seems to be the most efficient way to do it instead of using a cnc machine (small detail doesn't always go well). It came out really well and it was deep enough that sanding doesn't accidently take the inlay off.
I learned that the laser does not always like going through glued up boards so make sure if you make this make sure that the inlay piece is one solid piece as cleaning it up is a pain and usually brakes it.
I used google gemini to create the image of the flowers and I kept changing the prompt until I was happy with a design. I used 1/8 cherry wood for this. As long as its thicker than 1/16th for the inlay and the laser can cut all the way through it it should work(just more material removal to make it flush to the cutting board).
Instruction
Step1

First I made my cutting board. I used the file I created “cutting board with a handle”. I did this using my Cnc machine as it is quicker. But if you are a woodworker the easiest thing to duplicate this is to use the file to cut out a template. Cut the wood out with a bandsaw or jigsaw and then flush trim the rest of it using the template. I used peruvian walnut for this board
Step2

Next I used the flower file and engraved it onto the cutting board. It is the vector that the setting is “engrave” on the flower file. I used the settings to make sure it got deep enough.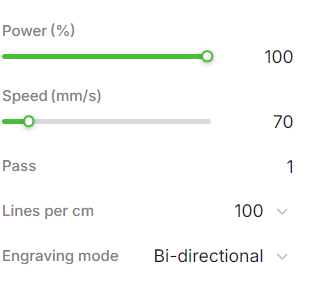
Step3

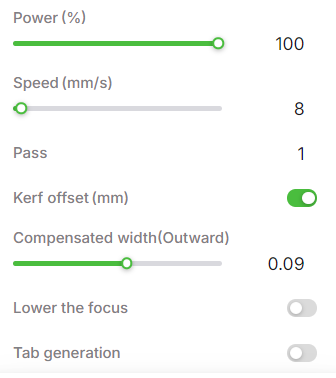
I used 1/8 cherry wood for this. As long as its thicker than 1/16th For the inlay and the laser can cut all the way through it it should work(just more work the thicker it is though). I decided to mirror the image so that if there was any issues with the bottom of the cut out the nicer side would fill up more of the engraving. I did the speed a little low than what I probably needed to but just wanted to make sure it cut all the way through as it is a very delicate piece. The 0.09 kerf offset is VERY important as it will make sure that the inlay fits nicely into the engraving.
Note: do not use laminated or glued up boards for this part as the laser sometimes doesn't go all the way through and its a pain to cut out with an exacto knife without breaking it.
Step4

Next I filled the engraving full of glue using a small syringe to make sure I got all the nooks a crannies. I used titebond 3 for this as it will be used for food (needing to be water proof). I then put the inlay in the engraving and use a mallet to carefully make sure I got all of the little pieces into the holes. Then I put a piece of plywood against it and some more boards on top and clamped it tight
Step5

After it was done being glued up I ran it through a planer (sanding could work too) and sanded it a little to clean it up. All done!


