


![[Laser cut and engrave] Laser Engraved Wood Test Chart for Speed, Power, and LPC Settings](https://storage-us.atomm.com/resource/xtool/community/attachment/xtool-community/79d0edfc-dd88-4367-bb43-1731ab825c78.jpg?x-oss-process=image/resize,w_1200,h_900,limit_0/interlace,1/format,webp/auto-orient,1)
![[Laser cut and engrave] Laser Engraved Wood Test Chart for Speed, Power, and LPC Settings](data:image/png;base64,iVBORw0KGgoAAAANSUhEUgAAAAoAAAAKCAYAAACNMs+9AAAAAXNSR0IArs4c6QAAABdJREFUKFNjZCASMBKpjmFUId6QIjp4AAppAAuXjCs4AAAAAElFTkSuQmCC)
![[Laser cut and engrave] Laser Engraved Wood Test Chart for Speed, Power, and LPC Settings](https://storage-us.atomm.com/resource/xtool/community/attachment/xtool-community/79d0edfc-dd88-4367-bb43-1731ab825c78.jpg?x-oss-process=image/resize,w_200,h_150,limit_0/interlace,1/format,webp/auto-orient,1)
![[Laser cut and engrave] Laser Engraved Wood Test Chart for Speed, Power, and LPC Settings](https://storage-us.atomm.com/resource/xtool/community/attachment/xtool-community/e3caf49c-7500-466b-a0c4-d57b4df98ab1.jpg?x-oss-process=image/resize,w_200,h_150,limit_0/interlace,1/format,webp/auto-orient,1)
Laser Engraved Wood Test Chart for Speed, Power, and LPC Settings
 Instruction
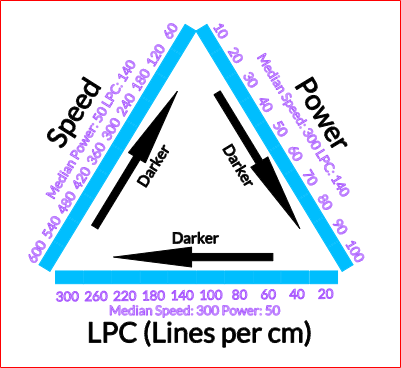
Information
      I have been seeing this triangle float around online as reference for how to determine which direction to go to achieve appropriate darkness levels. While it is always a good idea to do a material test grid to get the exact levels, I found that this triangle gave a great starting point for what I was trying to achieve.
The file included here gives you the exact triangle shown on FB and other social media platforms. I am not sure who created this diagram but I could not find a cut file anywhere for it, so I created my own and am now sharing it here.
**NOTE: The photo shows I engraved with LPI but it is set to LPC and I have fixed the plans to show LPC instead.
Instruction
Step1: Before you begin - IMPORTANT!!!

First a few notes that are really important!
- This was done on ¼" birch. If you are doing this on any other material, please be aware that the settings which engrave really deep may actually punch all the way through. This could be a fire hazard. So, as with any project, but especially with this one, be with your machine when doing this. If you look at the attached photo, you will see that the 60 speed went a little more than half way through the ¼" birch. That means that it would have either punched through 1/8" birch or almost have done so.
- This can be done on any machine but the cut settings may need to be adjusted to cut the triangle out. Each of the settings for engraving are individual and if you adjust those, be sure to adjust the others in the same line to allow an even engrave the entire line through.
- This is a starting point tool. In other words, do not rely on this to give you your desired engrave unless you actually see that tone in the results.
- Each side is set to have the other options at median levels. This means that the Power side will include median numbers for Speed and LPC, the Speed side will include median numbers for Power and LPC and the LPC will include median numbers for Power and Speed. That also means that there is one identical block on every side at the half way point.
There are several colors included in this file.
Black is the lettering and arrow engrave.
Light Blue is the different engraves for the lines going along each leg of the triangle
Purple is the scored lines for the numbers and median levels
Red is the cut line for the square of the triangle.
Step2: Engraving the Triangle
There are several dozen settings in this plan and so I would be sure each is set by looking on the right side of xTool studio to ensure all is as it should be. Be sure to have your product set stable in your machine.
Note: I did this on the P2 with the honeycomb. Either raise the material off the honeycomb to prevent overburn or ensure your tray is clean underneath to prevent extreme flare ups should the engraves punch through the material. (It is a good idea to ensure a clean tray regardless!)
Step3: Final Notes
I like to provide tools that help my fellow laser enthusiasts. I hope this will help you as it has me. I refer to these triangles to help get a good starting point for new materials and in some cases can get the exact depth I need just by looking at this.
Feel free to remix this with other materials and be sure share it on Atomm for the other laser users in our community.
If you like this plan, take a look at my other plans. I have a lot of them posted to Atomm. There are some Premium ones but most are free to download and use.
https://www.atomm.com/profile/15190?utm_source=Social_Share
Happy Crafting!


