


Report
![[Laser cut and engrave] Laser Cut Wooden Desk Organizers with Decorative End Panels](https://storage-us.atomm.com/resource/xtool/community/attachment/xtool-community/59782414-7050-4185-b2c8-c58fe956d34a.jpeg?x-oss-process=image/resize,w_1200,h_900,limit_0/interlace,1/format,webp/auto-orient,1)
![[Laser cut and engrave] Laser Cut Wooden Desk Organizers with Decorative End Panels](data:image/png;base64,iVBORw0KGgoAAAANSUhEUgAAAAoAAAAKCAYAAACNMs+9AAAAAXNSR0IArs4c6QAAABdJREFUKFNjZCASMBKpjmFUId6QIjp4AAppAAuXjCs4AAAAAElFTkSuQmCC)
![[Laser cut and engrave] Laser Cut Wooden Desk Organizers with Decorative End Panels](https://storage-us.atomm.com/resource/xtool/community/attachment/xtool-community/59782414-7050-4185-b2c8-c58fe956d34a.jpeg?x-oss-process=image/resize,w_200,h_150,limit_0/interlace,1/format,webp/auto-orient,1)
![[Laser cut and engrave] Laser Cut Wooden Desk Organizers with Decorative End Panels](https://storage-us.atomm.com/resource/xtool/community/attachment/xtool-community/8354338f-cbf0-4b7d-a575-b4e880ff2fe6.jpeg?x-oss-process=image/resize,w_200,h_150,limit_0/interlace,1/format,webp/auto-orient,1)
![[Laser cut and engrave] Laser Cut Wooden Desk Organizers with Decorative End Panels](https://storage-us.atomm.com/resource/xtool/community/attachment/xtool-community/c3de1cc3-4bdf-4f1d-be82-2f20c3ce08fe.jpeg?x-oss-process=image/resize,w_200,h_150,limit_0/interlace,1/format,webp/auto-orient,1)
![[Laser cut and engrave] Laser Cut Wooden Desk Organizers with Decorative End Panels](https://storage-us.atomm.com/resource/xtool/community/attachment/xtool-community/4a1d9d08-b5ef-458e-81dd-ff9a76ae296b.jpeg?x-oss-process=image/resize,w_200,h_150,limit_0/interlace,1/format,webp/auto-orient,1)
Laser Cut and Engrave Wooden Bed for a Barbie doll or a doll / Bett aus Holz für eine Barbie Puppe
 Instruction
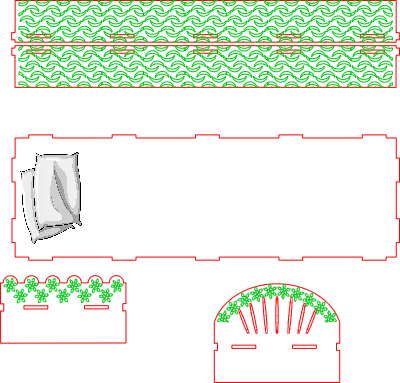
Barbie Bett
.xcs
Application scenario
Laser processing (17min)
Machine & module
xTool P3
5W, 80WCompatibles · 12
Material used

1/8"(3mm) Birch Plywood
2
62
Information
a small addition for the children's room
Instruction
1
Step1: engrave

Preview
first step is engraving, no cutting. For that turn the Nozzle off and make sure you don't move the board after engraving.
2
Step2: cutting
Make sure you don't move the board after engraving.
Turn the nozzle on and cut them
3
Step3: clean and glue

Preview

Preview
After all that, you need to clean the pieces and sand them if necessary.
Then you can glue them together, with the engraved patterns on the top and bottom facing inwards.
The engraving on the side pieces faces outwards.
Comments


