


![[Laser cut and engrave] Bamboo cutting board with Angus cattle](https://storage-us.atomm.com/resource/xtool/community/attachment/xtool-community/880427da-bab8-4024-b796-04fe0d5dd79e.jpg?x-oss-process=image/resize,w_1200,h_900,limit_0/interlace,1/format,webp/auto-orient,1)
![[Laser cut and engrave] Bamboo cutting board with Angus cattle](data:image/png;base64,iVBORw0KGgoAAAANSUhEUgAAAAoAAAAKCAYAAACNMs+9AAAAAXNSR0IArs4c6QAAABdJREFUKFNjZCASMBKpjmFUId6QIjp4AAppAAuXjCs4AAAAAElFTkSuQmCC)
![[Laser cut and engrave] Bamboo cutting board with Angus cattle](https://storage-us.atomm.com/resource/xtool/community/attachment/xtool-community/880427da-bab8-4024-b796-04fe0d5dd79e.jpg?x-oss-process=image/resize,w_200,h_150,limit_0/interlace,1/format,webp/auto-orient,1)
![[Laser cut and engrave] Bamboo cutting board with Angus cattle](https://storage-us.atomm.com/resource/xtool/community/attachment/xtool-community/da0ff6fe-32a9-4db0-b562-702f524ab42c.jpg?x-oss-process=image/resize,w_200,h_150,limit_0/interlace,1/format,webp/auto-orient,1)
Bamboo cutting board with Angus cattle
 Cutting Board Contest
 Instruction
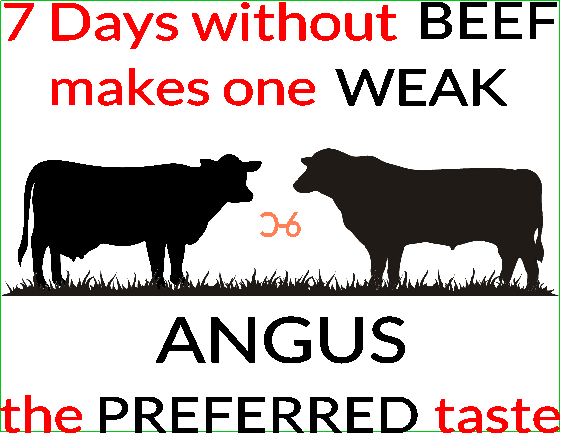

Information
This is my first attempt at engraving Bamboo. The design was originally engraved on the back of an unfinished casserole carrier I made out of pine (2nd picture). The first sentence came from a bumper sticker our Cattlewomen's Association made years ago. The backward C bar 6 is my brand. The size of the engraving area of the cutting board required moving the brand to the center. I raise Angus cattle and that is my preferred taste.
Instruction
Step1: Text

The first step was the text. It was inserted in 8 separate text boxes. That way I was able to adjust the size and engrave using different settings.
Black-100%, 80, 2 passes
Red- 90%, 100, 2 passes
Step2: Image
The second step was picking the design. I was able to download correct silhouettes of an Angus cow and bull. Angus do not have horns. I also downloaded a strip of grass for them to stand on.
Lt blue-100%, 80, 2 passes
Dk blue-85%, 150, 1 pass
Step3: Placement
The third step was where I wanted the text. I wanted the cattle in the middle. I started with the first sentence on the bottom, it didn't look right, so I put it to the top.
Step4: Alignment

The fourth step was aligning and grouping. I aligned and grouped the animals horizontally, moved the grass in and aligned it to and grouped with the animals. The top line of text was aligned and grouped together. I did the same thing with each line of text.
I then inserted a rectangle and moved everything inside, adjusting the size to fit. I then removed the rectangle and grouped the design. I added my brand and aligned it to be in the center and grouped it to the design.
Step5: Project size

The fifth step was the actual size. I moved the rectangle back to the design, grouped all and shrunk it to 11" x 8.5". These dimensions gave me some wiggle room to place it between the handle opening and the far edge of the board.
Step6: Settings


