


![[Laser cut and engrave] RAINBO-8 Christmas LED Light Sculpture](https://storage-us.atomm.com/resource/xtool/community/attachment/xtool-community/600a2e45-bced-495b-8fc3-6351a3333d48.JPG?x-oss-process=image/resize,w_1200,h_900,limit_0/interlace,1/format,webp/auto-orient,1)
![[Laser cut and engrave] RAINBO-8 Christmas LED Light Sculpture](data:image/png;base64,iVBORw0KGgoAAAANSUhEUgAAAAoAAAAKCAYAAACNMs+9AAAAAXNSR0IArs4c6QAAABdJREFUKFNjZCASMBKpjmFUId6QIjp4AAppAAuXjCs4AAAAAElFTkSuQmCC)
![[Laser cut and engrave] RAINBO-8 Christmas LED Light Sculpture](https://storage-us.atomm.com/resource/xtool/community/attachment/xtool-community/600a2e45-bced-495b-8fc3-6351a3333d48.JPG?x-oss-process=image/resize,w_200,h_150,limit_0/interlace,1/format,webp/auto-orient,1)
![[Laser cut and engrave] RAINBO-8 Christmas LED Light Sculpture](https://storage-us.atomm.com/resource/xtool/community/attachment/xtool-community/5ae1d56f-5de0-46d0-9db7-dbbc01cc6532.JPG?x-oss-process=image/resize,w_200,h_150,limit_0/interlace,1/format,webp/auto-orient,1)
![[Laser cut and engrave] RAINBO-8 Christmas LED Light Sculpture](https://storage-us.atomm.com/resource/xtool/community/attachment/xtool-community/ecf94dfc-524c-4312-9841-35c05052c89c.JPG?x-oss-process=image/resize,w_200,h_150,limit_0/interlace,1/format,webp/auto-orient,1)
![[Laser cut and engrave] RAINBO-8 Christmas LED Light Sculpture](https://storage-us.atomm.com/resource/xtool/community/attachment/xtool-community/fe38824e-cb2b-4684-8ef4-8ee04da1a57e.JPG?x-oss-process=image/resize,w_200,h_150,limit_0/interlace,1/format,webp/auto-orient,1)
![[Laser cut and engrave] RAINBO-8 Christmas LED Light Sculpture](https://storage-us.atomm.com/resource/xtool/community/attachment/xtool-community/154ff853-9560-444f-9703-18aa905b8bf5.JPG?x-oss-process=image/resize,w_200,h_150,limit_0/interlace,1/format,webp/auto-orient,1)
![[Laser cut and engrave] RAINBO-8 Christmas LED Light Sculpture](https://storage-us.atomm.com/resource/xtool/community/attachment/xtool-community/136fa7f5-376d-4c62-b80c-e2e70668e419.jpg?x-oss-process=image/resize,w_200,h_150,limit_0/interlace,1/format,webp/auto-orient,1)
RAINBO-8 Christmas LED Light Sculpture
 Instruction
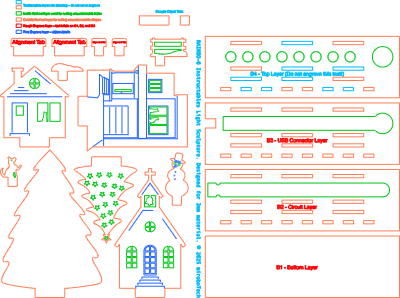

Information
Create your own light sculpture design featuring a multi-layer Laser cut base that holds an integrated LED lighting circuit, plus a variety of foreground and background objects designed to fit into slots in base. I originally created this version to celebrate our son and daughter-in-law's first Christmas in their new house – you can see their home, modelled with their dog and two cats in the second picture! The base design includes multiple slots, making it versatile enough to create light sculptures for all kinds of designs or occasions.
Instruction
Step1: What you'll need


This light sculpture design consists of three main groups of parts:
- a Laser-cut base made from four layers of 3mm plywood or MDF
- a USB-C powered RAINBO-8 LED lighting effect circuit from mirobo.tech
- Laser-cut foreground and background objects with tabs that fit into slots in the base
While the pictured design is Christmas-themed, different kinds of objects can be installed into the base to make a decorative LED light sculpture suitable for other holidays, events, themes, logos, or decorations!
To assemble this design, you'll need two sheets of 300mm X 300mm Laser plywood or MDF, and wood glue. Optionally, decorate or protect the light sculpture objects and base using paint or stain.
Step2: Plan your design before cutting

Before cutting the file, notice that only some slots on the B4 - Top Layer are set to be cut, as opposed to all of the slots on the B3 - USB Connector Layer and the B2 - Circuit Layer.
The tabs on the included objects shown in the phots fit into the slots cut into B4, while the other slots are not cut to maintain the clean appearance of the top of the base where no objects have been installed.
Feel free to create a light sculpture scene using your own objects, which you can position in any of the available slots. Before cutting, simply select and enable output for every required slot on the B4 layer, and disable output for the slots that aren't needed for your design!
Step3: Cut and assemble the base and install the LED lighting circuit


After all of the pieces are cut, start assembling the base:
- Glue base layer B2 onto layer B1 by applying glue onto the bottom of B2 and carefully aligning B2 on top of B1. Wait for the glue to set before continuing.
- The RAINBO-8 lighting effects circuit is available with a self-adhesive LED strip, or with the LEDs encased in a silicone sleeve. The self-adhesive LED strip is thinner, so a spacer cut from card stock (or a cereal or cracker box) can be glued into the opening to raise the LED strip slightly before sticking the strip into the long slot cut into B2. The silicone LED strip can simply be laid into the slot. Ensure that the two semi-circular wood ‘bumps’ in the B2 slot fit into the notches of the RAINBO-8 USB-C connector circuit board.
Step4: Finish assembling the upper layers of the base


Continue assembling the upper layers onto the base:
- Glue B3 onto B2 by applying glue onto B2, and carefully align B3 on top. Temporarily insert two or more of the alignment tabs into matching slots to align B3 with B2 while glueing, but be sure not to glue the alignment tabs into place! Wait for the glue to set.
- Would you like your light sculpture to be permanent? If so, glue B4 onto B3 exactly as you did with the previous layers. Otherwise, just setting B4 on top of B3 will allow it to be held in place by light sculpture objects while also making it easy to swap out to create alternate designs!
Step5: Add the light sculpture objects


Decide if you'd like to paint, stain, or seal any of the light sculpture objects or the base, or just leave them as natural wood. Insert the tabs of the objects into their slots in the base to complete the assembly of your light sculpture design. Leave the objects un-glued to make it easier to disassemble seasonal designs, or glue the objects into the base if you'd like to make a more permanent light sculpture.
Tips for designing your own light sculpture objects to create your own custom scenes:
- place tall background objects in the slots behind the LED strip to create a reflective surface that silhouettes the foreground objects
- light sculptures look great in the dark, so rely more on the shapes of the foreground objects to create the scene than having lots of detail on the front of the objects
- make creative use of holes in foreground objects to allow the light reflected from the background objects to pass through them
- layer foreground objects in multiple rows to provide visual depth in your scene
- when designing the objects and your light sculpture scene, temporarily align them with the slots in the RAINBO base file in the xTool editor to better see the fit and relationships between the objects


