


![[Laser cut and engrave] Laser Cut Wooden Ocean Animal Puzzle with Coral and Seaweed](https://storage-us.atomm.com/resource/xtool/community/attachment/xtool-community/f2667e58-4ee7-4bbf-ad30-9bc86618002a.JPG?x-oss-process=image/resize,w_1200,h_900,limit_0/interlace,1/format,webp/auto-orient,1)
Ocean-themed jigsaw template
 Instruction
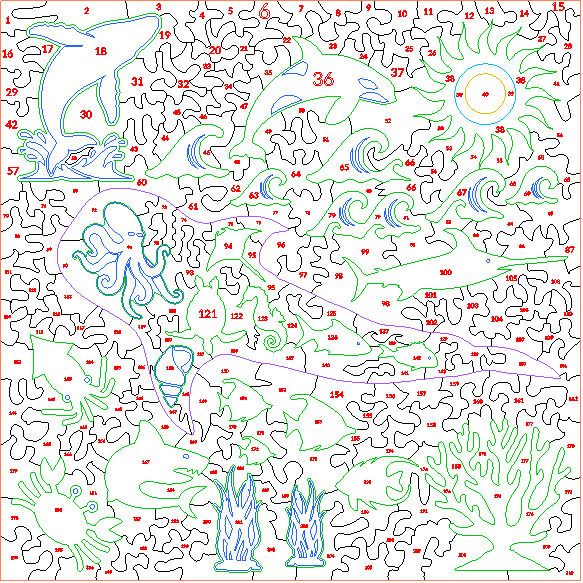

Information
A square jigsaw pattern with special ocean shapes. Combine with a photo of the beach or a holiday snap and create your own ocean-themed jigsaw puzzle! Specifically, these are creatures from the Ningaloo Reef, the largest fringing coral reef in the world!
Instruction
Step1: Remove the numbers!
These numbers are purely for reference purposes. You should definitely ‘ignore’ them straight away. Make sure they don't print. You could reverse the entire image and then print them on the back, but I don't think that is necessary.
Step2: Pick your material and image.
The total puzzle size is 290mm square. It can be resized if you have a machine that can cut a larger area, but for the M1 Ultra, this is about as big as it can get. Use an image and that is about this size and print it onto the wood using the the settings you find best. These will vary based on the image. I advise printing a test image. Also, dark colours tend to blend together, so try to make your dark colours brighter and lighter. I suggest using something like ‘inkaid’ if you can get it to make your colours pop better.
Be careful if you make the cut files smaller. Some of the pieces will become so small they will snap easily once cut. I imagine 6mm thickness will give you some grace, but there comes a point where even that will get too thin if you shrink the cut file.
Step3: Align your material
Make sure your material is in the build plate and framed correctly. The total size is 290mm square, so you need to be precise if you are using 300mm xtool board. Once positioned correctly, tape in place or use the magnet holders that come with the honeycomb to hold the material flat. Otherwise, any warp in the wood could cause the laser to be at different heights during the build. I'm not sure if this will definitely ruin the cut, but why take chances? Place the laser module into the middle of the material and use the auto depth feature to measure the material depth. Check the depth at the edges and hopefully they are similar.
Step4: Score the Details
Score first. You can make this as dark as you like, or ignore this completely if you don't want it to obscure the puzzle picture. I like to put it on lightly and find it doesn't get in the way.
Step5: Cut out the shapes
Process the shapes by layer from top to bottom. I've set up the colours so that interior shapes are cut before exterior shapes. You can set this to go at the same time as the scoring step above. I've set it up so that it can run all the way through.
Step6: Stay with the machine!
I know that my laser with these settings doesn't set fire to anything. Correction… hasn't yet set fire to anything. But let's face it. We're dealing with a laser. Stay nearby, use the fire suppression system if you have it, and keep an eye on things. Be safe people.
And have fun!


