


Report
![[Laser cut and engrave] Laser Cut Wooden Money Box with Festive Logo Design](https://storage-us.atomm.com/resource/xtool/community/attachment/xtool-community/9288ef41-9666-45d6-a175-e89609302e2d.png?x-oss-process=image/resize,w_1200,h_900,limit_0/interlace,1/format,webp/auto-orient,1)
![[Laser cut and engrave] Laser Cut Wooden Money Box with Festive Logo Design](data:image/png;base64,iVBORw0KGgoAAAANSUhEUgAAAAoAAAAKCAYAAACNMs+9AAAAAXNSR0IArs4c6QAAABdJREFUKFNjZCASMBKpjmFUId6QIjp4AAppAAuXjCs4AAAAAElFTkSuQmCC)
![[Laser cut and engrave] Laser Cut Wooden Money Box with Festive Logo Design](https://storage-us.atomm.com/resource/xtool/community/attachment/xtool-community/9288ef41-9666-45d6-a175-e89609302e2d.png?x-oss-process=image/resize,w_200,h_150,limit_0/interlace,1/format,webp/auto-orient,1)
![[Laser cut and engrave] Laser Cut Wooden Money Box with Festive Logo Design](https://storage-us.atomm.com/resource/xtool/community/attachment/xtool-community/bee34e66-f092-452e-b886-6883329b470e.jpeg?x-oss-process=image/resize,w_200,h_150,limit_0/interlace,1/format,webp/auto-orient,1)
xTool Christmas Piggy Bank
 Instruction
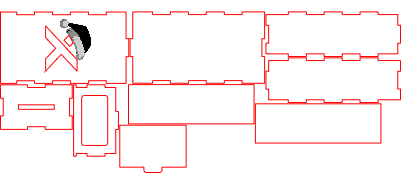
Christmas Piggy Bank
.xcs
Application scenario
Laser processing
Machine & module
xTool S1
40WCompatibles · 9
Material used

1/8"(3mm) MDF Board
10
81
Information
This laser-cut Christmas piggy bank features a festive xTool design and a clean, while the xTool logo cutout allows a decorative banknote to be visible from the outside. Easy to assemble and fun to customize, it’s a perfect holiday project and a practical gift for saving money.
Instruction
1
Step1: Assemble the First Walls

Preview
Glue the first three side walls onto the base plate as shown in the reference photos.
2
Step2: Attach the xTool Wall

Preview
Glue the final wall with the xTool logo cutout into place to close the box.
3
Step3: Insert the Inner Layers

Preview
Glue the inner insert pieces inside the box as shown in the images.
4
Step4: Attach the Lid

Preview
Glue the lid onto the top of the piggy bank and let it set.
5
Step5: Insert the Sliding Element
Slide the movable element into its slot. Do not glue this part.
6
Step6: Turn the Piggy Bank Over

Preview
Flip the piggy bank to its upright position — the main structure is now complete.
7
Step7: Optional: Add a Decorative Banknote

Preview
Glue a banknote to the inside back wall so it remains visible through the xTool logo cutout.
Comments


