


![[Laser cut and engrave] Engraving Parameter Test Array](https://storage-us.atomm.com/resource/xtool/community/attachment/xtool-community/745ab302-fb12-474c-b077-3799eb5dbb26.jpeg?x-oss-process=image/resize,w_1200,h_900,limit_0/interlace,1/format,webp/auto-orient,1)
![[Laser cut and engrave] Engraving Parameter Test Array](data:image/png;base64,iVBORw0KGgoAAAANSUhEUgAAAAoAAAAKCAYAAACNMs+9AAAAAXNSR0IArs4c6QAAABdJREFUKFNjZCASMBKpjmFUId6QIjp4AAppAAuXjCs4AAAAAElFTkSuQmCC)
![[Laser cut and engrave] Engraving Parameter Test Array](https://storage-us.atomm.com/resource/xtool/community/attachment/xtool-community/745ab302-fb12-474c-b077-3799eb5dbb26.jpeg?x-oss-process=image/resize,w_200,h_150,limit_0/interlace,1/format,webp/auto-orient,1)
![[Laser cut and engrave] Engraving Parameter Test Array](https://storage-us.atomm.com/resource/xtool/community/attachment/xtool-community/0c9b472d-c296-4af8-a5b0-a8e92831f837.jpeg?x-oss-process=image/resize,w_200,h_150,limit_0/interlace,1/format,webp/auto-orient,1)
![[Laser cut and engrave] Engraving Parameter Test Array](https://storage-us.atomm.com/resource/xtool/community/attachment/xtool-community/ffcd5b46-2dae-42c6-afde-86340364f327.jpeg?x-oss-process=image/resize,w_200,h_150,limit_0/interlace,1/format,webp/auto-orient,1)
Engraving Parameter Test Array
 Instruction
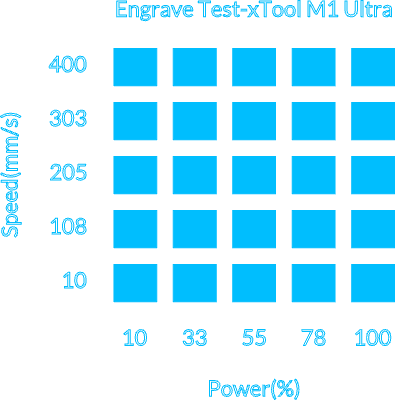


Information
A simple and efficient way to test different power and speed settings before your final engraving. Always keep an extra piece of material to run a test first, this helps you quickly identify the best parameters for clean, consistent results without risking your final piece.
Instruction
Step1
1- Measure and verify the diameter of your coffee tumbler.
2- In the software, select Chuck Mode.
3- Install and use the rotary attachment.
4- Select the appropriate material.
5- Enter the exact diameter of your tumbler in the settings.
6- Click Mark Processing Area and choose Line to mark the reference points.
7- Place the tumbler on the rotary attachment and mark the area where you want to engrave the test.
8- Perform the auto measurements.
9- Depending on the position of the Coffee Tumbler you will need to rotate the file.
Step2
Important note:
Always use the preview and double-check the measurements of your item before processing.
Click Process in the software.
Press the Start button on your machine to begin the engraving test.
Make sure you clean the area with soap after the test.


