


Report
![[Laser cut and engrave] Laser Cut Wooden Calibration Test Plate on Metal Base](https://storage-us.atomm.com/resource/xtool/community/attachment/xtool-community/68cb12d6-cef3-4ac2-9e8c-40c347f4e325.jpg?x-oss-process=image/resize,w_1200,h_900,limit_0/interlace,1/format,webp/auto-orient,1)
![[Laser cut and engrave] Laser Cut Wooden Calibration Test Plate on Metal Base](data:image/png;base64,iVBORw0KGgoAAAANSUhEUgAAAAoAAAAKCAYAAACNMs+9AAAAAXNSR0IArs4c6QAAABdJREFUKFNjZCASMBKpjmFUId6QIjp4AAppAAuXjCs4AAAAAElFTkSuQmCC)
![[Laser cut and engrave] Laser Cut Wooden Calibration Test Plate on Metal Base](https://storage-us.atomm.com/resource/xtool/community/attachment/xtool-community/68cb12d6-cef3-4ac2-9e8c-40c347f4e325.jpg?x-oss-process=image/resize,w_200,h_150,limit_0/interlace,1/format,webp/auto-orient,1)
![[Laser cut and engrave] Laser Cut Wooden Calibration Test Plate on Metal Base](https://storage-us.atomm.com/resource/xtool/community/attachment/xtool-community/eb0163c4-774a-4c03-aff1-562c4cc28075.jpg?x-oss-process=image/resize,w_200,h_150,limit_0/interlace,1/format,webp/auto-orient,1)
![[Laser cut and engrave] Laser Cut Wooden Calibration Test Plate on Metal Base](https://storage-us.atomm.com/resource/xtool/community/attachment/xtool-community/758c252f-9576-4cbc-bd57-0eab424b6d7f.jpg?x-oss-process=image/resize,w_200,h_150,limit_0/interlace,1/format,webp/auto-orient,1)
![[Laser cut and engrave] Laser Cut Wooden Calibration Test Plate on Metal Base](https://storage-us.atomm.com/resource/xtool/community/attachment/xtool-community/51b9f745-c0c1-4198-9724-44f2e96b470f.jpg?x-oss-process=image/resize,w_200,h_150,limit_0/interlace,1/format,webp/auto-orient,1)
![[Laser cut and engrave] Laser Cut Wooden Calibration Test Plate on Metal Base](https://storage-us.atomm.com/resource/xtool/community/attachment/xtool-community/1ffdae35-cb5b-4505-93e0-8e83d237f00a.jpg?x-oss-process=image/resize,w_200,h_150,limit_0/interlace,1/format,webp/auto-orient,1)
F2Ultra UV Work area protection jig
 Instruction
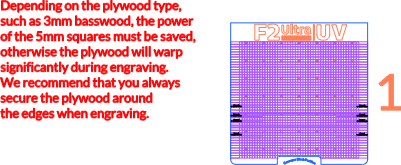
F2Ultra UV Work area protection jig
.xcs
Application scenario
Laser processing (80min)
Machine & module
xTool D1 Pro
20WxTool P2S
55WxTool P2
55WxTool P3
80WCompatibles · 10
Material used

1/8"(3mm) Basswood Plywood
1
8
Information
      I haven't received the F2 Ultra UV yet, but I've heard it's the same as the F2 Ultra.
However, it's currently unclear whether the engraving for the RA2 is the same as that for the RA3.
I'll check as soon as the F2 Ultra UV and RA3 arrive.
Overseas products seem to have higher priority, so if you have any information, please comment.

1. Prevents accidental damage from objects placed in the work area or the laser.
2. Creates 5mm-wide grids to visually check and align materials at right angles.
3. Clearly indicates the designated positions for RA2 A-C and L.
4. The enclosure can be sealed with the conveyor fixing jig still attached.
Google Translate
Instruction
1
Step1
Regarding jig mounting Threaded hole: 4mm Stainless steel M4 x 15mm screws (6-7 pieces) can be installed. Even if they are a little tight, the screws will trim them down each time you attach the jig.
Google Translate
Comments


