
![[Laser cut and engrave] Laser Engraved Wooden Cutting Board with Handwritten Recipe](https://storage-us.atomm.com/resource/xtool/community/attachment/xtool-community/6b5a3699-384a-49b6-a82b-3e40b4f1b1e3.jpg?x-oss-process=image/resize,w_1200,h_900,limit_0/interlace,1/format,webp/auto-orient,1)
Cara: Talenan Resep Nenek
 Instruksi
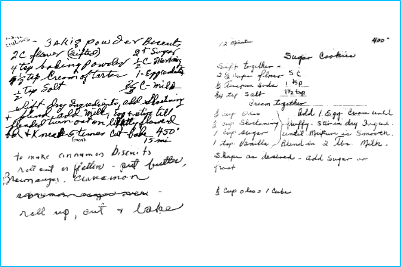

Informasi
Ibu Mertua saya memberi saya resep tulisan tangan dari ibu dan ayahnya. Saya mengedit dan mengukir ini di dua papan untuknya dan keduanya di satu untuk masing-masing anaknya sebagai Hadiah Natal. Di bawah ini adalah langkah demi langkah tentang bagaimana saya bisa mendapatkan ukiran yang jelas dari resep tulisan tangan lama.
Instruksi
Langkah1: Edit gambar asli

Dengan menggunakan editor gambar apa pun yang paling nyaman bagi Anda, pangkas dan edit resep untuk membuat teks menonjol dari latar belakang. Saya menemukan bahwa meminimalkan saturasi, memaksimalkan kontras, dan kemudian menyesuaikan kecerahan menghasilkan hasil terbaik.
Langkah2: Unggah dan Lacak


Tambahkan gambar ke kanvas, lalu pilih Edit dan Lacak.
Sekali lagi, ini akan membutuhkan beberapa pemecahan masalah untuk melakukannya dengan benar. Gerakkan penggeser ke atas dan ke bawah dalam kombinasi yang berbeda untuk membuat teks diuraikan sebaik mungkin.
Tip: Anda dapat melakukan ini beberapa kali dan menggabungkan bagian terbaik dari setiap resep. Misalnya, terkadang saya bisa mendapatkan bagian atas yang halus tetapi tidak bagian bawah (atau sebaliknya), jadi saya akan melakukannya sekali dengan bagian atas bersih, sekali dengan bagian bawah bersih, lalu menghapus bagian kabur masing-masing dan menggabungkan.
Langkah3: Mengukir
Atur untuk mengukir dan mengoptimalkan pengaturan untuk alat berat Anda. Potong.
