


Report
![[Laser cut and engrave] Laser Cut Wooden Candle Holder with Snowflake Design](https://storage-us.atomm.com/resource/xtool/community/attachment/xtool-community/c0c8d6c7-9afa-40b2-a619-37ae0c49b77b.jpg?x-oss-process=image/resize,w_1200,h_900,limit_0/interlace,1/format,webp/auto-orient,1)
![[Laser cut and engrave] Laser Cut Wooden Candle Holder with Snowflake Design](data:image/png;base64,iVBORw0KGgoAAAANSUhEUgAAAAoAAAAKCAYAAACNMs+9AAAAAXNSR0IArs4c6QAAABdJREFUKFNjZCASMBKpjmFUId6QIjp4AAppAAuXjCs4AAAAAElFTkSuQmCC)
![[Laser cut and engrave] Laser Cut Wooden Candle Holder with Snowflake Design](https://storage-us.atomm.com/resource/xtool/community/attachment/xtool-community/c0c8d6c7-9afa-40b2-a619-37ae0c49b77b.jpg?x-oss-process=image/resize,w_200,h_150,limit_0/interlace,1/format,webp/auto-orient,1)
![[Laser cut and engrave] Laser Cut Wooden Candle Holder with Snowflake Design](https://storage-us.atomm.com/resource/xtool/community/attachment/xtool-community/a95ba617-93a2-4698-8ac2-b483472ee2db.png)
![[Laser cut and engrave] Laser Cut Wooden Candle Holder with Snowflake Design](https://storage-us.atomm.com/resource/xtool/community/attachment/xtool-community/163702f0-4feb-492c-9206-19cac03d94a0.jpg?x-oss-process=image/resize,w_200,h_150,limit_0/interlace,1/format,webp/auto-orient,1)
![[Laser cut and engrave] Laser Cut Wooden Candle Holder with Snowflake Design](https://storage-us.atomm.com/resource/xtool/community/attachment/xtool-community/22ea1b68-7f5a-4a5f-b8e4-51ed40870ea7.jpg?x-oss-process=image/resize,w_200,h_150,limit_0/interlace,1/format,webp/auto-orient,1)
![[Laser cut and engrave] Laser Cut Wooden Candle Holder with Snowflake Design](https://storage-us.atomm.com/resource/xtool/community/attachment/xtool-community/c906147d-8cb6-4d2b-b850-7bebe5a69792.jpg?x-oss-process=image/resize,w_200,h_150,limit_0/interlace,1/format,webp/auto-orient,1)
Laser Cut Wooden Candle Holder with Snowflake Design
 Instruction
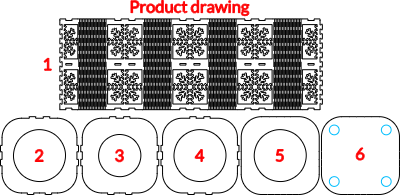
Tealight shade 2.4 mm MDF
.xcs
Show 1 more
Application scenario
Laser processing (40min)
Machine & module
xTool S1
40WMaterial used
2.4 mm MDF a 3 mm MDF
28
575
Information
      Warning!
Burning tealights, do not use without protective glass!
Risk of fire!

Do not place anything on the candle holder while burning!
Risk of fire!

Flameless LED tealights, can be used without protective glass.

The candle holder is not a toy for children!
Instruction
1
Step1: Let's look at the product drawing

Preview
You can change the circular holes for the lampshade glass according to your needs.
2
Step2: Laser cut plan 1

Preview
We proceed according to laser cutting plan 1, or according to our own considerations.
3
Step3: Laser cut plan 2

Preview

Preview
We proceed according to laser cutting plan 2, or according to our own considerations.
4
Step4: Product assembly part 1

Preview

Preview

Preview
5 More images
First we assemble parts 1-2
5
Step5: Product assembly part 2

Preview

Preview
We proceed in parts 3-4
Part 3 goes to the bottom and 4 goes to the top
6
Step6: Product assembly part 3

Preview

Preview

Preview
6 More images
In the third step, glue the end pieces 5-6
Piece 6 goes on the bottom and 5 goes on top
7
Step7: Product assembly part 4

Preview

Preview

Preview
In the last step, glue the self-adhesive cork feet
8
Step8: Finished candlestick with snowflake motif

Preview

Preview

Preview

Preview
Finished Laser Cut Wooden Candle Holder with Snowflake Motif
Comments


