


Report
![[Laser cut and engrave] 3d Snowflake Multiface](https://storage-us.atomm.com/resource/xtool/community/attachment/xtool-community/534b3f49-2d76-4c7e-8a76-637adae9798c.jpg?x-oss-process=image/resize,w_1200,h_900,limit_0/interlace,1/format,webp/auto-orient,1)
3d Snowflake Multiface
 Remix
Remix Instruction
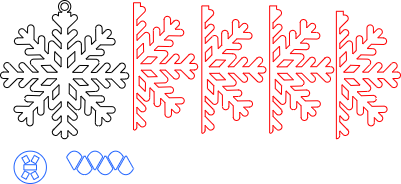
3d Snowflake - Multiface
.xcs
Application scenario
Laser processing
Machine & module
xTool S1
40WCompatibles · 13
Material used

1/8"(3mm) Basswood Plywood
14
175
Information
      After seeing a design on Atomm by 'Shas' for a 3d Christmas Tree bauble, I wanted to see if the 3d Snowflake Design I had already created could be adapted - So here you have the Multi face 3d Snowflake which is I guess a Remix of my original design.

This took a while to perfect but I am finally happy with how it looks and how it assembles.

Have fun and as always, If you have any issues - let me know.

Created on a S1 40W
Cutting 100% power with 15mm/s Speed on 3mm Basswood (Good quality Basswood that did measure 3mm thickness)

Approx dimensions is 80mm by 80mm

It looks great - Just needs a little patience with assembly but it is pretty easy to be honest.
This remix is based on

Wooden 3D snowflake
 CRAFTELEE
Instruction
1
Step1: Gather the Pieces

Preview
A fun Multi Face Snowflake Design ready top be painted and hung on your Christmas tree.
This is a little remix of my other design.
2
Step2: Before assembly, You may want to sand the scorch marks off or pre-paint the bauble prior to assembly - I did not do this for the Instructions.
3
Step3: Slide the top of the Bauble through the associating slot and Glue in place

Preview
4
Step4: Place one of the 4 Snowflake Pieces and Push into the slot as per the photo, Glue in place.

Preview
5
Step5: Use another snowflake piece and again push into the slot and Glue in place

Preview
6
Step6: Using one of the small wedges - Glue this into place so that both snowflake pieces glue to the wedge, this provides strength.

Preview
7
Step7: Once you have completed the assembly, hold the bottom of the bauble together and carefull glue along the touching surfaces to finish your Bauble.

Preview
8
Step8: Hopefully you will have a finished Snowflake Bauble. I chose not to sand or paint before assembly as this was a test to see how it all went😁

Preview
Comments


