


Report
![[Laser cut and engrave] Laser Cut Wooden Perpetual Calendar with Nativity Scene](https://storage-us.atomm.com/resource/xtool/community/attachment/xtool-community/ac9ded35-ab42-4caa-81e2-4315086a3450.jpg?x-oss-process=image/resize,w_1200,h_900,limit_0/interlace,1/format,webp/auto-orient,1)
![[Laser cut and engrave] Laser Cut Wooden Perpetual Calendar with Nativity Scene](data:image/png;base64,iVBORw0KGgoAAAANSUhEUgAAAAoAAAAKCAYAAACNMs+9AAAAAXNSR0IArs4c6QAAABdJREFUKFNjZCASMBKpjmFUId6QIjp4AAppAAuXjCs4AAAAAElFTkSuQmCC)
![[Laser cut and engrave] Laser Cut Wooden Perpetual Calendar with Nativity Scene](https://storage-us.atomm.com/resource/xtool/community/attachment/xtool-community/ac9ded35-ab42-4caa-81e2-4315086a3450.jpg?x-oss-process=image/resize,w_200,h_150,limit_0/interlace,1/format,webp/auto-orient,1)
![[Laser cut and engrave] Laser Cut Wooden Perpetual Calendar with Nativity Scene](https://storage-us.atomm.com/resource/xtool/community/attachment/xtool-community/116b0010-53dc-4079-8185-b79021cfc7cf.jpg?x-oss-process=image/resize,w_200,h_150,limit_0/interlace,1/format,webp/auto-orient,1)
![[Laser cut and engrave] Laser Cut Wooden Perpetual Calendar with Nativity Scene](https://storage-us.atomm.com/resource/xtool/community/attachment/xtool-community/bb66f387-508e-4b3d-89bf-5379fcf45bb5.jpg?x-oss-process=image/resize,w_200,h_150,limit_0/interlace,1/format,webp/auto-orient,1)
![[Laser cut and engrave] Laser Cut Wooden Perpetual Calendar with Nativity Scene](https://storage-us.atomm.com/resource/xtool/community/attachment/xtool-community/4d0bfc50-b061-4f5c-9d63-1ddab1d97c3d.jpg?x-oss-process=image/resize,w_200,h_150,limit_0/interlace,1/format,webp/auto-orient,1)
![[Laser cut and engrave] Laser Cut Wooden Perpetual Calendar with Nativity Scene](https://storage-us.atomm.com/resource/xtool/community/attachment/xtool-community/38f77b32-2377-4ec3-927c-22ed1032f441.jpg?x-oss-process=image/resize,w_200,h_150,limit_0/interlace,1/format,webp/auto-orient,1)
Customizable Desktop Calendar
 Instruction
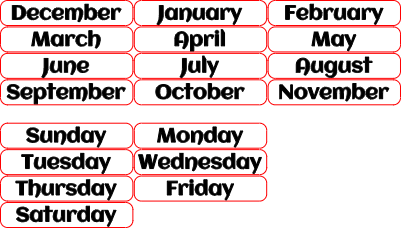
Desktop Calendar
.xcs
Application scenario
Laser processing
Machine & module
xTool S1
20W, 40WCompatibles · 13
Material used

1/8"(3mm) Basswood Plywood
10
252
Information
This customizable desktop calendar makes a versatile and creative project, perfect for adapting to different seasons throughout the year. The included xTool file features cutouts for every month, day of the week, and number tiles, giving you a complete set to assemble. A special nativity scene is provided for the Christmas season, and you can easily add or swap in additional designs to personalize the calendar for holidays or seasonal themes.
Instruction
1
Step1: Use the Included fFle to Cut Out The Parts

Preview
The first step is to cut out all the parts using your S1 laser. Please note that you will need to cut two parts for the base. This will give it extra thickness to support the calendar.
2
Step2: Glue up and Stain

Preview
Next add wood glue to the back of the top layer for the calendar. This is the part that has the cutouts for the tiles. It is easier to glue this side rather than the backing so that you don't have exposed glue when you stick the parts together.
Glue together the two parts that make up the base.
Place these parts under a heavy book to ensure the parts stay flat and the glue gets a good solid bond.
Once the glue is dry, you can then apply stain to color the parts you want.
Comments
Remixes
xTool Supplies Used in This Project

Related collections


Related tags
License

This work contains AI-generated content.