


Report
![[Laser cut and engrave] 65mm Ornament Tent - Tabbed Base](https://storage-us.atomm.com/resource/xtool/community/attachment/xtool-community/66dcd796-55fe-46ed-aab2-ed250456f3cd.jpeg?x-oss-process=image/resize,w_1200,h_900,limit_0/interlace,1/format,webp/auto-orient,1)
![[Laser cut and engrave] 65mm Ornament Tent - Tabbed Base](data:image/png;base64,iVBORw0KGgoAAAANSUhEUgAAAAoAAAAKCAYAAACNMs+9AAAAAXNSR0IArs4c6QAAABdJREFUKFNjZCASMBKpjmFUId6QIjp4AAppAAuXjCs4AAAAAElFTkSuQmCC)
![[Laser cut and engrave] 65mm Ornament Tent - Tabbed Base](https://storage-us.atomm.com/resource/xtool/community/attachment/xtool-community/66dcd796-55fe-46ed-aab2-ed250456f3cd.jpeg?x-oss-process=image/resize,w_200,h_150,limit_0/interlace,1/format,webp/auto-orient,1)
![[Laser cut and engrave] 65mm Ornament Tent - Tabbed Base](https://storage-us.atomm.com/resource/xtool/community/attachment/xtool-community/e47e9452-b74d-463e-8d4e-251332c47fa5.jpeg?x-oss-process=image/resize,w_200,h_150,limit_0/interlace,1/format,webp/auto-orient,1)
![[Laser cut and engrave] 65mm Ornament Tent - Tabbed Base](https://storage-us.atomm.com/resource/xtool/community/attachment/xtool-community/6cad10dd-3703-412a-b514-09535d867c52.jpeg?x-oss-process=image/resize,w_200,h_150,limit_0/interlace,1/format,webp/auto-orient,1)
![[Laser cut and engrave] 65mm Ornament Tent - Tabbed Base](https://storage-us.atomm.com/resource/xtool/community/attachment/xtool-community/251c869c-4090-41cd-be05-8732faca67d3.jpeg?x-oss-process=image/resize,w_200,h_150,limit_0/interlace,1/format,webp/auto-orient,1)
65mm Ornament Tent - Tabbed Base
 Instruction
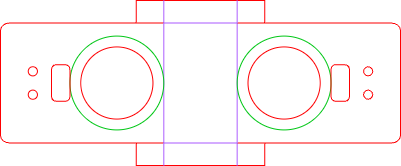
65mm_tabbed_ornament_tent
.xcs
Application scenario
Laser processing (0.7min)
Machine & module
xTool P2S
55WCompatibles · 12
Accessories

xTool P2 Honeycomb Panel
Material used

Red Cardstock-9oz(300g)
44
456
Information
I struggled to find a design that properly packaged my small 65mm glass balls. To solve, I created an ornament tent with side panels from an 8 1/2 x 11 sheet of cardstock. The fold lines are scored for precision and the sides are tabbed so that they can be glued or attached with tape for base stability. I used double-sided tape for quick assembly. If you leave the string on the ornament top, it can be pulled out to allow the package to hang. Tie it together and finish it off with a twist tie or ribbon.
Instruction
1
Step1: Load and Cut the Cardstock

Preview
On my P2S, with the honeycomb tray, I used cut settings of power 50%, speed 250mm and scribe settings of power 1%, speed 250mm.
2
Step2: Fold on score lines and tape or glue tabs

Preview
3
Step3: Insert ornament and tie with ribbon

Preview
Comments


