![[Laser cut and engrave] Laser Cut Wooden Perpetual Desk Calendar with Sliding Date Panels](https://storage-us.atomm.com/resource/xart/result/389041/4edeb753-ebdc-49b7-a2a3-f3972c243db3.png?x-oss-process=image/resize,w_1200,h_900,limit_0/interlace,1/format,webp/auto-orient,1)
![[Laser cut and engrave] Laser Cut Wooden Perpetual Desk Calendar with Sliding Date Panels](https://storage-us.atomm.com/resource/xart/result/389041/4edeb753-ebdc-49b7-a2a3-f3972c243db3.png?x-oss-process=image/resize,w_200,h_150,limit_0/interlace,1/format,webp/auto-orient,1)
![[Laser cut and engrave] Laser Cut Wooden Perpetual Desk Calendar with Sliding Date Panels](https://storage-us.atomm.com/resource/xtool/community/attachment/xtool-community/775b18fd-9cd2-4d93-969d-e6bd0b492442.jpg?x-oss-process=image/resize,w_200,h_150,limit_0/interlace,1/format,webp/auto-orient,1)
Elegant Perpetual Calendar


Information
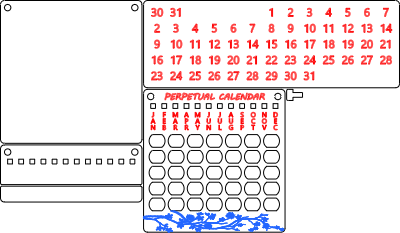
      A timeless piece. A perpetual calendar design with personalization options. A perfect gift.
Can be used as a desktop piece or mounted on a wall.
Perpetual calendar is the last calendar you will need. It will always work and show the correct day.
Instruction
Step1: Cut the pieces

Cut out the pieces. Make sure you don't loose the small peg piece.
Instead of the floral engraving in the front you can add a personalized detail.
Step2: Glue the center pieces


Glue the smaller center piece to the bottom, align it with the front piece edges.
Use the sliding numbers piece as a spacing guide to position the larger center piece on the top. The pieces should touch so there is some friction when sliding.
Clamp everything well together and wait for the glue to cure.
Step3: Glue the back plate


Glue the back plate. Align it well with the edges.
Try it with the sliding numbers piece installed before gluing. If there is too much friction, add normal paper as a spacer. There should be friction but not so much you can't slide the parts.
Step4: Add the sliding number piece
Slide the sliding numbers piece. You should feel friction if you assembled the middle piece properly. If there is too much friction, you can lightly sand the edges and back as required.
Step5: How to use

Use the small peg piece to show which month is selected. Then look up the proper order of days and slide the center piece to the appropriate position.
For example, January 2026 will have its first day on a Thursday. So we slide the center piece until the number 1 is in 4th opening.
The design intentionally doesn't show day names as some use Monday and some Sunday as the first day. This makes the design more universal.
To help you differentiate, you can draw a red border around weekend days.


