


Report
![[Laser cut and engrave] Snowman tealight stand](https://storage-us.atomm.com/resource/xtool/community/attachment/xtool-community/840ac350-af0e-43b0-b9d9-6a2dcfbb6809.jpg?x-oss-process=image/resize,w_1200,h_900,limit_0/interlace,1/format,webp/auto-orient,1)
![[Laser cut and engrave] Snowman tealight stand](data:image/png;base64,iVBORw0KGgoAAAANSUhEUgAAAAoAAAAKCAYAAACNMs+9AAAAAXNSR0IArs4c6QAAABdJREFUKFNjZCASMBKpjmFUId6QIjp4AAppAAuXjCs4AAAAAElFTkSuQmCC)
![[Laser cut and engrave] Snowman tealight stand](https://storage-us.atomm.com/resource/xtool/community/attachment/xtool-community/840ac350-af0e-43b0-b9d9-6a2dcfbb6809.jpg?x-oss-process=image/resize,w_200,h_150,limit_0/interlace,1/format,webp/auto-orient,1)
![[Laser cut and engrave] Snowman tealight stand](https://storage-us.atomm.com/resource/xtool/community/attachment/xtool-community/1c0ca789-78fb-4252-8caa-135a3f3500e8.jpg?x-oss-process=image/resize,w_200,h_150,limit_0/interlace,1/format,webp/auto-orient,1)
![[Laser cut and engrave] Snowman tealight stand](https://storage-us.atomm.com/resource/xtool/community/attachment/xtool-community/39cd1fbc-b0a9-44c6-a8c6-97eb319ed891.jpg?x-oss-process=image/resize,w_200,h_150,limit_0/interlace,1/format,webp/auto-orient,1)
![[Laser cut and engrave] Snowman tealight stand](https://storage-us.atomm.com/resource/xtool/community/attachment/xtool-community/7d7e4b04-dbfd-4ff8-a231-7d25ea407a65.jpg?x-oss-process=image/resize,w_200,h_150,limit_0/interlace,1/format,webp/auto-orient,1)
Snowman tealight stand
 Instruction
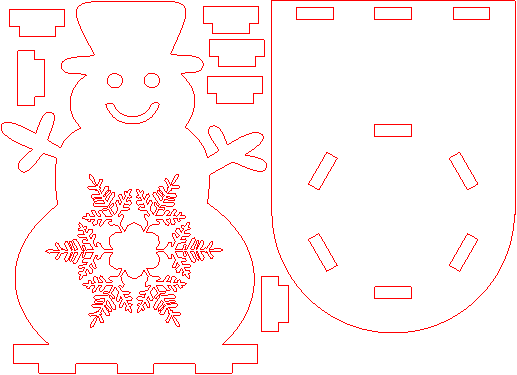
snowman_tealight_holder
.xcs
Application scenario
Laser processing
Machine & module
xTool M1 Ultra
20WCompatibles · 13
Material used

1/8"(3mm) Basswood Plywood
115
1121
Information
A snowman with a snowflake cutout tealight stand.
Instruction
1
Step1: Cut out the pieces

Preview
Cut out all of the pieces. Make sure you don't throw away the small T shaped pieces.
You get an extra nice looking snowflake which is cut out from the snowman center.
2
Step2: Assemble the base

Preview
Glue the T shaped pieces in to the bottom part. Make sure they are all aligned.
3
Step3: Paint the snowman
This step is optional. I recommend you paint your pieces now as it will be more difficult later.
4
Step4: Add the snowman

Preview

Preview
Glue the snowman part to the base you made in previous step.
Make sure it is perpendicular to the bottom part. If using wood glue, brace it with something to hold it in place.
Using a few drops of superglue is very helpful to keep everything in place.
Comments


