
Report
![[Laser cut and engrave] Laser Cut Decorative Paper Lantern with LED Light for Outdoor Ambiance](https://image-res.atomm.com/resource/xtool/community/attachment/xtool-community/572db133-0d26-41dc-94c5-bfda58941081.jpg?x-oss-process=image/resize,w_1200,h_900,limit_0/interlace,1/format,webp/auto-orient,1)
![[Laser cut and engrave] Laser Cut Decorative Paper Lantern with LED Light for Outdoor Ambiance](data:image/png;base64,iVBORw0KGgoAAAANSUhEUgAAAAoAAAAKCAYAAACNMs+9AAAAAXNSR0IArs4c6QAAABdJREFUKFNjZCASMBKpjmFUId6QIjp4AAppAAuXjCs4AAAAAElFTkSuQmCC)
![[Laser cut and engrave] Laser Cut Decorative Paper Lantern with LED Light for Outdoor Ambiance](https://image-res.atomm.com/resource/xtool/community/attachment/xtool-community/572db133-0d26-41dc-94c5-bfda58941081.jpg?x-oss-process=image/resize,w_200,h_150,limit_0/interlace,1/format,webp/auto-orient,1)
![[Laser cut and engrave] Laser Cut Decorative Paper Lantern with LED Light for Outdoor Ambiance](https://storage-us.atomm.com/resource/xtool/community/attachment/xtool-community/6c5700d3-8753-462a-adc0-14747a557ce7.png)
![[Laser cut and engrave] Laser Cut Decorative Paper Lantern with LED Light for Outdoor Ambiance](https://image-res.atomm.com/resource/xtool/community/attachment/xtool-community/c61c1f53-2a63-429d-94cf-a045cc46c585.jpg?x-oss-process=image/resize,w_200,h_150,limit_0/interlace,1/format,webp/auto-orient,1)
![[Laser cut and engrave] Laser Cut Decorative Paper Lantern with LED Light for Outdoor Ambiance](https://image-res.atomm.com/resource/xtool/community/attachment/xtool-community/59066aaf-fce5-491b-984e-d7f1c5948c66.jpg?x-oss-process=image/resize,w_200,h_150,limit_0/interlace,1/format,webp/auto-orient,1)
![[Laser cut and engrave] Laser Cut Decorative Paper Lantern with LED Light for Outdoor Ambiance](https://image-res.atomm.com/resource/xtool/community/attachment/xtool-community/7434e672-5f68-4b4a-ab03-29bf0484beca.jpg?x-oss-process=image/resize,w_200,h_150,limit_0/interlace,1/format,webp/auto-orient,1)
![[Laser cut and engrave] Laser Cut Decorative Paper Lantern with LED Light for Outdoor Ambiance](https://image-res.atomm.com/resource/xtool/community/attachment/xtool-community/58a62a0d-339d-48e2-abd0-0706efccfa72.jpg?x-oss-process=image/resize,w_200,h_150,limit_0/interlace,1/format,webp/auto-orient,1)
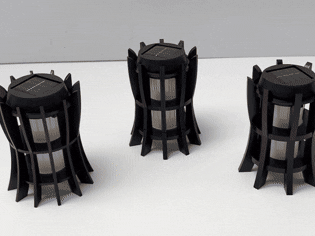
SATURN Glow Modular Lampshade
 Atomm Featured
 Instruction
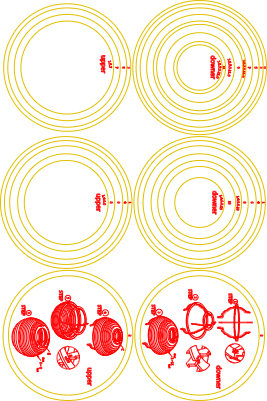
SATURNGlowModularLampshade
.xcs
Application scenario
Laser processing
Machine & module
xTool D1 Pro
20WMaterial used

1/8"(3mm) Birch Plywood
8mm corrugated fiberboard

31
1533
Information
      Detachable design with a unique halo effect for every user.

_____The Symphony of Wood and Light_____
The design of this lampshade centers around wood, celebrating the harmony and wonder found between different wooden materials.
The wooden board offers firm and powerful support — a symbol of strength and foundation — while corrugated cardboard, also born from wood, reveals an unexpected softness and play of light and shadow.

_____The Poetry of Flute Direction_____
Corrugated cardboard is typically composed of three or more layers — the liner, the corrugated medium, and the inner liner.
Within it lies a special property known as the flute direction — the orientation of the corrugation that defines its strength and visual rhythm

_____A Light Uniquely Yours_____
When assembling the lampshade, whether you intentionally align or freely arrange the corrugated layers,
each direction of the flutes interacts with light to create a halo pattern that is uniquely yours.
Just like trees that grow — trimmed, shaped, and kissed by sunlight —
every grain and every glow becomes a piece of living art shaped by nature and time.
Instruction
1
Step1

Preview

Preview
Assemble the three serrated frame pieces with the A ring.
2
Step2

Preview

Preview
Assemble the three serrated frame pieces with the B ring.
3
Step3

Preview

Preview

Preview
Assemble the corrugated boards No.1 to No.11 in order from largest to smallest, then attach the C ring and rotate it to lock.
4
Step4

Preview
After locking the C ring, turn the entire lampshade upside down.
5
Step5

Preview

Preview
Attach the D ring.
6
Step6

Preview

Preview

Preview
Assemble the corrugated boards No.0 to No.8 in order from largest to smallest
The hole size at the center of the E ring can be adjusted according to the size of the lamp you have.
Place the lamp inside first, then cover it with the E ring and rotate to lock it in place.
7
Step7

Preview
Hold the completed lampshade and slowly rotate it.
Observe how the light passes through each flute direction.
Every angle reveals a halo that is uniquely yours.
Comments
Remixes


You may also like

Tent Night Lamp

24
116

Colorful Flower Lamp

6
6

Solar powered Fairy Light Lantern

5
27

Herrnhuter Stern

16
52

'/%3e%3cdefs%3e%3clinearGradient%20id='paint0_linear_1433_15675'%20x1='12'%20y1='3.25'%20x2='16.6891'%20y2='20.75'%20gradientUnits='userSpaceOnUse'%3e%3cstop%20stop-color='%23FF5D80'/%3e%3cstop%20offset='1'%20stop-color='%23FF0035'/%3e%3c/linearGradient%3e%3c/defs%3e%3c/svg%3e)
Laser Cut Wooden Lantern with forest

179
1102

Laser Cut Wooden Geometric Light Sphere with Floral Patterns

15
61

Lotus Lamp

203
496

Garden Owl Lamp

21
142

$6.44
$6.44
Credits644
Laser Cut Wooden Minnesota Lights Lantern with Geometric Design

0

Light Pendants Pattern Design Laser Cut Files Pendant Lights Centerpiece Lampshade Lamp Decor SVG Digital Download |#180|

17
105

GIF
Solar Powered Table Top Lanterns- 3 variations

1
4

Lampada decorativa

10
55

3D Lampshade
29
198

Chandelier 3mm

8
61

3D Summer LED decor. Tropical nature scene lightbox laser cut files. Shelf sitter. Wooden led light lamp. Led lantern. Beach svg. Home decor

32
173

Light Lattice - Lighting

6
7

Custom Engraved LED Night Light with Couple Portrait

3
29

Mandala Lantern SVG, Laser Cut Wood Lamp, Decorative Shadow Light (Digital Download)

11
120