


![[Laser cut and engrave] Laser Cut Wooden Halloween Decorative Boxes with Pumpkin and Cat Designs](https://storage-us.atomm.com/resource/xtool/community/attachment/xtool-community/55118349-da6a-4991-acb4-ea935275aa42.jpeg?x-oss-process=image/resize,w_1200,h_900,limit_0/interlace,1/format,webp/auto-orient,1)
Laser Cut Wooden Halloween Decorative Boxes with Pumpkin and Cat Designs
 Instruction
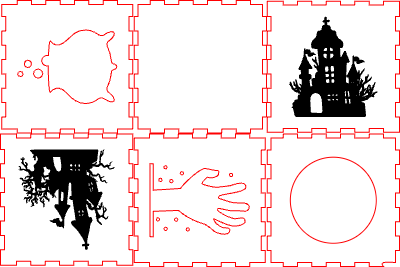

Information
I made these to sell at a craft show (they were good sellers and brought attention to our booth). And we'll keep a few for ourselves. This is a really easy project to make.
Instruction
Step1
The lighting in my video is bad and I apologize but you will see my process.
4x4" Halloween Box Lantern – Assembly Instructions
Designed by: David Hawke
Laser-ready material: 3 mm basswood
File source: Atomm.com
🔹 Step 1 – Download the design
- Go to Atomm.com and download the “4 x 4 Halloween Box Lantern” file.
- This free file includes six different designs for the same box pattern.
- Save it to your computer or just open it directly in Xtool Creative Studio (formerly XCS).
🔹 Step 2 – Prepare your laser
- Load 3 mm basswood onto your Xtool S1 (40 W recommended for my settings but any laser that will cut 3mm basswood will work).
- Use your preferred engraving and cut settings for 3mm basswood.
- Expect roughly 13–16 minutes per box depending on design.
- Cut out all the pieces for one box.
🔹 Step 3 – Optional: Stain the pieces
You may stain the wood before assembly for added color and depth.
- Light stains bring out engraving details nicely.
- Let the pieces dry completely before gluing.
🔹 Step 4 – Organize the parts
Lay out your cut pieces:
- Four sides (with Halloween designs)
- One bottom panel
- One top lid (keep this separate; it will remain unglued)
Place engraved sides face-out and any sanded surfaces facing in.
🔹 Step 5 – Apply wood glue
- Use regular wood glue – CA glue also works, but wood glue gives more working time.
- Apply a thin bead of glue along the interlocking tab edges.
- Do not glue the top tabs; leave the lid unglued so it can be removed later.
Tip: Keep a damp sponge handy to wipe away excess glue immediately.
🔹 Step 6 – Assemble the box
- Join the sides and bottom together carefully.
- Hold each corner snugly to ensure alignment.
- Secure with rubber bands around the box to clamp it as the glue dries.
- It’s normal if a little glue seeps out – wipe it off with your sponge.
- Let dry until solid (usually 30–60 minutes).
🔹 Step 7 – Finish up
- Remove rubber bands once the glue has dried.
- Place the lid on top – it should fit loosely so it can be lifted off.
🔹 Step 8 – Add lighting
Use only flameless LED candles inside.
- ⚠️ Do not use real candles – this is a wood product.
- Battery-operated tealights or flicker candles from Amazon work perfectly.
🔹 Step 9 – Display or sell
You’re done! Your lantern is ready for display, craft shows, or gifting.
Each of the six included designs fits this same 4 x 4 box layout, so feel free to mix and match styles.


