


![[Laser cut and engrave] Wood and crocodile leather handbag/Sac à main en bois et en cuir de crocodile](https://image-res.xtool.com/resource/xtool/community/attachment/xtool-community/6fe0622f-af72-4d61-af6b-05aec1331cfc?x-oss-process=image/resize,w_1200,h_900,limit_0/interlace,1/format,webp/auto-orient,1)
![[Laser cut and engrave] Wood and crocodile leather handbag/Sac à main en bois et en cuir de crocodile](data:image/png;base64,iVBORw0KGgoAAAANSUhEUgAAAAoAAAAKCAYAAACNMs+9AAAAAXNSR0IArs4c6QAAABdJREFUKFNjZCASMBKpjmFUId6QIjp4AAppAAuXjCs4AAAAAElFTkSuQmCC)
![[Laser cut and engrave] Wood and crocodile leather handbag/Sac à main en bois et en cuir de crocodile](https://image-res.xtool.com/resource/xtool/community/attachment/xtool-community/6fe0622f-af72-4d61-af6b-05aec1331cfc?x-oss-process=image/resize,w_200,h_150,limit_0/interlace,1/format,webp/auto-orient,1)
![[Laser cut and engrave] Wood and crocodile leather handbag/Sac à main en bois et en cuir de crocodile](https://image-res.xtool.com/resource/xtool/community/attachment/xtool-community/9a5ce2e4-a6aa-42d8-8d16-3db27ca9fdd3_handbag - zoom front view-012.jpg?x-oss-process=image/resize,w_200,h_150,limit_0/interlace,1/format,webp/auto-orient,1)
![[Laser cut and engrave] Wood and crocodile leather handbag/Sac à main en bois et en cuir de crocodile](https://image-res.xtool.com/resource/xtool/community/attachment/xtool-community/5d9a44ce-b0d2-4b46-ba8a-b1613be5a11f_handbag - global front view-vertical-013.jpg?x-oss-process=image/resize,w_200,h_150,limit_0/interlace,1/format,webp/auto-orient,1)
![[Laser cut and engrave] Wood and crocodile leather handbag/Sac à main en bois et en cuir de crocodile](https://image-res.xtool.com/resource/xtool/community/attachment/xtool-community/b0ef92b6-c9dc-41df-8c6b-0a7a75571d52_handbag - front open view-08.jpg?x-oss-process=image/resize,w_200,h_150,limit_0/interlace,1/format,webp/auto-orient,1)
Wood and crocodile leather handbag/Sac à main en bois et en cuir de crocodile
 Instruction
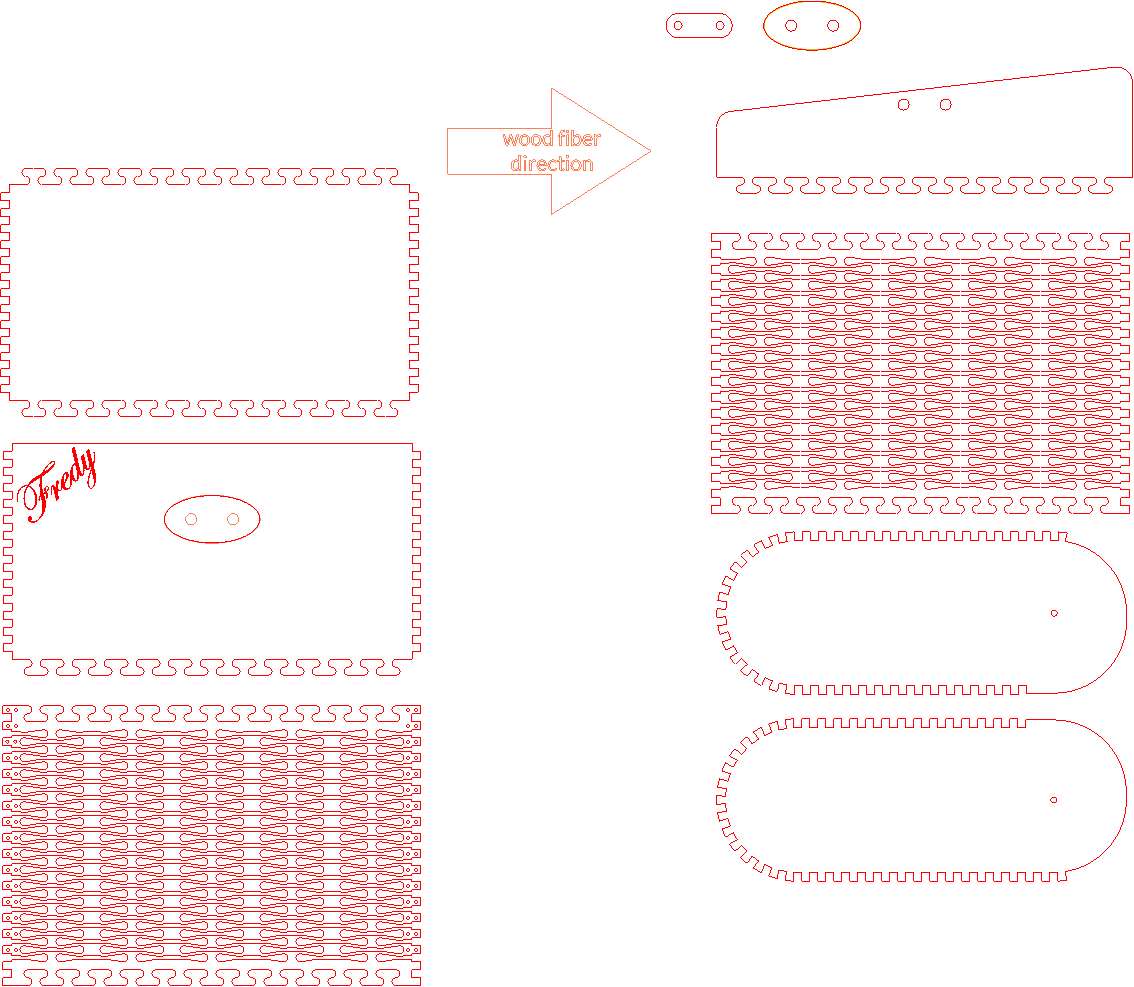


Information
      Handbags are often made of synthetic materials or leather, but rarely out of wood!
They can't be too small, because you can't put anything in them, and they can't be too big, because then it's no longer a handbag, and they can't be too heavy....
The idea is to make an adapted handbag out of precious wood and crocodile leather, using laser cutting, gluing and sewing!
French version-----
Les sacs à main sont souvent en matière synthétique, en cuir mais rarement en bois !
Il ne faut pas qu’ils soient trop petits car on ne peut rien mettre dedans et pas trop grand car sinon ce n’est plus un sac à main et pas trop lourd….
L’idée est de faire un sac à main adapté en bois précieux et en cuir de crocodile grâce à la découpe laser, au collage et à la couture !
Instruction
Step1: General description / description générale
The handbag consists of :
- a rigid front panel in Tiger Wood (a slightly orange color) supporting the bronze closure (latch) attached to an oval inlay in light oak
- a rigid back panel in Walnut wood (brown ribbed)
- a flexible part (*) in light oak corresponding to the bottom of the bag
- a flexible part (*) in light oak corresponding to the top flap of the bag. This flexible part is assembled with a rigid triangular part in Walnut wood which will support the other part of the bronze closure.
- two side parts in light Oak wood, which will support the bronze chain rings for carrying the bag on the shoulder.
(*): the flexible parts in light oak wood are cut from a rigid sheet of oak wood, with fine longitudinal patterns, a kind of mesh, cut in the direction of the wood grain, thus lightening its structure and making the sheet of wood more flexible, but only in one direction.
In a 4mm thick wooden plate, after engraving the meshes, it is possible to roll this plate into a roll shape up to a 25mm radius (50mm diameter) without breaking the wooden meshes. In our case, the radius of curvature is 38mm (diameter 76mm) for the top and bottom parts of the handbag.
To join the wooden sheets together, 4mm square "slots" and "S"-shaped tenons/mortises are used. Note that to compensate for the wood burn on the visible crenellations, an extra 0.5mm is needed to sand down the top of the crenellations and remove the black created by laser cutting, to reveal the wood's native color.
French version-----
Le sac à main est constitué :
· d’un panneau avant rigide en Tiger Wood (couleur un peu orangée) supportant la fermeture en bronze (loquet) fixée sur une marqueterie ovale en chêne clair
· d’un panneau arrière rigide en bois de Noyer (couleur marron nervurée)
· d’une partie souple (*) en bois de Chêne clair qui correspond au fond du sac
· d’une partie souple (*) en bois de Chêne clair qui correspond à la bavette du dessus du sac. Cette partie souple est assemblée avec une partie triangulaire rigide en bois de Noyer qui supportera l’autre partie de la fermeture en bronze.
· de deux parties latérales en bois de Chêne clair, qui supporteront les anneaux en bronze de fixation de la chaine, pour porter le sac à l’épaule.
(*) : les parties souples en bois de chêne clair sont taillées dans une plaque de bois de chêne rigide sur laquelle sont découpées de fins motifs longitudinaux, sorte de maille, dans le sens de la fibre du bois, permettant ainsi d’alléger sa structure et d’assouplir la plaque de bois mais dans une seule direction.
Dans une plaque de bois de 4 mm d’épaisseur, il est possible après gravure des mailles, de rouler cette plaque en forme de rouleau jusqu’à un rayon de 25mm (diamètre de 50mm) sans casser les mailles de bois. Dans notre cas le rayon de courbure est de 38mm (diamètre 76mm) pour la partie haute et la partie basse du sac à main.
Pour assembler des plaques de bois entre elles, des « créneaux » carrés de 4mm et des tenons/mortaises en forme de « S » sont utilisés. Notez que pour compenser la brulure du bois sur les créneaux visibles, une sur-longueur de 0,5mm est nécessaire permettant de poncer le haut des créneaux et de supprimer le noir engendré par la découpe laser, pour faire apparaitre la couleur native du bois.
Step2: Laser cut and text engraving on wood / découpage laser et gravure sur bois de text


Select the desired wood species. Position the wood sheets in the Xtool machine. Position the Xtool software's laser-cutting masks on the correct pieces of wood.
Depending on the size of the pieces of wood, you'll need to do this in several stages.
I chose to engrave a text corresponding to my wife's little name. I didn't want to overload it with engraved images to preserve the natural beauty of the wood.
Engraving is done right after cutting.
French version-----
Choisir les essences de bois souhaitées. Positionner les plaques de bois dans la machine Xtool. Positionner les masques de découpage laser du logiciel Xtool sur les bons morceaux de bois.
En fonction de la taille des morceaux de bois il faudra s'y prendre en plusieurs fois.
J’ai choisi de graver un texte correspondant au petit nom de mon épouse. Je n’ai pas voulu surcharger avec des images gravées pour conserver la beauté naturelle du bois.
La gravure se fait dans la foulée du découpage.
Step3: Laser cut on leather / découpage laser sur du cuir


To avoid snagging on the ends of the mesh cut to make the wood supple, I sewed on a strip of leather. I used crocodile leather, less than 1mm thick. The holes for the saddle stitching are laser-cut in the leather (1mm diameter) and on the wood (1.5mm diameter). The needle used will be about 1mm to pass through the wood, which is not as flexible as leather.
Excellent YouTube tutorials show you how to do this type of stitching.
Note that the leather strip must be folded over to form a leather bead that appears on the visible side of the bag's flap. There is a double stitch for aesthetic purposes (see photos). The space between the 2 sets of stitching holes corresponds to the thickness of the wood (4mm), plus 2 times the thickness of the leather (1mm), i.e. a total of 4+1+1=6mm, so be careful not to sew the leather strip upside down, as it's not symmetrical.
French version-----
Afin de ne pas s’accrocher sur les extrémités des mailles découpées pour rendre souple le bois, j’ai cousu une bande de cuir. J’ai pris du crocodile, de moins de 1mm d’épaisseur. Les trous pour la couture au point de Sellier sont faits au laser dans le cuir (diamètre 1mm) et sur le bois (diamètre 1,5mm). L’aiguille utilisée sera d’environ 1mm pour passer à travers le bois qui n’est pas souple comme le cuir.
D’excellent tuto sur YouTube vous montre comme faire ce type de couture.
Il faut noter que la bande de cuir doit être repliée sur elle meme pour faire un bourrelet de cuir qui apparaitra sur la face visible de la bavette du sac. Il y a une double couture pour l'esthétique (voir les photos). L'espace entre les 2 séries de trous pour la couture correspond à l'épaisseur du bois de 4mm, plus 2 fois l'épaisseur du cuir de 1 mm soit au totale 4+1+1=6mm, donc attention à ne pas coudre à l'envers cette bande de cuir qui n'est pas symétrique.
Step4: Oval inlay for handbag latch / Marqueterie ovale pour le loquet du sac à main


For aesthetic reasons (light wood / orange wood contrast on the front panel), but also as a precaution against splitting the wood when inserting the threaded brass inserts, I chose to position the handbag latch on a lighter oval piece of wood (oak) that fits perfectly into the Tigerwood front panel of the handbag.
For a perfect fit, cut the oval light oak part to an positif offset of +0.2mm all around the ellipse using the "Outline" function at +0.2mm, and vice versa, cut the hole in ellipse shape in the Tigerwood front panel at a negativ offset -0.2mm smaller all around.
Before adjusting, insert the brass inserts into the oval cut-out as described elsewhere, because if the wood splits during this operation, it's easy to re-cut an oval piece of wood and repeat the operation.
Next, adjust the cut-outs with fine sandpaper to remove the black laser-cut burn on the inside of the front panel cut-out and on the periphery of the oval piece, so that you can insert the oval oak piece into the Tigerwood front panel, in order to have effectiveness gluing.
Apply white wood glue to the outer edge of the oval piece and to the inner edge of the front panel cut-out, then assemble, making sure there are no gaps between the surfaces.
French version-----
J’ai choisi pour une question d’esthétique (contraste bois clair / bois orangé du panneau avant) mais aussi par prudence en cas de fente dans le bois au moment d’insérer les inserts en laiton taraudés, de positionner le loquet du sac à main sur une partie de bois (chêne) ovale plus clair venant s’insérer parfaitement dans la face avant en Tigerwood du sac à main.
Pour avoir un ajustement parfait il faut découper la partie ovale en chêne clair à 0,2mm en plus tout autour de l’ellipse en utilisant la fonction « Outline » à +0.2mm, et réciproquement, il faut découper le trou en forme d'ellipse dans la face avant en Tigerwood mais plus petite de -0.2mm en moins tout autour.
Avant ajustage, insérer les inserts en laiton taraudés dans la pièce ovale découpée comme décrit par ailleurs, car si le bois se fend pendant cette opération, il est facile de redécouper une pièce de bois ovale et de recommencer l’opération.
Ensuite, il faut ajuster les découpes avec un papier de verre fin pour faire disparaitre le noir de la brulure due à la découpe laser sur la partie intérieur de la découpe du panneau avant et sur la périphérie de la pièce ovale pour pouvoir insérer la pièce ovale en chêne dans la face avant en Tigerwood et avoir un bon collage
Enduire de colle à bois blanche la tranche extérieure de la pièce ovale et sur la partie intérieure de la découpe du panneau avant puis assembler en s’assurant qu’il n’y a pas de décalage entre les surfaces.
Step5: Fastening the latch closure / Fixation de la fermeture loquet


To secure the bag latch, 4 holes are required in the wood to accommodate M4mm L4mm D6mm brass threaded inserts. The diameter of the holes in the wood is 5.5mm (to be adapted with a circular file) to accommodate the 6mm insert without splitting the wood. The inserts must be fixed before assembling and gluing the different wood parts, as it's easier to work flat and you never know if one of the pieces of wood will split.... To do this, chamfer one of the two ends of the knurled insert (using a 4 mm screw fixed in a drill chuck or screwdriver) by turning it in the opposite direction to a normal drill hole (like an unscrewing operation) and rubbing the insert thus held in the chuck on a metal file and then on fine sandpaper.
To fit the inserts, a simple screw, washer and nut are required. Thread the brass insert (chamfered on the wood side) onto the threaded shank of the screw, then pass the screw through the 5.5mm hole in the wood plate, thread on the washer and then the nut. Hold the screw head and turn the nut, which will push the chamfered brass insert through the wood. Don't forget to put a little wood glue in the groove of the brass insert and also on the wooden periphery of the screw hole. Position the chamfer against the wood, not the other way round.
The holes for the M4 brass screws can be 4 mm, since laser-cutting the wood will produce a slightly larger hole, allowing the screw to pass through freely.
You can also opt for a magnetic closure. In this case, you'll need to adapt the number of holes and their diameter. Pay close attention to the position of these holes, to make sure that the handbag closure and the latch or magnetic fastener coincide, without forcing them to break the wooden mesh or causing the handbag flap to yawn.
French version-----
Pour fixer le loquet de fermeture du sac il faut 4 trous dans le bois pour accueillir des inserts en laiton taraudés M4mm L4mm D6mm. Le diamètre des trous dans le bois est de 5,5mm (à adapter à la lime circulaire) pour y loger l’insert de 6mm sans fendre le bois. Il faut fixer les inserts avant l’assemblage et le collage des différentes parties de bois car c’est plus facile de travailler à plat et on ne sait jamais, si une des pièces de bois se fend…. Pour se faire il faut chanfreiner une des deux extrémités de l’insert moleté (utiliser une vis de 4 mm fixée dans un mandrin de perceuse ou visseuse/deviseuse) en tournant à l’envers d’un perçage normal (comme une opération de dévissage) et en frottant l’insert ainsi maintenu dans le mandrin sur une lime à métaux puis sur du papier de verre fin.
Pour implanter les inserts, une simple vis, une rondelle et un écrou sont nécessaires. Enfiler l’insert en laiton (chanfrein coté bois) sur la tige filetée de la vis, puis passer la vis dans le trou de 5,5mm de la plaque de bois, enfiler la rondelle puis l’écrou. Maintenir la tête de vis et tourner l’écrou ce qui aura pour effet d’enfoncer à travers le bois l’insert en laiton chanfreiné. Ne pas oublier de mettre un peu de colle à bois dans la gorge de l’insert en laiton et aussi sur la périphérie en bois du trou de passage de la vis. Bien positionner le chanfrein contre le bois, et pas l’inverse.
Les trous de passage des vis en laiton diamètre M4 peuvent être de 4 mm, vu que la découpe laser du bois produira un trou un peu plus grand, permettant un libre passage de la vis.
Vous pouvez opter aussi pour une fermeture magnétique. Auquel cas il faudra adapter le nombre de trou et leur diamètre. Attention à la position de ces trous pour être sûr que la fermeture du sac à main avec le loquet ou la fermeture à bouton magnétique coïncide bien, sans forcer pour ne pas casser les mailles de bois ou sans faire bailler le rabat du sac à main.
Step6: Assembly and finishing / Assemblage et finition


First, carry out a test assembly without glue, to ensure that all the parts fit together properly.
Start by assembling the closing flap: the triangular part (with the two latch holes) on the soft wooden part with small holes on the sides (for future leather stitching).
Start by assembling the closing flap: the triangular part (with the 2 latch attachment holes) on the flexible wooden part which has small holes on the sides (for future leather stitching), taking care to position it on the side where the small holes are drilled all the way through, while the other side is missing 2 small holes on each side. In fact, it won't be possible to sew on this side, as it will be joined to the rear wood panel. (See drawing)
Then assemble all the pieces of wood in accordance with the enclosed general assembly drawing (see drawing).
Stitch the two leather strips on either side of the handbag's closing flap, before final assembly.
Then assemble all the pieces of wood in accordance with the attached general assembly drawing, using white wood glue. Wipe off any glue overflow to avoid staining the wood.
After the glue has dried (24 hrs), sand down any remaining black traces from the laser cutting with fine sandpaper. Also sand the assembled parts to avoid any protrusion on the wood. Finish sanding with very, very fine sandpaper to give the wood a smooth appearance.
Then use beeswax to coat the wood. Allow to dry for a few hours, then polish the surfaces with a wool cloth.
For the shoulder strap, I bought an aluminum chain with an imitation bronze surface treatment to keep the weight down. A leather strap might also do the trick, and may make less noise when the shoulder strap bangs against the wooden bag.
French version-----
Faire dans un premier temps un assemblage sans colle, pour bien maitriser l’emboitement de toutes les pièces.
Commencer par assembler le rabat de fermeture : la partie triangulaire (avec les 2 trous de fixation du loquet) sur la partie en bois souple qui a des petits trous sur les côtés (pour la future couture du cuir) en faisant attention de bien la positionner sur le côté où les petits trou sont percés jusqu’au bout, alors que de l’autre côté il manque 2 petits trou de chaque côté. En effet, il ne sera pas possible de coudre de ce côté vu que ce côté sera assemblé au panneau de bois arrière. (Voir schéma).
Réaliser les coutures des deux bandes de cuir de chaque coté du rabat de fermeture du sac à main, avant assemblage final.
Ensuite effectuer l’assemblage de tous les morceaux de bois conformément au dessin d’assemblage général joint. (Voir dessin)
Ensuite effectuer l’assemblage de tous les morceaux de bois conformément au dessin d’assemblage général joint en utilisant de la colle à bois blanche. Essuyer tout débordement de colle pour ne pas tacher le bois.
Après séchage de la colle, (24h) poncer avec du papier de verre fin, toutes les traces noires restantes issues de la découpe laser. Poncé aussi les parties assemblées pour ne pas avoir de ressaut sur le bois. Finir le ponçage avec un papier de verre très très fin pour donner aspect lisse au bois.
Utiliser ensuite de la cire d’abeille pour enduire le bois. Laisser sécher quelques heures, puis lustrer les surfaces avec un chiffon de laine.
Pour la bandoulière j’ai acheté une chaine en aluminium avec un traitement de surface imitation bronze pour limiter le poids. Une Sangle en cuir pourrait aussi faire l’affaire, et peut ferai moins de bruit lorsque la bandoulière tape contre le sac en bois.
Step7: Result / résultat


Here's how it looks in the end.
French version-----
Voici ce que cela donne en final.


