
Report
![[Laser cut and engrave] Boîte à mécanisme Halloween avec chat, citrouille et fantôme](https://storage-public.atomm.com/xtool/community/attachment/xtool-community/dafe67df-0478-435c-b6e7-5a75b3d6b31a.jpg?x-oss-process=image/resize,m_fill,w_1280,h_960,limit_0/interlace,1/format,webp/auto-orient,1)

![[Laser cut and engrave] Boîte à mécanisme Halloween avec chat, citrouille et fantôme](data:image/png;base64,iVBORw0KGgoAAAANSUhEUgAAAAoAAAAKCAYAAACNMs+9AAAAAXNSR0IArs4c6QAAABdJREFUKFNjZCASMBKpjmFUId6QIjp4AAppAAuXjCs4AAAAAElFTkSuQmCC)
![[Laser cut and engrave] Boîte à mécanisme Halloween avec chat, citrouille et fantôme](https://storage-public.atomm.com/xtool/community/attachment/xtool-community/dafe67df-0478-435c-b6e7-5a75b3d6b31a.jpg?x-oss-process=image/resize,m_fill,w_160,h_120,limit_0/interlace,1/format,webp/auto-orient,1)
![[Laser cut and engrave] Boîte à mécanisme Halloween avec chat, citrouille et fantôme](https://storage-public.atomm.com/xtool/community/attachment/xtool-community/a068f171-fd91-4ed6-a8ce-5c0dbecf0087.jpg?x-oss-process=image/resize,m_fill,w_160,h_120,limit_0/interlace,1/format,webp/auto-orient,1)
![[Laser cut and engrave] Boîte à mécanisme Halloween avec chat, citrouille et fantôme](https://storage-public.atomm.com/xtool/community/attachment/xtool-community/2549ed4f-1a9d-4c84-8475-cbaea48da0d3.jpg?x-oss-process=image/resize,m_fill,w_160,h_120,limit_0/interlace,1/format,webp/auto-orient,1)
![[Laser cut and engrave] Boîte à mécanisme Halloween avec chat, citrouille et fantôme](https://storage-public.atomm.com/xtool/community/attachment/xtool-community/765c3278-b8d4-4e8a-945a-56d212c6c371.jpg?x-oss-process=image/resize,m_fill,w_160,h_120,limit_0/interlace,1/format,webp/auto-orient,1)
La Manivelle Maudite
 Make It Move Contest
 Instruction
boite Halloween manivelle1
.xs
Application scenario
Laser processing
Machine & module

xTool S1
20WCompatible xTool Machine
P3
F2
F2 Ultra UV
F2 Ultra(Single)
F2 Ultra
F1 Ultra
F1
F1 Lite
P2S
P2
M1 Ultra
M1
D1 Pro 2.0
D1 Pro
D1
Laserbox
X1
M2
Material used

1/8"(3mm) Poplar Plywood

2 orange plywood 300x300 mm 2.8 mm
1 green plywood 300x300 mm 2.8 mm
1 yellow plywood 150 mmx150 mm 2.8 mm
1 black plywood 300x300 mm 2.8 mm

1
159
Information
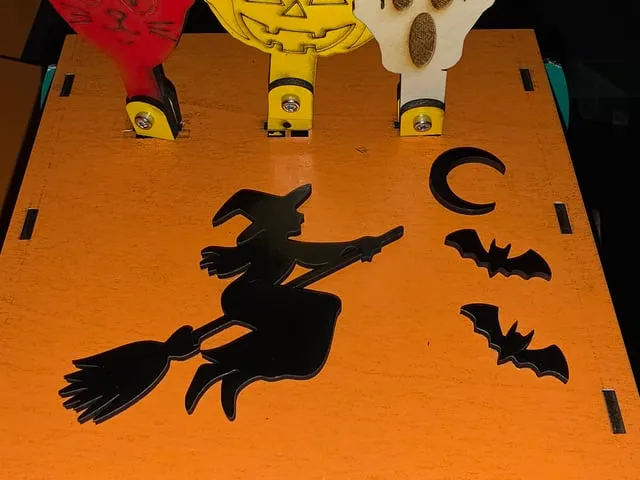
      It is a Halloween-themed mechanical box, entirely designed to be made of laser-cut wood. A crank drives toothed wheels and then a crossmember, on which several cams are placed. As they turn, these cams move three Halloween characters that appear above the box.

With this system, the mechanisms are visible and understandable: gears, rotation, cams and movement of the miniatures. The objective was to create an object that was both playful, decorative and truly mechanical, where a simple rotation of the crank triggers several movements.
Instruction
1
Step1: Monter le sol et les parois et la traverse

Preview
THE RED COLOR: CUT
L A BLACK COLOR: BURN
https://www.facebook.com/share/p/1DNTEFQqk7/
1.Mount the floor and walls
- Lay the floor 160 × 160 mm flat.
- Insert the left wall and the right wall into the grooves in the floor.
- Then install the 144.69 mm rear wall between the two side walls.
- Do not permanently install the front panel at this stage: the interior must be kept accessible.
2.Install the crossbeam
- Snap together the 2 pieces that make up the crossbeam.
- Insert the crossbar into the Ø22 mm hole in the left wall.
- Feed it through the entire box.
- Extend its end through the Ø22 mm hole in the right wall.
- Immediately check that it can rotate freely 360°, without touching the ground or walls.
2
Step2: Install the 3 camshafts and cam shims

Preview
Install all 3 cams and cam shims
- Cams must be mounted on the crossmember before closing the box completely.
- Position a cam under each of the three future figures and the cam shims on each side to prevent the figures from going right or left
- The three cams must be distributed along the length of the crossmember.
3
Step3: Install the toothed wheels on the right and left side

Preview

Preview
Install the toothed wheels on the right and left side
- Place the large toothed wheel on the right side of the crossmember.
- The central cross should also match your crossmember exactly.
- Then install the small wheel/pinion linked to the crank.
- Install the crank and washers/ also add metal washers.
- Adjust their position so that the teeth mesh correctly without being too tight.
4
Step4: Install the top board and figures
Preview

Preview
Install the top tray and the figures
- Put the upper tray.
- Position each figure exactly above its cam and the figure holders with 3 x 10mm M3 screws.
- The leg of each figure must remain free: it must not be attached to the cam.
- The bottom of the leg/pad rests on the cam.
- As the cam rotates, it gradually lifts the figure and then the figure descends by its weight.
5
Step5: Decorations

Preview
glue the decorations found on Atomm with wood glue.
Comments
Remixes



You may also like

Halloween Pumpkin Notch

26
66

$6.98
$6.98
Credits698
Exclusive
Pumpkin Candy Box

48

Halloween Pumpkin Bowl with Top Hat

0
0

$1.99
$1.99
Credits199
4 Designs Halloween Box

0

$5.49
$5.49
$10.98
Credits549
Pumpkin Halloween Crate Basket

17

$2.99
$2.99
Credits299
Exclusive
Halloween surprise candy box

75

$2.99
$2.99
$5.98
Credits299
Pumpkin Treat Bag Box - M1 Ultra
19

Wooden Jack-o-lanterns

79
303

$6.98
$6.98
Credits698
Exclusive
Pumpkin Candy Box P2
29

lanterne halloween 2

4
19

$1.99
$1.99
$3.98
Credits199
Halloween Box

16

'/%3e%3cpath%20d='M15.9997%2019.3335L11.833%2014.3335H14.333L15.9997%2017.6668L17.6663%2014.3335H20.1663L15.9997%2019.3335Z'%20fill='white'/%3e%3c/g%3e%3cdefs%3e%3clinearGradient%20id='paint0_linear_1412_57140'%20x1='16'%20y1='7.6665'%20x2='16'%20y2='24.3332'%20gradientUnits='userSpaceOnUse'%3e%3cstop%20stop-color='%23FFA15F'/%3e%3cstop%20offset='1'%20stop-color='%23E37C32'/%3e%3c/linearGradient%3e%3c/defs%3e%3c/svg%3e)
Decorative Halloween Lantern and Candy Bowl

33
182

Halloween House - Changing Characters - Who's Hiding Behind the Window?

17
68

$2.40
$2.40
$6.00
Credits240
Laser Cut Halloween Hand Lantern SVG File - Spooky Night Light & Centerpiece

8

veilleuse haloween
1
7

Halloween Pumpkin House

9
15

$1.99
$1.99
$4.97
Credits199
Pumpkin Halloween Lantern
19

$5.00
$5.00
Credits500
Pumpkin shape lightbox laser file

1