
![[Laser cut and engrave] Kayla's Birthday Countdown Wooden Wall Sign with Cake and Balloons](https://storage-public.atomm.com/xtool/community/attachment/xtool-community/0666ae36-45f4-4485-b81b-4e58b9df81d9.gif)
![[Laser cut and engrave] Kayla's Birthday Countdown Wooden Wall Sign with Cake and Balloons](data:image/png;base64,iVBORw0KGgoAAAANSUhEUgAAAAoAAAAKCAYAAACNMs+9AAAAAXNSR0IArs4c6QAAABdJREFUKFNjZCASMBKpjmFUId6QIjp4AAppAAuXjCs4AAAAAElFTkSuQmCC)
![[Laser cut and engrave] Kayla's Birthday Countdown Wooden Wall Sign with Cake and Balloons](https://storage-public.atomm.com/xtool/community/attachment/xtool-community/659a0914-e8f1-4465-8f66-b110688dc16f.png?x-oss-process=image/resize,w_200,h_150,limit_0/interlace,1/format,webp/auto-orient,1)
![[Laser cut and engrave] Kayla's Birthday Countdown Wooden Wall Sign with Cake and Balloons](https://storage-public.atomm.com/xtool/community/attachment/xtool-community/99fa87b3-e5a1-4b66-ae47-e298d58ce50e.jpg?x-oss-process=image/resize,w_200,h_150,limit_0/interlace,1/format,webp/auto-orient,1)
![[Laser cut and engrave] Kayla's Birthday Countdown Wooden Wall Sign with Cake and Balloons](https://storage-public.atomm.com/xtool/community/attachment/xtool-community/17a5f5ba-4aba-48f2-8c69-3a7d977b3c22.JPG?x-oss-process=image/resize,w_200,h_150,limit_0/interlace,1/format,webp/auto-orient,1)
![[Laser cut and engrave] Kayla's Birthday Countdown Wooden Wall Sign with Cake and Balloons](https://storage-public.atomm.com/xtool/community/attachment/xtool-community/38cbbc79-fa6c-4eac-bc2e-e44df1beca7f.JPG?x-oss-process=image/resize,w_200,h_150,limit_0/interlace,1/format,webp/auto-orient,1)
![[Laser cut and engrave] Kayla's Birthday Countdown Wooden Wall Sign with Cake and Balloons](https://storage-public.atomm.com/xtool/community/attachment/xtool-community/1a6de3a6-8189-488e-b02c-c6f4081912f9.jpg?x-oss-process=image/resize,w_200,h_150,limit_0/interlace,1/format,webp/auto-orient,1)
![[Laser cut and engrave] Kayla's Birthday Countdown Wooden Wall Sign with Cake and Balloons](https://storage-public.atomm.com/xtool/community/attachment/xtool-community/f97f94c8-a2ca-41f2-a0b0-afb0ea484979.JPG?x-oss-process=image/resize,w_200,h_150,limit_0/interlace,1/format,webp/auto-orient,1)
![[Laser cut and engrave] Kayla's Birthday Countdown Wooden Wall Sign with Cake and Balloons](https://storage-public.atomm.com/xtool/community/attachment/xtool-community/8c2da3dd-d9c9-4aa0-b0fe-355b98485021.JPG?x-oss-process=image/resize,w_200,h_150,limit_0/interlace,1/format,webp/auto-orient,1)
![[Laser cut and engrave] Kayla's Birthday Countdown Wooden Wall Sign with Cake and Balloons](https://storage-public.atomm.com/xtool/community/attachment/xtool-community/782257cb-67c9-430b-bdf4-70fc1e1afdb7.JPG?x-oss-process=image/resize,w_200,h_150,limit_0/interlace,1/format,webp/auto-orient,1)
![[Laser cut and engrave] Kayla's Birthday Countdown Wooden Wall Sign with Cake and Balloons](https://storage-public.atomm.com/xtool/community/attachment/xtool-community/a894e2ef-f65b-489c-8810-f3dbc3ddb22a.JPG?x-oss-process=image/resize,w_200,h_150,limit_0/interlace,1/format,webp/auto-orient,1)
![[Laser cut and engrave] Kayla's Birthday Countdown Wooden Wall Sign with Cake and Balloons](https://storage-public.atomm.com/xtool/community/attachment/xtool-community/eda0baab-a40a-4dfb-92fb-90b0f2890017.JPG?x-oss-process=image/resize,w_200,h_150,limit_0/interlace,1/format,webp/auto-orient,1)
![[Laser cut and engrave] Kayla's Birthday Countdown Wooden Wall Sign with Cake and Balloons](https://storage-public.atomm.com/xtool/community/attachment/xtool-community/d2e5b5cf-8753-4bfb-9405-0b3de546e334.JPG?x-oss-process=image/resize,w_200,h_150,limit_0/interlace,1/format,webp/auto-orient,1)
![[Laser cut and engrave] Kayla's Birthday Countdown Wooden Wall Sign with Cake and Balloons](https://storage-public.atomm.com/xtool/community/attachment/xtool-community/39db1e31-ba2f-4033-8a56-5a395ade8fe8.gif?x-oss-process=image/resize,w_200,h_150,limit_0/interlace,1/format,webp/auto-orient,1)
Kalender Hitung Mundur Ulang Tahun yang Dipersonalisasi dengan Kue Menyala dan Motif Balon


Informasi
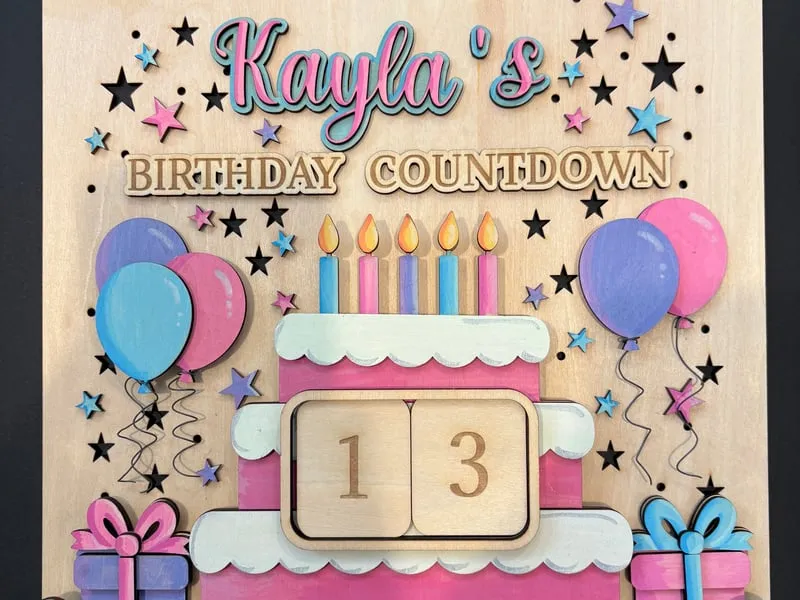
      Ulang tahun hanya datang setahun sekali, tetapi kegembiraan meningkat setiap hari menjelang mereka. Saya ingin menciptakan sesuatu yang mengubah antisipasi itu menjadi bagian dari perayaan.

Kotak Bayangan Hitung Mundur Ulang Tahun yang dipersonalisasi ini memungkinkan anak-anak dan ORANG DEWASA menghitung mundur hari hingga hari istimewa mereka hanya dengan mengubah blok nomor setiap pagi. Ini lebih dari sekadar dekorasi, ini adalah tradisi sehari-hari yang menciptakan kegembiraan, kenangan keluarga, dan sedikit keajaiban ulang tahun.

Kue ulang tahun berlapis, balon warna-warni, hadiah, bintang bercahaya, dan pencahayaan LED yang hangat menghidupkan seluruh pemandangan. Saat ruangan semakin gelap, cahaya lembut mengubah kotak bayangan menjadi lampu malam ceria yang mengingatkan anak yang berulang tahun bahwa hari besar mereka semakin dekat.

Setiap elemen dirancang khusus untuk pemotongan laser, mulai dari kue berlapis dimensi hingga blok hitung mundur yang dapat dipertukarkan dan nama yang dipersonalisasi. Karena setiap bagian dapat disesuaikan dengan warna, nama, dan usia, setiap proyek menjadi kenang-kenangan unik yang dapat ditampilkan dan dinikmati dari tahun ke tahun.

Ulang tahun adalah tentang merayakan orang yang kita cintai. Tujuan saya adalah membuat proyek yang dapat digunakan keluarga bersama, membangun kegembiraan satu hari pada satu waktu sambil menciptakan kenangan yang bertahan lama setelah lilin ditiup.

Saya harap proyek ini menginspirasi pembuat lain untuk membuat hadiah yang dipersonalisasi yang menjadi tradisi keluarga, karena terkadang hitungan mundur sama ajaibnya dengan ulang tahun itu sendiri.

Tautan Instagram: https://www.instagram.com/p/DajJi7SM2dX/
Instruksi
Langkah1: Siapkan Materi dan buka file

Harap baca semua petunjuk sebelum memulai----Tempatkan sepotong basswood 3mm pada bilah untuk setiap lapisan. Saya menggunakan 12x20 inci dengan kerf preset .2 (Modifikasi untuk mesin Anda). Semua potongan dipotong pada 60/27/1 dan diukir pada 30/500/1. Dilampirkan untuk diunduh adalah file .xs, .xcs dan .svg. Unduh file yang menyertai sistem operasi Anda. Ini memiliki 4 lapisan untuk diproses. Anda dapat memutuskan pesanan. Lapisan mana pun yang Anda lakukan, ingatlah untuk menghidupkan dan mematikan output.
Langkah2: Lapisan Proses


Pilih lapisan yang Anda potong. Sorot semua bagian. Nyalakan output. Pindahkan potongan yang dikelompokkan ke tengah kayu. Tekan ukuran yang ditujukan. Tekan tampilan closeup untuk memastikan semua bagian berada di atas kayu. Tekan pratinjau untuk mengonfirmasi semua bagian diatur untuk dipotong dan nama (ubah untuk file Anda) dan hitungan mundur ulang tahun diatur untuk mengukir. (Saya suka bagaimana namanya dipotong jadi saya membuat lapisan potong lain.) Tekan mulai pada mesin, ikuti petunjuk lalu mulai mesin. Kayu mudah terbakar, jadi harap perhatikan saat Anda memotong. Selesaikan semua lapisan dan lanjutkan ke melukis.
FYI: Saya memiliki potongan shim dalam file untuk digunakan lebih lanjut. Tab belakang kotak adalah shim-jangan dibuang. Saya juga menggunakan bintang guntingan dari pendukung untuk menambahkan pop-up pada pendukung.
Langkah3: Cat



Setelah Anda selesai memotong, Anda dapat memilih untuk membiarkan potongan tersebut tidak dicat. Saya memutuskan untuk melakukan uji coba tanpa merekatkan dan kemudian menambahkan warna untuk membuatnya menonjol. Anda dapat mengikuti contoh untuk ide warna. Saya menggunakan pena cat akrilik dalam 2 nada untuk menambah kedalaman. Saya menggunakan guntingan bintang untuk melukis dan menambah dimensi.
Langkah4: Perekatan - gunakan klem jika perlu - perhatikan shim!


Foto 1 dan 2-Kotak lem belakang dan depan/atas. Potongan-potongan itu dimaksudkan untuk menjadi nyaman. Ingat saya memiliki kerf .2 built-in.
Foto 3-Buat paket shim (2 bungkus 12 potongan tinggi diletakkan rata). Rekatkan ke bagian dalam kotak ke arah atas dan bawah. Gunakan selotip dua sisi untuk menempelkan cahaya 150 lumen dari Dollar Tree.
Foto 4- Rekatkan icing ke kue, rekatkan api ke lilin, lem nama untuk offset, lem busur, hadiah kotak atas untuk hadiahkan. Lem pita shim, lem pita tumpang tindih shim dan kotak atas.
Foto 5-gunakan shim tipis (potongan dari tab belakang kotak di bagian bawah masa kini.)
Foto 6- Rekatkan 2 kotak bersama-sama 4 kali dan tempatkan di mana tab biru berada.
Foto 7- Rekatkan kue ke tengah pendukung yang menyejajarkan bagian bawah dengan tepi. Rekatkan hadiah di kiri dan kanan kue. Rekatkan potongan awan icing kecil ke bagian icing awan besar untuk memastikan tidak ada celah. Rekatkan kedua potongan icing ke kue dan hadiah. Hitung mundur dan nama ulang tahun Tengah lalu rekatkan di tempatnya. Rekatkan balon sesuai keinginan Anda. Gunakan shim tab tipis untuk menyeimbangkan balon. Rekatkan bintang di mana pun Anda pilih. Ambil sepotong kawat tipis dan pukul pensil dan bagian bawah balon sebelum direkatkan ke pendukung.
Video- Selesaikan proyek dengan mengikuti video untuk menyatukan semuanya.
Silakan unggah kreasi Anda sehingga saya dapat melihatnya. Ini mungkin proyek favorit saya.
Remix



Anda mungkin juga menyukai

Kalender Pengingat Ulang Tahun Kayu dengan Tag Nama yang Dapat Disesuaikan


Kalender Ulang Tahun Keluarga Kayu


Hiasan kue ulang tahun Ari dan tanda nama dinding


Kalender ulang tahun, kalender ulang tahun


Api unggun Selamat Ulang Tahun – Karya Seni 🔥🏕️🎂 Ulang Tahun Kanvas Terukir Laser yang Dipersonalisasi


Spanduk Surat Selamat Ulang Tahun dengan Potongan Bintang


Kalender Pelacak Ulang Tahun Bertema Cupcake dengan label nama

Hari Kayu Terukir Laser Sampai Kalender Hitung Mundur Natal

Selamat Ulang Tahun Karangan Bunga Spanduk Surat Kayu


Plakat Ulang Tahun Batu Tulis Persegi dengan Kutipan Menua dan Ilustrasi Kue

Gantung Dinding Balon Udara Panas yang Dipersonalisasi dengan Motif Bintang


Tanda Dinding Pelacak Ulang Tahun Keluarga dan Teman dengan Motif Pohon Pelangi
.png?x-oss-process=image/resize,m_fill,w_240,h_240,limit_0/interlace,1/format,webp/auto-orient,1)

3D Selamat Ulang Tahun nomor bundel laser dipotong. Dekorasi dinding Selamat ulang tahun kayu. Tanda dinding berlapis kayu ulang tahun. Dekorasi pesta ulang tahun SVG. 10 Desain


Kalender Pengingat Ulang Tahun Kayu Potong Laser dalam bahasa Prancis

Papan Pelacakan Memori Petualangan Ulang Tahun dengan Token Pencapaian


Tanda Hitung Mundur Hari Sampai Liburan

Spanduk Ulang Tahun

Tanda Dinding Gnome Ulang Tahun dengan Lilin
