
![[Laser cut and engrave] Ghost stud earrings](https://image-res.atomm.com/resource/xart/result/18410/bd2ea6d7-99b9-48b3-8210-481794a5b0c0.png?x-oss-process=image/resize,m_fill,w_1280,h_960,limit_0/interlace,1/format,webp/auto-orient,1)
![[Laser cut and engrave] Ghost stud earrings](data:image/png;base64,iVBORw0KGgoAAAANSUhEUgAAAAoAAAAKCAYAAACNMs+9AAAAAXNSR0IArs4c6QAAABdJREFUKFNjZCASMBKpjmFUId6QIjp4AAppAAuXjCs4AAAAAElFTkSuQmCC)
![[Laser cut and engrave] Ghost stud earrings](https://image-res.atomm.com/resource/xart/result/18410/bd2ea6d7-99b9-48b3-8210-481794a5b0c0.png?x-oss-process=image/resize,m_fill,w_160,h_120,limit_0/interlace,1/format,webp/auto-orient,1)
![[Laser cut and engrave] Ghost stud earrings](https://image-res.atomm.com/resource/xtool/community/attachment/xtool-community/bb220b23-698a-4807-9d0e-4713af1b5672/12.png?x-oss-process=image/resize,m_fill,w_160,h_120,limit_0/interlace,1/format,webp/auto-orient,1)
Geister-Ohrringe
'/%3e%3cpath%20d='M7.99985%2010.6665L4.6665%206.6665H6.6665L7.99985%209.33317L9.33317%206.6665H11.3332L7.99985%2010.6665Z'%20fill='white'/%3e%3cdefs%3e%3clinearGradient%20id='paint0_linear_2869_78399'%20x1='8'%20y1='1.3335'%20x2='8'%20y2='14.6668'%20gradientUnits='userSpaceOnUse'%3e%3cstop%20stop-color='%23FFA15F'/%3e%3cstop%20offset='1'%20stop-color='%23E37C32'/%3e%3c/linearGradient%3e%3c/defs%3e%3c/svg%3e) Atomm Exclusive
Atomm Exclusive Anleitung


Information
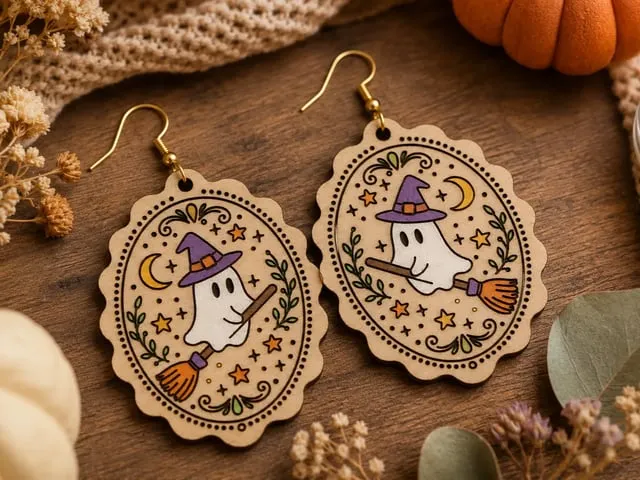
      Eine tolle Möglichkeit, übrig gebliebenes Holz mit diesen niedlichen Designs zu verbrauchen.
Ich habe diese von Hand bemalt, unten sieht man alle Details.
Anleitung
Schritt1: Punkte und schneiden Sie das Design

Wie man auf dem Bild sehen kann, habe ich mit einer vorgefertigten Sperrholzplatte angefangen – Ohrringe sind die beste Möglichkeit, Reste zu verwenden. :)
Du kannst die von mir bereitgestellten Einstellungen verwenden und die Ohrringe ausschneiden. (Ich habe sie gespiegelt, also gibt es eine linke und eine rechte Version :) )
Schritt2: Malerei


Verwende Marker, um das Malen zu erleichtern. (Ich habe den Typ angehängt, den ich verwendet habe).
Ich begann mit dem weißen und fügte dann das schwarze hinzu. Du kannst auch die Rückseite streichen, wenn du möchtest.
Warte, bis es vollständig getrocknet ist.
Schritt3: Lack


Füge Lack auf die Vorderseite hinzu (du gibst Lack auf die andere Seite, nachdem du die Ständer verklebt hast). Warte, bis es vollständig getrocknet ist.
Schritt4: Die Bolzen hinzufügen


Fügen Sie die Stecker auf die andere Seite hinzu (ich habe Sekundenkleber verwendet, das sieht man auf dem Bild). Warte, bis es vollständig getrocknet ist.
Schritt5: Lack


Sobald der Kleber getrocknet ist, kannst du auch Lack auf die Rückseite auftragen, um ihn besonders zu sichern, und du kannst diesen Lack auch an den Rändern auftragen.
(Es war eine schlechte Idee von mir, auf Papier zu arbeiten, weil es etwas klebrig war; Ich empfehle dir, einen Vinyl- oder Zellophanbeutel als Arbeitsbereich zu verwenden, das wird sauberer.
Teile sie unten, falls du es geschafft hast! :) Viel Spaß beim Basteln!
Remixe



Das könnte Ihnen auch gefallen

Lasergeschnittene Holz-Katzen-Geisterohrringe mit niedlichem Ausdruck


👻 Gruselige DIY-Halloween-Magnete – Eine Spuk-Bastelnacht


Halloween-Ohrstecker


Holz-Geisterohrringe zu Halloween


Geisterförmige Halloween-Ohrringe


Lasergeschnittene weiße Geister-Halloween-Ohrringe mit lächelnden Gesichtern


'/%3e%3cpath%20d='M15.9997%2019.3335L11.833%2014.3335H14.333L15.9997%2017.6668L17.6663%2014.3335H20.1663L15.9997%2019.3335Z'%20fill='white'/%3e%3c/g%3e%3cdefs%3e%3clinearGradient%20id='paint0_linear_1412_57140'%20x1='16'%20y1='7.6665'%20x2='16'%20y2='24.3332'%20gradientUnits='userSpaceOnUse'%3e%3cstop%20stop-color='%23FFA15F'/%3e%3cstop%20offset='1'%20stop-color='%23E37C32'/%3e%3c/linearGradient%3e%3c/defs%3e%3c/svg%3e)
Matte Schwarze Ghost Dangle Ohrringe zu Halloween


Lasergeschnittene hölzerne Halloween-Kürbis-Ohrringe


Geisterohren
Halloween Ghost Witch Ohrringe Laser-Cut-Datei, Holzschmuck-Vorlage (SVG, DXF, PDF)


Lasergeschnittene Halloween-Geisterohrringe


'/%3e%3c/g%3e%3cdefs%3e%3clinearGradient%20id='paint0_linear_1737_57170'%20x1='16.5097'%20y1='8.87061'%20x2='16.5097'%20y2='23.3945'%20gradientUnits='userSpaceOnUse'%3e%3cstop%20stop-color='%232E9AFF'/%3e%3cstop%20offset='1'%20stop-color='%233378FF'/%3e%3c/linearGradient%3e%3c/defs%3e%3c/svg%3e)
Halloween Ghost Dangle Ohrringe Vorlage — Gravieren & Schneiden (SVG/XCS)

Geisterholz-Ständer


Set mit 12 Halloween-Geister-Ohrringen


Paar Totenkopfohrringe


Holzohrringe mit Hexenhut-Design und Halloween-Sternen

Kleiner Geist
.JPEG?x-oss-process=image/resize,m_fill,w_80,h_80,limit_0/interlace,1/format,webp/auto-orient,1)

#5 HALLOWEEN ORECCHINI KAWAII
