
![[Laser cut and engrave] Cornice portafoto ovale in legno con scritta Mamma e decorazioni botaniche](https://storage-us.atomm.com/resource/xtool/community/attachment/xtool-community/1abfdad8-16b6-4d09-a0fc-14fa1a3c1f2a.jpeg?x-oss-process=image/resize,w_1200,h_900,limit_0/interlace,1/format,webp/auto-orient,1)
Oval wooden photo frame with writing Per Te Mamma
 Instruction
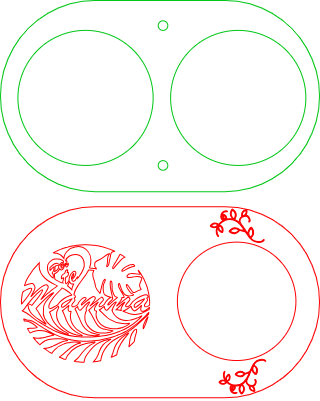


Instruction
Step1: Panel front

The photo frame consists of 2 panels: front and back.
The front panel is an oval of 200 x120mm, in which I drew two circles: one of 75mm to contain the photo and the other of 80 mm in which I carved the design.
I created the design with silhouette studio, merging the writing "For you" into a heart and then adding it to the word "mom" and leaves.
On the circle where to insert the photo I have engraved leaves, but everyone can put anything as they like, even for example the name of the mother.
Step2: Back panel

The back panel is the same size as the front panel, but the circles are larger (85mm in diameter). The cut circle can be placed behind the photo in order to fit it to the panel, applying a rotating metal or plastic clip to prevent it from falling.
In the center of the back panel two small 5 mm holes have been inserted, so you can choose whether to hang on the wall or place it on the table using an 80 mm stick.
I glued a stick in the drawing to make it stand on the table
