
![[Laser cut and engrave] Holzbox mit Feuerwehrmann und Feuerwehrfrau Motiv](https://storage-us.atomm.com/resource/xart/result/821562/1c200d96-7f31-47ab-ac22-11a85a6508d8.png?x-oss-process=image/resize,w_1200,h_900,limit_0/interlace,1/format,webp/auto-orient,1)
![[Laser cut and engrave] Holzbox mit Feuerwehrmann und Feuerwehrfrau Motiv](data:image/png;base64,iVBORw0KGgoAAAANSUhEUgAAAAoAAAAKCAYAAACNMs+9AAAAAXNSR0IArs4c6QAAABdJREFUKFNjZCASMBKpjmFUId6QIjp4AAppAAuXjCs4AAAAAElFTkSuQmCC)
![[Laser cut and engrave] Holzbox mit Feuerwehrmann und Feuerwehrfrau Motiv](https://storage-us.atomm.com/resource/xart/result/821562/1c200d96-7f31-47ab-ac22-11a85a6508d8.png?x-oss-process=image/resize,w_200,h_150,limit_0/interlace,1/format,webp/auto-orient,1)
![[Laser cut and engrave] Holzbox mit Feuerwehrmann und Feuerwehrfrau Motiv](https://storage-us.atomm.com/resource/xtool/community/attachment/xtool-community/9159658d-04fd-4377-bd95-619419e85e4a.jpeg?x-oss-process=image/resize,w_200,h_150,limit_0/interlace,1/format,webp/auto-orient,1)
Drink Coaster Holder
 Instruction
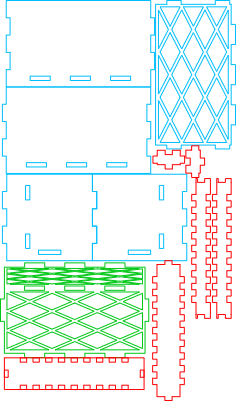


Information
      Practical holder for drink coasters with integrated bottle opener compartment

This thoughtfully designed holder offers the ideal storage for your 9.5 × 9.5 cm drink coasters. The compact design keeps the table tidy and keeps your coasters close at hand.

The bottom of the holder is perforated so that any condensation can drip off without any problems. This keeps the coasters hygienic and dries faster.

A special highlight is the raised compartment for a bottle opener integrated on the side. The elevated position makes the opener easy to access and comfortable to grip at all times.

Functionality meets simple, thoughtful design – perfect for use at home, in the bar or on the terrace.
Instruction
Step1

First, the base frame is assembled. To do this, use all the parts that are marked with black lines in the project file.
These elements are carefully glued together to create a stable basis for further construction. Be sure to align the parts exactly and allow the glue to dry sufficiently before proceeding to the next step.
Step2

While the base structure is drying, you can already glue together the elevation for the bottle opener.
Use all the remaining parts that are marked in green in the project file. Glue them together carefully and make sure that the individual elements are neatly aligned.
Then let the glued parts dry well before processing them in the next step.
Step3

Finally, insert the elevation – i.e. the small box for the bottle opener – into the recess provided for this purpose in the box.
Gently but firmly press the part into the opening until it is fully at the bottom. You can check this through the perforated bottom. Make sure that everything is flush
.Then the holder is fully assembled and ready for use.
