
舉報
![[Laser cut and engrave] Laser Cut Wooden Snowflake Candle Holder Lantern](https://image-res.atomm.com/resource/xtool/community/attachment/xtool-community/ab2d34b9-46f2-4249-b2cb-cb9fb7c7f946.png?x-oss-process=image/resize,w_1200,h_900,limit_0/interlace,1/format,webp/auto-orient,1)
![[Laser cut and engrave] Laser Cut Wooden Snowflake Candle Holder Lantern](data:image/png;base64,iVBORw0KGgoAAAANSUhEUgAAAAoAAAAKCAYAAACNMs+9AAAAAXNSR0IArs4c6QAAABdJREFUKFNjZCASMBKpjmFUId6QIjp4AAppAAuXjCs4AAAAAElFTkSuQmCC)
![[Laser cut and engrave] Laser Cut Wooden Snowflake Candle Holder Lantern](https://image-res.atomm.com/resource/xtool/community/attachment/xtool-community/ab2d34b9-46f2-4249-b2cb-cb9fb7c7f946.png?x-oss-process=image/resize,w_200,h_150,limit_0/interlace,1/format,webp/auto-orient,1)
![[Laser cut and engrave] Laser Cut Wooden Snowflake Candle Holder Lantern](https://image-res.atomm.com/resource/xtool/community/attachment/xtool-community/c83049f6-0456-4585-bcf6-0cd81e99a047.png?x-oss-process=image/resize,w_200,h_150,limit_0/interlace,1/format,webp/auto-orient,1)
![[Laser cut and engrave] Laser Cut Wooden Snowflake Candle Holder Lantern](https://image-res.atomm.com/resource/xtool/community/attachment/xtool-community/ab7823b3-ea25-4134-87ab-9cebe2e0856b.png?x-oss-process=image/resize,w_200,h_150,limit_0/interlace,1/format,webp/auto-orient,1)
![[Laser cut and engrave] Laser Cut Wooden Snowflake Candle Holder Lantern](https://image-res.atomm.com/resource/xtool/community/attachment/xtool-community/cac9680a-3dba-4892-b6c3-11b60fd74531.png?x-oss-process=image/resize,w_200,h_150,limit_0/interlace,1/format,webp/auto-orient,1)
六角形聖誕燈籠 – 雷射切割(六面燈籠)
 教程
教程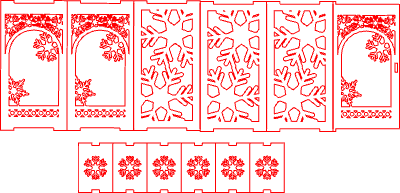
Lucerna_6Hran
.xcs
應用場景
激光加工 (120min)
機器與模組

xTool S1
20W兼容的 xTool 機器
上新
M2
10W, 20WF2 Ultra UV
5WF2
15WP3
80WF2 Ultra
40WF1 Ultra
20WM1
5W, 10WD1
5W, 10W, 20WD1 Pro
5W, 10W, 20W, 40WP2
55WF1
10WS1
10W, 40WM1 Ultra
10W, 20WP2S
55W使用的材料

3mm椴木膠合板

54
1158
教程
1
步驟1

預覽
這盞優雅的六角形聖誕燈籠由六個裝飾側板、一個頂蓋、一個底板,以及工作門。雪花切口搭配LED蠟燭時,會產生溫暖的發光效果。
燈籠堅固、視覺上引人注目,非常適合作為獨立裝飾或堆疊成裝飾塔。
⚠️ 只使用LED蠟燭——絕不要使用真火焰。
⚠️ 門鉸鏈應輕度打磨以保持平順開啟。
⚠️ 完整組裝需使用木工膠。
Include Parts
6× side panels with snow
portouts1× door panel
1× bottom plate
1× top plate
1× 六角形頂蓋(煙囪)
1×懸掛環
內建連接器與鎖定標籤
Assembly Guide
請使用下方雷射設定切割所有零件。
如有需要,邊緣可輕易打磨燒焦。
將六個側板黏合成封閉六角形。
插入並黏合底板。
附上頂板。
組裝小型頂部煙囪,黏合後安裝在燈籠上。
安裝懸掛迴圈。
插入 door panel:
輕輕打磨鉸鏈邊緣以便移動。
測試最終組裝前的開機動作。
在所有結構接縫處塗抹木工膠,並輕輕夾緊直到乾燥。
插入一根LED蠟燭,享受發光效果。
評論
二創



您可能還喜歡

$3.60
$3.60
$12.00
积分360
🎄 聖誕侏儒燈籠 — 三套雷射切割設計

8

雷射切割木製聖誕樹飾品,配有雪花圖案

17
109

雷射切割木製聖誕燈籠裝飾,帶有聖誕樹與星星

1
2

雷射切割透明壓克力聖誕裝飾品,搭配雪花圖案

5
55

雷射切割木製雪花聖誕樹裝飾

11
83

木製聖誕屋燈籠

180
659

雷射切割木製聖誕樹裝飾搭配LED燈

13
25

'/%3e%3cdefs%3e%3clinearGradient%20id='paint0_linear_1433_15675'%20x1='12'%20y1='3.25'%20x2='16.6891'%20y2='20.75'%20gradientUnits='userSpaceOnUse'%3e%3cstop%20stop-color='%23FF5D80'/%3e%3cstop%20offset='1'%20stop-color='%23FF0035'/%3e%3c/linearGradient%3e%3c/defs%3e%3c/svg%3e)
門框方面——雷射切割聖誕聖誕雪橇節日裝飾——也適合其他角落,如畫作、電視等。

31
104

'/%3e%3cdefs%3e%3clinearGradient%20id='paint0_linear_1433_15752'%20x1='12.5'%20y1='5'%20x2='12.5'%20y2='19.2596'%20gradientUnits='userSpaceOnUse'%3e%3cstop%20stop-color='%232F7FFF'/%3e%3cstop%20offset='1'%20stop-color='%232661F1'/%3e%3c/linearGradient%3e%3c/defs%3e%3c/svg%3e)
雷射切割木製聖誕樹飾品,配有雪花圖案

33
228

雷射切割雪花裝飾品,帶有旋轉圖案

20
140

$2.49
$2.49
$4.98
积分249
雷射切割木製聖誕裝飾品組,帶有節日造型

1

雷射切割壓克力懸掛裝飾

2
29

雷射切割木製聖誕雪橇,附有馴鹿節慶裝飾

20
94

剪紙聖誕蠟燭裝飾,配有冬青葉與漿果

2
3

雷射切割木製聖誕燈籠裝飾,主題有馴鹿與月亮
2
1

雪花聖誕裝飾套裝
0
5

木製雪花
9
54

為公司準備的聖誕飾品

1
6