


![[Laser cut and engrave] Laser Cut Wooden Dragon Model Puzzle Toy](https://storage-us.atomm.com/resource/xtool/community/attachment/xtool-community/02f53644-c73a-4695-8ab1-d12bccd208e2.jpg?x-oss-process=image/resize,w_1200,h_900,limit_0/interlace,1/format,webp/auto-orient,1)
![[Laser cut and engrave] Laser Cut Wooden Dragon Model Puzzle Toy](data:image/png;base64,iVBORw0KGgoAAAANSUhEUgAAAAoAAAAKCAYAAACNMs+9AAAAAXNSR0IArs4c6QAAABdJREFUKFNjZCASMBKpjmFUId6QIjp4AAppAAuXjCs4AAAAAElFTkSuQmCC)
![[Laser cut and engrave] Laser Cut Wooden Dragon Model Puzzle Toy](https://storage-us.atomm.com/resource/xtool/community/attachment/xtool-community/02f53644-c73a-4695-8ab1-d12bccd208e2.jpg?x-oss-process=image/resize,w_200,h_150,limit_0/interlace,1/format,webp/auto-orient,1)
![[Laser cut and engrave] Laser Cut Wooden Dragon Model Puzzle Toy](https://storage-us.atomm.com/resource/xtool/community/attachment/xtool-community/d553ec1c-f3dc-4c83-aa61-b83ccf199994.jpg?x-oss-process=image/resize,w_200,h_150,limit_0/interlace,1/format,webp/auto-orient,1)
![[Laser cut and engrave] Laser Cut Wooden Dragon Model Puzzle Toy](https://storage-us.atomm.com/resource/xtool/community/attachment/xtool-community/b7931587-17df-436b-916f-54e5445f6e5e.jpg?x-oss-process=image/resize,w_200,h_150,limit_0/interlace,1/format,webp/auto-orient,1)
![[Laser cut and engrave] Laser Cut Wooden Dragon Model Puzzle Toy](https://storage-us.atomm.com/resource/xtool/community/attachment/xtool-community/bca2da94-4780-4ae2-9476-c998634aa291.jpg?x-oss-process=image/resize,w_200,h_150,limit_0/interlace,1/format,webp/auto-orient,1)
มังกรไร้ฟัน
 คำแนะนำ
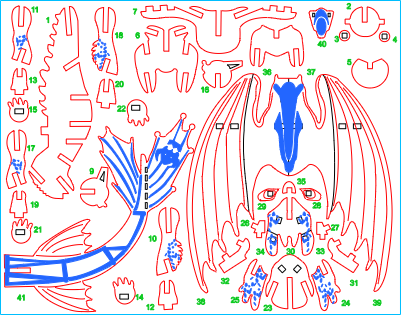

คำแนะนำ
ขั้นตอน1: ตัดลวดลาย

ตัดชิ้นส่วนทั้งหมด
ขั้นตอน2: ประกอบชิ้นส่วนร่างกาย


ชิ้นแรกเข้าคอ มีแถบสี่เหลี่ยมสองแถบที่ยื่นออกมาจากด้านข้าง กาวเข้าที่ จากนั้นติดชิ้นกลมเล็กๆ สองชิ้นที่ด้านข้าง
ชิ้นต่อไปคือดิสก์ที่มีการตัดรูปตัววี
ถัดไปคือชิ้นส่วนขาที่มีรูปตัว V อยู่ด้านบน (ปีกจะเข้าไปในช่องในขั้นตอนต่อมา)
ตอนนี้ติดกาวที่ยึดปีกในช่องถัดไป
ชิ้นสุดท้ายคือที่ยึดขาหลัง
ขั้นตอน3: รวบรวมมรดก


มีสองส่วนขาสําหรับด้านหน้าและ สองส่วนสําหรับด้านหลัง
ขาหน้ามีขนนก ขาหลังไม่มี
การแกะสลักออกไปด้านนอก แยกกลุ่มขาทั้งหมดออกจากกัน
กาวที่ขา ตามด้วยที่วางเท้า และสุดท้ายที่เท้า
ขั้นตอน4: การประกอบหัว


ติดชิ้นส่วนแก้มลงบนขากรรไกรล่าง/ใบหน้า
เลื่อนสิ่งนี้เข้าไปในชิ้นส่วนหลัก
มีที่ยึดตาขนาดเล็กสองอันที่ติดกาวเข้ากับชิ้นส่วนขากรรไกร
ติดตาลงบนชิ้นงานเหล่านี้ เพิ่มจมูกที่ด้านหน้า
นําส่วนบนของส่วนหัวแล้วติดที่ยึดหูที่ด้านล่าง
ติดหูเข้ากับแถบที่ยื่นออกมาเป็นมุม
เลื่อนชิ้นนี้เข้าไปในช่องที่ด้านหลังศีรษะ
ขั้นตอน5: เพิ่มปีกและหาง


เลื่อนปีกด้านในเข้าไปเพื่อให้ชิดกับชิ้นส่วนหลักของตัวถัง
กาวปีกด้านนอกทั้งสองชิ้น
ติดชิ้นส่วนหางในช่องที่เหลือที่ด้านหลังของร่างกาย
ขั้นตอน6: เสร็จแล้ว


คุณทําเสร็จแล้ว!
ฉันหวังว่าคุณจะสนุกกับมัน!


