


Сообщить
![[Laser cut and engrave] Snowman tealight stand](https://storage-us.atomm.com/resource/xtool/community/attachment/xtool-community/840ac350-af0e-43b0-b9d9-6a2dcfbb6809.jpg?x-oss-process=image/resize,w_1200,h_900,limit_0/interlace,1/format,webp/auto-orient,1)
![[Laser cut and engrave] Snowman tealight stand](data:image/png;base64,iVBORw0KGgoAAAANSUhEUgAAAAoAAAAKCAYAAACNMs+9AAAAAXNSR0IArs4c6QAAABdJREFUKFNjZCASMBKpjmFUId6QIjp4AAppAAuXjCs4AAAAAElFTkSuQmCC)
![[Laser cut and engrave] Snowman tealight stand](https://storage-us.atomm.com/resource/xtool/community/attachment/xtool-community/840ac350-af0e-43b0-b9d9-6a2dcfbb6809.jpg?x-oss-process=image/resize,w_200,h_150,limit_0/interlace,1/format,webp/auto-orient,1)
![[Laser cut and engrave] Snowman tealight stand](https://storage-us.atomm.com/resource/xtool/community/attachment/xtool-community/1c0ca789-78fb-4252-8caa-135a3f3500e8.jpg?x-oss-process=image/resize,w_200,h_150,limit_0/interlace,1/format,webp/auto-orient,1)
![[Laser cut and engrave] Snowman tealight stand](https://storage-us.atomm.com/resource/xtool/community/attachment/xtool-community/39cd1fbc-b0a9-44c6-a8c6-97eb319ed891.jpg?x-oss-process=image/resize,w_200,h_150,limit_0/interlace,1/format,webp/auto-orient,1)
![[Laser cut and engrave] Snowman tealight stand](https://storage-us.atomm.com/resource/xtool/community/attachment/xtool-community/7d7e4b04-dbfd-4ff8-a231-7d25ea407a65.jpg?x-oss-process=image/resize,w_200,h_150,limit_0/interlace,1/format,webp/auto-orient,1)
Чайный киоск для снеговиков
 Инструкция
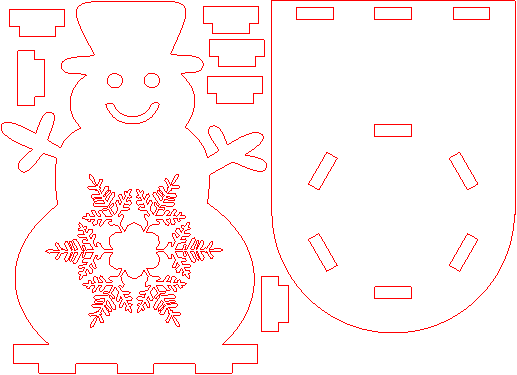
snowman_tealight_holder
.xcs
Сценарий применения
Лазерная обработка
Машина и модуль
xTool M1 Ultra
20WСовместимые · 13
Используемый материал

Фанера из тополя 3 мм
115
1245
Информация
Снеговик с вырезанной снежинкой для чайных ламп.
Инструкция
1
Шаг1: Вырежь кусочки

Предварительный просмотр
Вырезать все кусочки. Убедитесь, что не выбрасываете маленькие Т-образные детали.
Вы получаете особенно красивую снежинку, вырезанную из центра снеговика.
2
Шаг2: Собери основание

Предварительный просмотр
Приклейте Т-образные детали к нижней части. Убедитесь, что все они выровнены.
3
Шаг3: Нарисуй снеговика
Этот шаг необязательный. Рекомендую красить свои работы сейчас, так как потом будет сложнее.
4
Шаг4: Добавьте снеговика

Предварительный просмотр

Предварительный просмотр
Приклейте часть снеговика к основанию, которую вы сделали на предыдущем этапе.
Убедитесь, что она перпендикулярна нижней части. Если используете клей для дерева, закрепите его чем-то, чтобы удерживать на месте.
Несколько капель суперклея очень помогают удержать всё на месте.
Комментарии


