
신고
![[Laser cut and engrave] Billiard Room Dining Lamp Chandelier](https://storage-us.atomm.com/resource/xtool/community/attachment/xtool-community/d4a2c459-fbf1-48df-9b62-1545a920ddeb.gif)
![[Laser cut and engrave] Billiard Room Dining Lamp Chandelier](data:image/png;base64,iVBORw0KGgoAAAANSUhEUgAAAAoAAAAKCAYAAACNMs+9AAAAAXNSR0IArs4c6QAAABdJREFUKFNjZCASMBKpjmFUId6QIjp4AAppAAuXjCs4AAAAAElFTkSuQmCC)
![[Laser cut and engrave] Billiard Room Dining Lamp Chandelier](https://image-res.atomm.com/resource/xtool/community/attachment/xtool-community/774406c6-05c6-4953-adf3-94500069ff86.png?x-oss-process=image/resize,w_200,h_150,limit_0/interlace,1/format,webp/auto-orient,1)
![[Laser cut and engrave] Billiard Room Dining Lamp Chandelier](https://image-res.atomm.com/resource/xtool/community/attachment/xtool-community/1e979f60-365d-48f6-acaf-9695e4660250.jpeg?x-oss-process=image/resize,w_200,h_150,limit_0/interlace,1/format,webp/auto-orient,1)
![[Laser cut and engrave] Billiard Room Dining Lamp Chandelier](https://image-res.atomm.com/resource/xtool/community/attachment/xtool-community/f63d979a-831b-4e8a-8d4e-3dabf27d0435.jpeg?x-oss-process=image/resize,w_200,h_150,limit_0/interlace,1/format,webp/auto-orient,1)
![[Laser cut and engrave] Billiard Room Dining Lamp Chandelier](https://image-res.atomm.com/resource/xtool/community/attachment/xtool-community/b3078c42-2a38-40db-82d0-be34579db244.jpeg?x-oss-process=image/resize,w_200,h_150,limit_0/interlace,1/format,webp/auto-orient,1)
![[Laser cut and engrave] Billiard Room Dining Lamp Chandelier](https://image-res.atomm.com/resource/xtool/community/attachment/xtool-community/74f09d71-5abb-4280-9648-5e510063e475.jpeg?x-oss-process=image/resize,w_200,h_150,limit_0/interlace,1/format,webp/auto-orient,1)
당구장 식당 램프 샹들리에
 설명서
설명서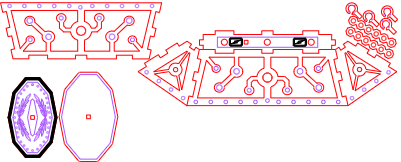
billiardLamp
.xcs
응용 시나리오
레이저 가공
기계 및 모듈

xTool S1
40W호환되는 xTool 기기
M2
10W, 20WF2 Ultra UV
5WF2
15WP3
80WF2 Ultra
40WF1 Ultra
20WM1
5W, 10WD1
5W, 10W, 20WD1 Pro
5W, 10W, 20W, 40WP2
55WF1
10WS1
10W, 20WM1 Ultra
10W, 20WP2S
55W사용된 재료

3mm 자작나무 합판

7
613
설명서
1
단계1: 로드 파일 : 목재 선택

미리보기
이
작업에는 Screwdriver Caddy 프로젝트에서 남은 어두운 스테인드 나무를 사용했는데 정말 멋져 보입니다. 파일을 넣고 선택한 1/8인치 합판을 모두 잘라내세요.
https://vt.tiktok.com/ZSQrQhTo9/
2
단계2: 드라이핏 후 접착하세요!

미리보기

미리보기
램프 조립 부품을 배치하세요. 두 손가락을 단단히 눌러 붙이면서 시크를 테이프로 붙이세요. 서로 꽉 조여진 후에는 내부 전체에 목공 접착제를 발라서 굳히게 하세요. 접착제를 잘 살피면서 필요에 따라 회전시켜 접착제가 고이거나 이상한 곳에 흐르지 않도록 하세요. 작은 히터 팬 앞에서 이 작업을 하면 아주 잘 작동합니다.
3
단계3: 접착제 후크 설치

미리보기
후크를 조명 기구 상단에 접착하세요. 사용할 경우 천장 마운트 플레이트에 접착제 후크를 붙이세요.
체인을 설치하면 밥이 바로 당신의 삼촌입니다!
댓글
리믹스



이것도 좋아하실 수 있습니다

미니어처 테이블 및 의자 세트

9
60

인형의 집 식탁

50
189

커피 테이블 세트 1:12 / 커피 테이블 세트 1:12
.JPG?x-oss-process=image/resize,m_fill,w_240,h_240,limit_0/interlace,1/format,webp/auto-orient,1)
21
122

미니어처 약국 템플릿 인형의 집 레이저 컷

22
72

북눅/돌하우스용 책장

20
143

레이저 컷 목재 인형의 집 가구 세트 DXF 파일

45
288

레이저 컷 인형의 집 키트 미니 가구 무료 벡터

40
296

레이저 컷 빨간색 나무 미니어처 여우 침대, 슬라트 베이스

1
28

$13.96
$13.96
크레딧1396
돌하우스 미니어처 나무 단조 철 침대

24

돌하우스용 현대 미니어처 1:12 책상

4
29

레이저 컷 돌하우스 SVG 파일 가구 포함 – 3mm 목재 호환

30
210

돌하우스 다이닝 체어
40
228

미니아투르 에크티쉬 1:12 / 인형의 집을 위한 미니어처 코너 테이블
16
80

미니어처 진열장 레이저 절단 템플릿 | 디지털 SVG DXF 파일 | 돌의 집 전시대 1:12 스케일
3
15

미니 주방 테이블

6
30

스트란드코브 / 비치 체어

80
295

미니어처 흔들의자

66
459

램프 스탠드

3
24