


![[Laser cut and engrave] Laser Cut Personalized Wooden Christmas Hat Ornament with Name](https://storage-us.atomm.com/resource/xtool/community/attachment/xtool-community/49dc3b6e-841b-4927-ae2e-7304817ee51a.jpg?x-oss-process=image/resize,w_1200,h_900,limit_0/interlace,1/format,webp/auto-orient,1)
![[Laser cut and engrave] Laser Cut Personalized Wooden Christmas Hat Ornament with Name](data:image/png;base64,iVBORw0KGgoAAAANSUhEUgAAAAoAAAAKCAYAAACNMs+9AAAAAXNSR0IArs4c6QAAABdJREFUKFNjZCASMBKpjmFUId6QIjp4AAppAAuXjCs4AAAAAElFTkSuQmCC)
![[Laser cut and engrave] Laser Cut Personalized Wooden Christmas Hat Ornament with Name](https://storage-us.atomm.com/resource/xtool/community/attachment/xtool-community/49dc3b6e-841b-4927-ae2e-7304817ee51a.jpg?x-oss-process=image/resize,w_200,h_150,limit_0/interlace,1/format,webp/auto-orient,1)
![[Laser cut and engrave] Laser Cut Personalized Wooden Christmas Hat Ornament with Name](https://i.ytimg.com/vi/2qt2V0blNhA/hqdefault.jpg)
![[Laser cut and engrave] Laser Cut Personalized Wooden Christmas Hat Ornament with Name](https://storage-us.atomm.com/resource/xtool/community/attachment/xtool-community/5da5747b-fb5a-42b2-96af-90bfda7e0f1a.jpg?x-oss-process=image/resize,w_200,h_150,limit_0/interlace,1/format,webp/auto-orient,1)
![[Laser cut and engrave] Laser Cut Personalized Wooden Christmas Hat Ornament with Name](https://storage-us.atomm.com/resource/xtool/community/attachment/xtool-community/b4971299-dc8b-4361-9a4c-dd31e5ec329f.png?x-oss-process=image/resize,w_200,h_150,limit_0/interlace,1/format,webp/auto-orient,1)
個人化雷射切割木製聖誕帽飾品,配有金箔
 教程
教程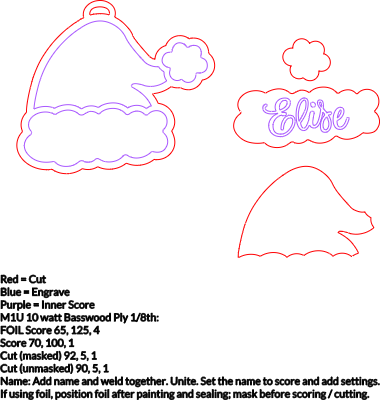
RRB Santa Hat Gold Foil
.xcs
應用場景
激光加工 (15min)
機器與模組
xTool M1 Ultra
10W兼容的 · 3
使用的材料

3mm椴木膠合板
54
507
教程
1
步驟1
用1/8分之一的椴木膠合板,分白段和紅板(壓克力顏料)上色。如果需要,封住乾燥且上色的木頭。
剪一塊金箔,大小和聖誕老人帽絨毛袖口一樣。像影片 中所示,將白漆部分放置
。遮罩已塗漆且箔膜化的板子,放入雷射機中。確保材料是水平的。
打開檔案並自動測量距離。
使用文字功能輸入名稱,焊接並合併。將名字設定為65、125、4分。把已經存在的名字移除,然後把你的名字放進毛絨裡。
確保其他部分都設定為剪裁,並把帽子絨毛、毛球帽和紅帽插入物設定成92、5、1。將裝飾品背襯分數設為70、100、1,切割為90、5、1。
處理以下作品(標示每個處理區域):帶有名字的帽子絨毛、帽子毛球和紅帽插入物。如果有煙灰,請移除並擦拭邊緣。
放入一塊未遮罩的椴木夾板,確保其水平。自動療養並標記處理區域。處理並擦拭邊緣。
將每件作品的遮蔽去除。把帽子的絨毛放在桌上,然後盡量往後拉,盡量貼近桌子,去除多餘的鋁箔。如果是複雜的名字,請慢慢來,並用塑膠刮鬍刀幫助提起裡面的字母碎片。
把碎片黏在有劃痕的背板上,再加一條繩子或緞帶,然後展示出來。
注意:你可以用噴封方式封住鋁箔。它會降低一些反光特性,但仍然會很有光澤。
評論


