![[Laser cut and engrave] Santa Christmas Wish List Board](https://image-res.atomm.com/resource/xart/result/375803/ef6de045-2c8a-46cc-8a7e-1a812d93c26f.png?x-oss-process=image/resize,w_1200,h_900,limit_0/interlace,1/format,webp/auto-orient,1)
![[Laser cut and engrave] Santa Christmas Wish List Board](data:image/png;base64,iVBORw0KGgoAAAANSUhEUgAAAAoAAAAKCAYAAACNMs+9AAAAAXNSR0IArs4c6QAAABdJREFUKFNjZCASMBKpjmFUId6QIjp4AAppAAuXjCs4AAAAAElFTkSuQmCC)
![[Laser cut and engrave] Santa Christmas Wish List Board](https://image-res.atomm.com/resource/xart/result/375803/ef6de045-2c8a-46cc-8a7e-1a812d93c26f.png?x-oss-process=image/resize,w_200,h_150,limit_0/interlace,1/format,webp/auto-orient,1)
![[Laser cut and engrave] Santa Christmas Wish List Board](https://image-res.atomm.com/resource/xtool/community/attachment/xtool-community/e196a824-edbc-4092-81b5-1153387d0052.jpg?x-oss-process=image/resize,w_200,h_150,limit_0/interlace,1/format,webp/auto-orient,1)
Santa Christmas Wish List Board
 Instruction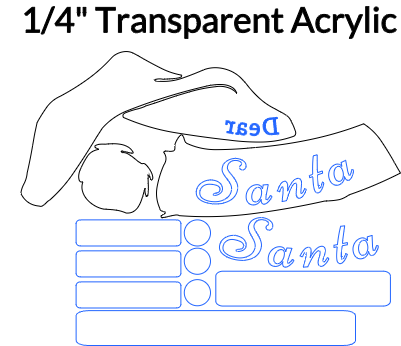


Instruction
Step1: Machine Setup - Wood Cuts

The main board is cut & engraved from the ¼" Birch Plywood - File Name indicated with “Wood”
Step2: Macine Setup - Transparent Acrylic

Component cut-outs using Transparent Acrylic - File name indicated with “Acrylic”.
For reference, transparent acrylic was used but colored acrylic can be used as a replacement. I would suggest still using transparent for the Santa hat (Red portion). There would be a “Dear” engraved on the back of this portion, I would suggest painting this White then overlaying the red paint. BE SURE THAT THE RED PORTION OF SANTA HAT STAYS MIRRORED.
The image shown, I initially used the ¼" Birch Wood for the Santa Hat (which the mirrored portion would not be required for the Santa hat red portion being made with wood), but the “Dear” was very hard to see after painting. As suggested above, it would be better to use painted transparent acrylic instead (mirrored for engraving “Dear” on back).
Step3: Painting Components

If Transparent Acrylic is used, I suggest sanding with 320 grit sand paper before painting to ensure adhesion to the material.
Step4: Glue Components to Board

Glue each component on a flat surface and allow to dry.
Link to glue used:
https://www.amazon.com/Gorilla-Construction-Adhesive-Strength-Ounce/dp/B0916KZ598/ref=sr_1_12?crid=3UY2SNMZODNC6&dib=eyJ2IjoiMSJ9.jiRO8PEySKqiM7Gkbry_9iD1bEJQVhNsXFsRjsQDIZSdCNJvNnMdkda_l7-G7v4jRnSGD2_LDP5agAVCFYKiKev7iqlWmlkR9k_JaLyWfgaXmMT-1xlmHYjYyDtFgXhxvERavzk0TXqD70NdCmsypnCENJAPTNgbsMrGm-e3vnabsx9FUim_opjQuy3YmdhcfgYptWkTvgLMzV0vDIEevpFq-7Zp6_u-1Rujr3ao1vk.KfcN0x9_fuFAkNupnnuC9xThRI4DN817w-Arms52hc0&dib_tag=se&keywords=gorilla%2Bgel%2Bglue&qid=1760199837&sprefix=gorrila%2Bgel%2Bglue%2Caps%2C86&sr=8-12&th=1
Step5: Finished Product
Dry erase markers are used to fill in all information and can be used year to year.
Reminder for “This Christmas I Am” information is written in white portion Santa Hat Ball.
Remixes



You may also like

Laser Cut Santa Sleigh Christmas QR Code Tracker Sign


Laser Cut Christmas Wall Art with Santa Sleigh and Pine Trees


🎅 Santa’s Workshop 3025 – Designed by Creative Lab AI


Santa Claus Slate Christmas Decoration Plaque


Elf report board


Laser Cut Christmas Santa and Elves Wall Art Decoration


Santa Themed Round Wooden Wall Art Decoration


Laser Cut Wooden Santa Claus Christmas Wall Art Decoration


Dear Santa Christmas Wish Letter Board


Christmas Wall Art with Santa Sleigh and Pine Trees


SANTA'S WORKSHOP


Laser Engraved Santa Claus Christmas Plaque on Wooden Stand


Light up wood sogn


Laser Engraved Wooden Days Until Christmas Countdown Calendar

Crescent Moon of Santa Layered Papercut Wall Art Decoration


Christmas Slate Wall Art with Santa and Reindeer

Santa Claus Wall Art Decoration


Christmas Scenes board
