
舉報
![[Laser cut and engrave,Inkjet printing] Illuminated Christmas Lantern with Winter Village and Holiday Scene](https://storage-public.atomm.com/xtool/community/attachment/xtool-community/5d8698bc-7bf2-4684-a984-ed9f9df5a5cc.gif)

![[Laser cut and engrave,Inkjet printing] Illuminated Christmas Lantern with Winter Village and Holiday Scene](data:image/png;base64,iVBORw0KGgoAAAANSUhEUgAAAAoAAAAKCAYAAACNMs+9AAAAAXNSR0IArs4c6QAAABdJREFUKFNjZCASMBKpjmFUId6QIjp4AAppAAuXjCs4AAAAAElFTkSuQmCC)
![[Laser cut and engrave,Inkjet printing] Illuminated Christmas Lantern with Winter Village and Holiday Scene](https://storage-public.atomm.com/xtool/community/attachment/xtool-community/a7857af9-c03e-4de7-af3e-8a89438a5d5a.png?x-oss-process=image/resize,m_fill,w_160,h_120,limit_0/interlace,1/format,webp/auto-orient,1)
![[Laser cut and engrave,Inkjet printing] Illuminated Christmas Lantern with Winter Village and Holiday Scene](https://storage-public.atomm.com/xtool/community/attachment/xtool-community/cbecd879-70a8-4178-92f4-f57cd7b4aeb5.png)
![[Laser cut and engrave,Inkjet printing] Illuminated Christmas Lantern with Winter Village and Holiday Scene](https://storage-public.atomm.com/xtool/community/attachment/xtool-community/55ef2cf4-f6cf-402a-90a7-e2d201ec6806.JPG?x-oss-process=image/resize,m_fill,w_160,h_120,limit_0/interlace,1/format,webp/auto-orient,1)
![[Laser cut and engrave,Inkjet printing] Illuminated Christmas Lantern with Winter Village and Holiday Scene](https://storage-public.atomm.com/xtool/community/attachment/xtool-community/0575bce5-648a-46b2-af22-24456599aa05.jpg?x-oss-process=image/resize,m_fill,w_160,h_120,limit_0/interlace,1/format,webp/auto-orient,1)
![[Laser cut and engrave,Inkjet printing] Illuminated Christmas Lantern with Winter Village and Holiday Scene](https://storage-public.atomm.com/xtool/community/attachment/xtool-community/66e9eed5-26b6-40c4-806d-11c0e5210ec3.JPG?x-oss-process=image/resize,m_fill,w_160,h_120,limit_0/interlace,1/format,webp/auto-orient,1)
![[Laser cut and engrave,Inkjet printing] Illuminated Christmas Lantern with Winter Village and Holiday Scene](https://storage-public.atomm.com/xtool/community/attachment/xtool-community/c234f9bf-eae1-4aab-87ed-3d30e910053c.jpg?x-oss-process=image/resize,m_fill,w_160,h_120,limit_0/interlace,1/format,webp/auto-orient,1)
![[Laser cut and engrave,Inkjet printing] Illuminated Christmas Lantern with Winter Village and Holiday Scene](https://storage-public.atomm.com/xtool/community/attachment/xtool-community/05eb1113-cf58-4475-8fb1-6afcd3c34a11.JPG?x-oss-process=image/resize,m_fill,w_160,h_120,limit_0/interlace,1/format,webp/auto-orient,1)
![[Laser cut and engrave,Inkjet printing] Illuminated Christmas Lantern with Winter Village and Holiday Scene](https://storage-public.atomm.com/xtool/community/attachment/xtool-community/3c08987e-427f-45cc-a6b5-386ef84b7976.jpg?x-oss-process=image/resize,m_fill,w_160,h_120,limit_0/interlace,1/format,webp/auto-orient,1)
![[Laser cut and engrave,Inkjet printing] Illuminated Christmas Lantern with Winter Village and Holiday Scene](https://storage-public.atomm.com/xtool/community/attachment/xtool-community/7444680a-6287-47d2-870d-88aa4aab05a3.JPG?x-oss-process=image/resize,m_fill,w_160,h_120,limit_0/interlace,1/format,webp/auto-orient,1)
![[Laser cut and engrave,Inkjet printing] Illuminated Christmas Lantern with Winter Village and Holiday Scene](https://storage-public.atomm.com/xtool/community/attachment/xtool-community/dd48c43e-f972-4a39-9026-bdc922dc0101.JPG?x-oss-process=image/resize,m_fill,w_160,h_120,limit_0/interlace,1/format,webp/auto-orient,1)
![[Laser cut and engrave,Inkjet printing] Illuminated Christmas Lantern with Winter Village and Holiday Scene](https://storage-public.atomm.com/xtool/community/attachment/xtool-community/66733895-cafe-41af-87e3-8cdab79c6486.png?x-oss-process=image/resize,m_fill,w_160,h_120,limit_0/interlace,1/format,webp/auto-orient,1)
![[Laser cut and engrave,Inkjet printing] Illuminated Christmas Lantern with Winter Village and Holiday Scene](https://storage-public.atomm.com/xtool/community/attachment/xtool-community/56a86615-a198-4b09-aee6-7db930e4864b.png?x-oss-process=image/resize,m_fill,w_160,h_120,limit_0/interlace,1/format,webp/auto-orient,1)
![[Laser cut and engrave,Inkjet printing] Illuminated Christmas Lantern with Winter Village and Holiday Scene](https://storage-public.atomm.com/xtool/community/attachment/xtool-community/85510acf-65b9-4b7c-bdd1-25bdb6e02cff.png?x-oss-process=image/resize,m_fill,w_160,h_120,limit_0/interlace,1/format,webp/auto-orient,1)
![[Laser cut and engrave,Inkjet printing] Illuminated Christmas Lantern with Winter Village and Holiday Scene](https://storage-public.atomm.com/xtool/community/attachment/xtool-community/d3b59d68-432d-48db-9441-46d98c52ccda.png?x-oss-process=image/resize,m_fill,w_160,h_120,limit_0/interlace,1/format,webp/auto-orient,1)
![[Laser cut and engrave,Inkjet printing] Illuminated Christmas Lantern with Winter Village and Holiday Scene](https://storage-public.atomm.com/xtool/community/attachment/xtool-community/5e530b61-d399-4e73-b5f5-e1a465f1d94a.JPG?x-oss-process=image/resize,m_fill,w_160,h_120,limit_0/interlace,1/format,webp/auto-orient,1)
![[Laser cut and engrave,Inkjet printing] Illuminated Christmas Lantern with Winter Village and Holiday Scene](https://storage-public.atomm.com/xtool/community/attachment/xtool-community/7a609f4a-8ee9-4560-b05a-187c0bcfb30f.JPG?x-oss-process=image/resize,m_fill,w_160,h_120,limit_0/interlace,1/format,webp/auto-orient,1)
![[Laser cut and engrave,Inkjet printing] Illuminated Christmas Lantern with Winter Village and Holiday Scene](https://storage-public.atomm.com/xtool/community/attachment/xtool-community/cf000444-f702-48bd-9290-683c4c501854.JPG?x-oss-process=image/resize,m_fill,w_160,h_120,limit_0/interlace,1/format,webp/auto-orient,1)
![[Laser cut and engrave,Inkjet printing] Illuminated Christmas Lantern with Winter Village and Holiday Scene](https://storage-public.atomm.com/xtool/community/attachment/xtool-community/cc072500-b814-4d30-8ee4-d29146dd4d9d.JPG?x-oss-process=image/resize,m_fill,w_160,h_120,limit_0/interlace,1/format,webp/auto-orient,1)
![[Laser cut and engrave,Inkjet printing] Illuminated Christmas Lantern with Winter Village and Holiday Scene](https://storage-public.atomm.com/xtool/community/attachment/xtool-community/8ce013df-b9f2-4343-8706-edae666d6ab8.JPG?x-oss-process=image/resize,m_fill,w_160,h_120,limit_0/interlace,1/format,webp/auto-orient,1)
![[Laser cut and engrave,Inkjet printing] Illuminated Christmas Lantern with Winter Village and Holiday Scene](https://storage-public.atomm.com/xtool/community/attachment/xtool-community/7beeeada-4ec8-44c3-ac67-10fa4f0b0824.JPG?x-oss-process=image/resize,m_fill,w_160,h_120,limit_0/interlace,1/format,webp/auto-orient,1)
![[Laser cut and engrave,Inkjet printing] Illuminated Christmas Lantern with Winter Village and Holiday Scene](https://storage-public.atomm.com/xtool/community/attachment/xtool-community/db0144ea-008b-4df5-95ce-f5d0fce13d0a.png?x-oss-process=image/resize,m_fill,w_160,h_120,limit_0/interlace,1/format,webp/auto-orient,1)
可更換的季節節日燈籠,配有16個裝飾嵌板
 教程
教程lantern good
.xs
顯示剩餘(1項)
應用場景
激光加工、噴墨列印
機器與模組

xTool M2
10W, Ink module兼容的 xTool 機器
P3
F2
F2 Ultra UV
F2 Ultra(Single)
F2 Ultra
F1 Ultra
F1
F1 Lite
S1
P2S
P2
M1 Ultra
M1
D1 Pro 2.0
D1 Pro
D1
Laserbox
使用的材料

3mm椴木膠合板

硫酸紙不乾膠

69
2520
資訊
      光之年:可更換彩繪玻璃燈籠側板 我用Photoshop製作,並以厚羊皮紙作為面板底片,印在M2上。

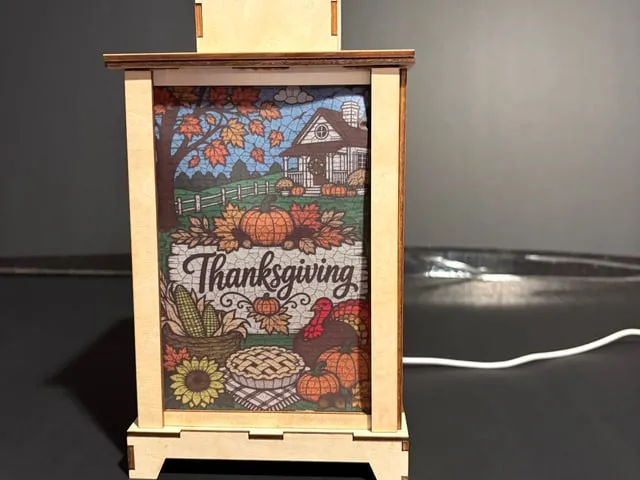
這款雷射切割木製燈籠設計為全年可搭配可更換的彩繪玻璃風格插片,讓人全年享受。每幅原創插畫都慶祝不同的季節或節日,讓燈籠只需簡單更換面板,即可在數秒內變身。結合雷射切割、借來的M2印刷半透明藝術品,以及背光,一盞可重複使用的燈籠成為無盡的季節裝飾,為任何家帶來溫暖、創意與光明。

如果你沒有 M2,借朋友或用噴墨印表機列印,這個專案仍可用噴墨印表機完成!!

Instagram:https://www.instagram.com/p/DbRsGESEXua/
Facebook:https://www.facebook.com/story.php?story_fbid=1985105935524869&id=100020764455787&mibextid=wwXlfr&rdid=ShLiyzJvk3vl505x

雷射材料與工藝用品社群連結:https://www.facebook.com/groups/lasermaterials/posts/1327327649382650/?mibextid=wwXIfr
教程
1
步驟1: 材料準備

預覽

預覽

預覽
下載兩個檔案。一個檔案是列印檔案,另一個是木檔案。如果你沒有 M2,請下載檔案並匯出成 png、jpeg 或 svg,然後用噴墨印表機列印側板。
用亞馬遜上買到的厚重羊皮紙印出你喜歡的面板。
連結:https://www.amazon.com/dp/B096Z6JRDJ?lv=shuf&channelId=500&plpRedirect=mhFallback&th=1
我為燈籠的四面做了四塊。用3毫米的椴木剪木件。把它們放在木頭上。在做完瞄準測量和特寫觀察後,開啟輸出並開始切割作品。
100/4/1 切割
印刷時墨水飽和度為 80%
2
步驟2: 開始組裝木燈籠

預覽

預覽
在側板上加裝 L 型支架。務必正確對齊,這樣你才有空間把4x6的羊皮紙板緊密地固定。
3
步驟3: 膠基

預覽

預覽
將圓圈環黏在底座上,對齊刻痕。用黏著劑把燈黏在環的中心。確保電線穿過開口並穿過底座下方。把底座括號黏到底部的標籤裡。
連結: https://www.amazon.com/dp/B0FVM939M8?lv=shuf&channelId=500&plpRedirect=mhFallback&th=1
4
步驟4: 膠面板

預覽
側板要用膠水黏住。
5
步驟5: 黏燈籠蓋板——千萬不要黏在側板上

預覽

預覽

預覽
如果你打算更換內襯,請不要把燈籠蓋黏在側板上。
用膠水頂蓋高支架。用膠水把拉片從頂部平坦的T面板 上
。把T面板黏到頂部。
第一個戒指是面朝上放置的。然後把兩邊的環面朝下黏上,形成一個完整的圓。
我不喜歡有凸出的標籤,所以我加了一個可以黏在燈籠頂部的方形。
6
步驟6: 插入片/標籤覆蓋

預覽

預覽
把短支架黏在面板內側,讓彩色面板有方便的插入點。
把長支架黏在外側,蓋住卡扣。
7
步驟7: 插入面板 新增頂部

預覽

預覽
預覽

預覽
插入面板並加蓋。開燈並選擇顏色。
評論
二創



您可能還喜歡

$2.40
$2.40
$4.00
积分240
聖誕燈籠 - 3 毫米 SVG 雷射切割檔案

0

$1.00
$1.00
$2.00
积分100
聖誕夜燈與侏儒

17

$2.99
$2.99
$5.98
积分299
组合
節日影盒燈籠 — 5合1 - 雷射切割設計
10

$1.60
$1.60
$4.00
积分160
聖誕村燈籠與聖誕老人雪橇剪影

2

$5.00
$5.00
积分500
雷射切割聖誕快樂LED節日裝飾,搭配聖誕樹與禮物

6

Book Nook 雷射切割木製聖誕雪人影盒裝飾

22
80


雷射切割木製聖誕燈塔裝飾,附 LED

137
674

帶有聖誕老人輪廓的發光木製聖誕燈籠
4
11

聖誕燈盒裝飾

6
16

聖誕燈籠,帶有教堂與雪人主題

30
133

$2.09
$2.09
$2.99
积分209
木製聖誕燈籠與馴鹿與冬季小屋場景

1

$1.60
$1.60
$4.00
积分160
帶有節慶主題的點亮聖誕燈籠
0

$5.00
$5.00
积分500
雷射切割聖誕節燈飾,搭配屋子和糖果
0

雷射切割聖誕木質節日分層藝術裝飾

23
82

霍斯雷燈

2
18

$2.00
$2.00
$4.00
积分200
聖誕書燭台 🎄
18

$2.00
$2.00
$4.00
积分200
聖誕快樂星星 - 燭台 - 燈籠 - 夜燈
3

雷射切割木製聖誕場景裝飾,配有雪人和聖誕樹

0
3