


報告
![[Laser cut and engrave] Laser Cut Wooden Dragon Model Puzzle Toy](https://storage-us.atomm.com/resource/xtool/community/attachment/xtool-community/02f53644-c73a-4695-8ab1-d12bccd208e2.jpg?x-oss-process=image/resize,w_1200,h_900,limit_0/interlace,1/format,webp/auto-orient,1)
![[Laser cut and engrave] Laser Cut Wooden Dragon Model Puzzle Toy](data:image/png;base64,iVBORw0KGgoAAAANSUhEUgAAAAoAAAAKCAYAAACNMs+9AAAAAXNSR0IArs4c6QAAABdJREFUKFNjZCASMBKpjmFUId6QIjp4AAppAAuXjCs4AAAAAElFTkSuQmCC)
![[Laser cut and engrave] Laser Cut Wooden Dragon Model Puzzle Toy](https://storage-us.atomm.com/resource/xtool/community/attachment/xtool-community/02f53644-c73a-4695-8ab1-d12bccd208e2.jpg?x-oss-process=image/resize,w_200,h_150,limit_0/interlace,1/format,webp/auto-orient,1)
![[Laser cut and engrave] Laser Cut Wooden Dragon Model Puzzle Toy](https://storage-us.atomm.com/resource/xtool/community/attachment/xtool-community/d553ec1c-f3dc-4c83-aa61-b83ccf199994.jpg?x-oss-process=image/resize,w_200,h_150,limit_0/interlace,1/format,webp/auto-orient,1)
![[Laser cut and engrave] Laser Cut Wooden Dragon Model Puzzle Toy](https://storage-us.atomm.com/resource/xtool/community/attachment/xtool-community/b7931587-17df-436b-916f-54e5445f6e5e.jpg?x-oss-process=image/resize,w_200,h_150,limit_0/interlace,1/format,webp/auto-orient,1)
![[Laser cut and engrave] Laser Cut Wooden Dragon Model Puzzle Toy](https://storage-us.atomm.com/resource/xtool/community/attachment/xtool-community/bca2da94-4780-4ae2-9476-c998634aa291.jpg?x-oss-process=image/resize,w_200,h_150,limit_0/interlace,1/format,webp/auto-orient,1)
トゥースレスドラゴン
 指示
指示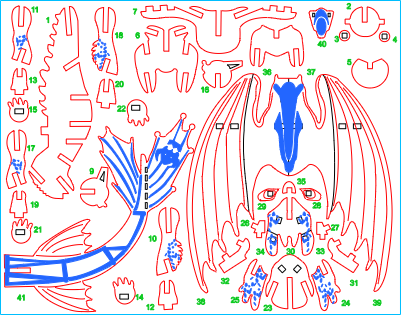
Toothless
.xcs
4件をさらに表示
アプリケーションシナリオ
レーザー加工 (60min)
機械とモジュール
xTool S1
40W互換性のある · 13
使用される材料

3mmポプラ合板
14
124
指示
1
ステップ1: カットアウトパターン

プレビュー
すべてのパーツを切り取ってください
2
ステップ2: ボディパーツの組み立て

プレビュー

プレビュー

プレビュー
8 More images
最初の部分は喉に差し込みます。 側面から突き出た2つの四角いタブがあります。 接着剤で固定し、その後2つの小さな丸い部分を側面に接着します。
次のピースはV字型の切り欠きが入った円盤です。
次は上部にV字型の脚のパーツ(翼は後の工程でスロットに入れます)。
次に、次のスロットに翼のホルダーを接着します。
最後のパーツは後ろ脚のホルダーです。
3
ステップ3: アセンブル・レガシー

プレビュー

プレビュー

プレビュー
前脚は
2つ、 後部は2つあります。
前脚には羽根があり、後脚にはありません。
彫刻は外側に広がっています。すべての脚のグループは分けておきましょう。
脚を接着し、次にフットホルダー、最後にフット
を接着します。4
ステップ4: ヘッドアセンブリ

プレビュー

プレビュー

プレビュー
6 More images
頬当てを下顎やフェイスピースに接着します。
これをメインのボーデピースに滑り込ませます。
顎のパーツに接着する小さなアイホルダーが2つあります。
目をこれらのパーツに接着してください。前方にノーズを加えます。
ヘッドピースの上部を取って、下部のイヤーホルダーを接着します。
耳を斜めに突き出たタブに接着します。
このパーツを頭の後ろのスロットに差し込みます。
5
ステップ5: 翼と尾を追加してください

プレビュー

プレビュー

プレビュー

プレビュー
内側の翼を本体にぴったりと押し付けます。
外側の翼の2枚を接着します。
テールパーツをボディ背面の残ったスロットに接着します。
6
ステップ6: 終わり

プレビュー

プレビュー

プレビュー
2 More images
終わりだ!
楽しんでいただければ幸いです!
コメント


