
Expanding an image with AI — also called outpainting or uncropping — grows the canvas and fills the new space with content the model invents to match your photo's edges. It takes about a minute.
This guide walks through the process step by step, covers how to write a prompt when the automatic fill guesses wrong, and is direct about where the technique works and where it should not be used at all.
Expand an image nowDrag the canvas outward and let AI fill the new area, free in the browser.Open AI ExpandKey Takeaways
- AI expansion generates the new area. Your original pixels are never altered.
- Automatic fill handles simple surroundings; a short prompt steers it when it does not.
- Keep the subject centred and fully visible — cut-off subjects produce the worst results.
What Expanding an Image With AI Actually Does

The model looks at the edges of your photo — colours, textures, lighting direction, where lines are heading — and predicts a plausible continuation outward into the empty canvas.
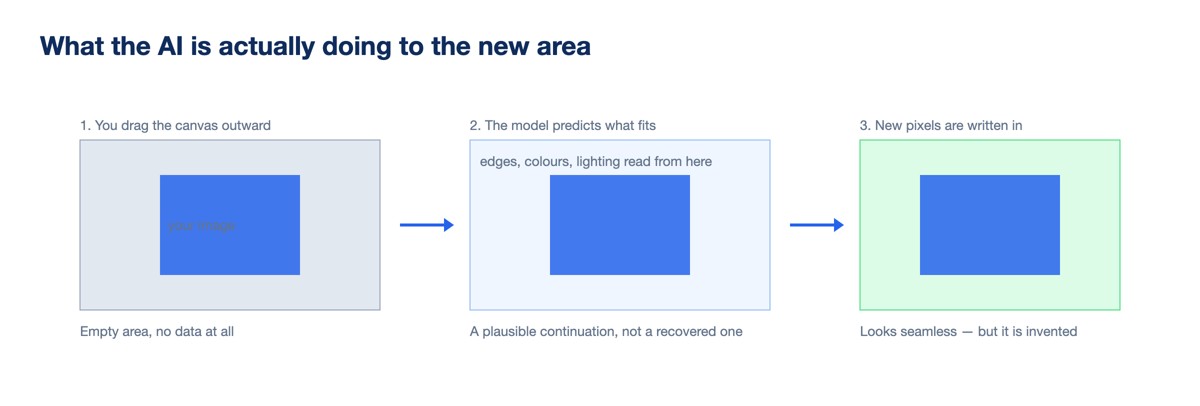
Two consequences follow, and both matter. Your original is untouched, so there is no quality loss in the part you photographed. And the new area is a guess, however convincing it looks.
If what you actually need is a sharper or larger version of the existing frame, that is upscaling instead — the difference is set out in how to expand picture size.
What You Need to Expand an Image With AI
An image with the subject centred
Atomm's tool asks for the main subject centred and fully visible, and every outpainting model works better that way. A subject already cropped at the edge gives the model no way to know how it continues.
A supported file
JPG, JPEG, PNG or WEBP, up to 10 MB.
An idea of the target shape
Knowing you need 16:9 for a banner, or a square for a listing, makes the drag step much faster.
How to Expand an Image With AI, Step by Step
Step 1: Upload your image
Open AI Expand and drop the file in. Nothing is generated at this point; you are just loading the source.
Step 2: Drag the canvas outward

Select the Expand tool and pull the handles in the directions you need. Expand only where you need it — a small extension on one side is far more reliable than a large one on all four.
Step 3: Generate and compare variations
Click Generate. The empty space fills with content matched to your photo, and the tool produces several variations you can cycle through. Look at all of them before choosing; they differ more than you expect.
Step 4: Add a prompt if the fill guesses wrong
Type a short description into the prompt box and generate again. The tool's own example is “blue sky”, which is the right level of detail — you are naming what should be there, not writing a scene.
Step 5: Check the seam before you use it
Zoom to where old meets new. Look for repeated texture, a shift in lighting direction, and objects that start in the real area and end incorrectly in the generated one. Those are the tells, and they are easier to spot at 100% than in a thumbnail.
Writing the Prompt to Expand an Image With AI
Prompting here is unlike prompting an image generator. You are describing a background that has to agree with an existing photograph, not composing a picture.
Name the surroundings, not the subject
The subject is already in the frame. “Wooden table surface” is useful; “a beautiful product photo” is not.
Stay short
Two or three words usually beats a sentence, because you are correcting a guess rather than specifying a whole image.
Match what is already visible
If the light falls from the left, do not ask for something that implies a window on the right.
Ask for empty where you want empty
“Plain wall” or “blurred background” gives clean space for text, which is usually why a banner needed expanding in the first place.
Expand in stages for large extensions
Doubling the width in one pass gives the model very little to work from at the far edge. Two smaller expansions, generating each time, keeps every step anchored to real detail and produces a more coherent result.
Where AI Image Expansion Works Well

Plain and continuous backgrounds
Sky, studio backdrops, walls, water, grass. Nothing structured for the model to get wrong.
Aspect ratio changes for layout
Turning a portrait photo into a banner, or squaring a landscape shot for a grid.
Adding headroom or margin
Space above a subject for a headline, or breathing room so a crop does not feel tight.
Blurred or shallow-depth backgrounds
Out-of-focus areas are the easiest thing in photography to continue convincingly.
Where AI Image Expansion Fails
Knowing the failure modes saves you from shipping something odd.
Faces and hands at the edge
Partially visible people are the classic outpainting disaster, and extra limbs are the classic symptom.
Text and logos
Models produce text-like shapes rather than text. Any generated signage or packaging copy will be wrong.
Repeating structure
Brickwork, tiling, railings and window grids drift out of alignment, and the eye catches it immediately.
Very large extensions
The further from real pixels, the weaker the anchor. This is what staged expansion is for.
When Not to Expand an Image With AI

This is a judgement about honesty rather than about quality, and no amount of prompting changes it.
Product images
Generated area can imply packaging, accessories or scale that the buyer will not receive.
Property listings
Extending a room, a garden or a view invents space that does not exist. That is a misrepresentation whatever the intent.
News, documentary and evidence photography
The entire value of the image is that it records something real.
Anywhere a platform forbids it
Marketplaces and stock libraries increasingly have rules about generated content, and they apply to the expanded area too.
In all of these, extend with a plain colour fill or upscale instead. Both change how the image is presented without changing what it shows.
Alternatives If Expanding With AI Is Wrong
All four alternatives below are covered properly in the best image expanding tools, which compares the AI and non-AI routes side by side.
| Situation | Do this instead |
|---|---|
| Product photo needs to be square | Extend the canvas with a solid white fill |
| Image is too small or soft | Upscale it — framing is not the problem |
| Needs to print larger | Lower the print DPI before touching the file |
| Vertical video framing | Blurred stretch of the same frame behind it |
| Factual image, wrong shape | Solid fill, or reshoot if it matters enough |
Conclusion
The workflow is genuinely quick: upload, drag the canvas, generate, and prompt only if the automatic fill misreads the scene. Keeping the subject centred and expanding in stages covers most of what makes results good.
It works best on plain, continuous backgrounds and fails predictably on faces, text and repeating structure. Checking the seam at full zoom takes ten seconds and catches nearly every problem.
The one rule worth remembering past the technique: the new area is invented. On decorative and marketing work that is fine, and on product, property or news images it is not.
If you need this regularly, the AI tools are compared on real pricing in the best AI image expanders.
Frequently Asked Questions about Expanding Images With AI
How do I expand an image with AI?
Upload the image, drag the canvas outward in the directions you need, then click Generate. The empty area fills with content matched to your photo’s edges, and you can cycle through several variations.
Does AI expansion reduce the quality of my photo?
No. Your original pixels are untouched — the tool only adds new area around them. If your image looks soft, the issue is resolution, which needs an upscaler rather than an expander.
What file types and sizes can I expand?
Atomm’s AI Expand accepts JPG, JPEG, PNG and WEBP up to 10 MB, and asks that the main subject is centred and fully visible for the best result.
How do I write a good prompt for expanding?
Describe the surroundings rather than the subject, and keep it to a few words. The tool’s own example is “blue sky”. You are correcting the model’s guess, not composing a new image.
Why does the expanded area look wrong?
Usually faces, text or repeating structure near the edge, or too large an extension in one pass. Expand in two smaller steps and add a short prompt naming what should be there.
Is it OK to use AI expansion on product photos?
No. The added area is generated, so it can imply packaging, accessories or scale a buyer will not receive. Extend with a plain white fill instead, which changes the shape without changing the facts.
What is the difference between expanding and uncropping?
They are the same operation described two ways. Uncropping suggests restoring what was cut off, but nothing is restored — the model predicts a plausible continuation rather than recovering the original scene.
Expand an image in your browser
Free AI Expand from Atomm, or explore the wider set of AI image tools.
