


![[Laser cut and engrave] Laser Cut Wall Clock with Colorful Heart Accents and Inspirational Quote](https://storage-us.atomm.com/resource/xtool/community/attachment/xtool-community/839e353e-54ce-4369-b4de-7b1427cdb1b2.jpeg?x-oss-process=image/resize,w_1200,h_900,limit_0/interlace,1/format,webp/auto-orient,1)
Laser Cut Wall Clock with Colorful Heart Accents and Inspirational Quote with OutIn branding
 Návod
Návod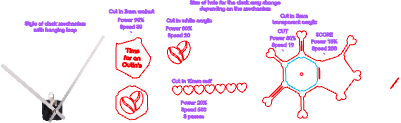

Informace
      I was inspired to make this clock with transparent acrylic so that the clock and hearts appear to float on the wall. The shape represents the coffee molecule and the hearts, the love for coffee.

The text can be changed.

I made the design in Xtool Studio.
Návod
Krok1: Cut & score the transparent acrylic.

I taped the back with blue painters tape and put a film of washing up liquid on the front to enable cutting and scoring.
MAKE SURE THAT THE SIZE OF THE CENTRE HOLE ACCOMMODATES YOUR CLOCK MECHANISM.
Krok2: Cut and prepare the hearts in 12mm MDF.


It took 3 passes for the MDF to cut this thickness of MDF.
Once cut I sanded the fronts for a more rounded effect. Keep sanding until the hearts are smooth.
I then painted the hearts with a grey primer. I selected the colours for the hearts from the OutIn range of products.
After all the layers had dried I added a coat of UV resin.
Krok3: Cut the coffee beans in white acrylic

I taped the front of the acrylic to help with the cutting process. I used acrylic that has a self adhesive backing.
MAKE SURE THAT THE SIZE OF THE CENTRE HOLE ACCOMMODATES YOUR CLOCK MECHANISM.
Krok4: Cut the walnut centre piece and text.

I taped the front of the walnut to help with the cutting process. In hindsight I would have used a material that had a self adhesive backing as this would have made the glueing process easier. I used the cut around the text as a template.
MAKE SURE THAT THE SIZE OF THE CENTRE HOLE ACCOMMODATES YOUR CLOCK MECHANISM.
Krok5: Assemble the project.

Use the score lines to add the main piece of walnut and the template to add the text.
Add the white acrylic for the coffee beans.
Glue the hearts to the perimeter of the clock.


