


舉報
![[Laser cut and engrave] Laser Engraved Wood Test Chart for Speed, Power, and LPC Settings](https://storage-us.atomm.com/resource/xtool/community/attachment/xtool-community/79d0edfc-dd88-4367-bb43-1731ab825c78.jpg?x-oss-process=image/resize,w_1200,h_900,limit_0/interlace,1/format,webp/auto-orient,1)
![[Laser cut and engrave] Laser Engraved Wood Test Chart for Speed, Power, and LPC Settings](data:image/png;base64,iVBORw0KGgoAAAANSUhEUgAAAAoAAAAKCAYAAACNMs+9AAAAAXNSR0IArs4c6QAAABdJREFUKFNjZCASMBKpjmFUId6QIjp4AAppAAuXjCs4AAAAAElFTkSuQmCC)
![[Laser cut and engrave] Laser Engraved Wood Test Chart for Speed, Power, and LPC Settings](https://storage-us.atomm.com/resource/xtool/community/attachment/xtool-community/79d0edfc-dd88-4367-bb43-1731ab825c78.jpg?x-oss-process=image/resize,w_200,h_150,limit_0/interlace,1/format,webp/auto-orient,1)
![[Laser cut and engrave] Laser Engraved Wood Test Chart for Speed, Power, and LPC Settings](https://storage-us.atomm.com/resource/xtool/community/attachment/xtool-community/e3caf49c-7500-466b-a0c4-d57b4df98ab1.jpg?x-oss-process=image/resize,w_200,h_150,limit_0/interlace,1/format,webp/auto-orient,1)
雷射雕刻木質測試表,提供速度、功率及低功率設定
 教程
教程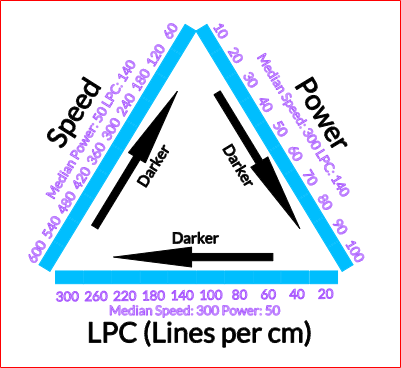
PowerSpeedLPC Triangle
.xcs
應用場景
激光加工 (25min)
機器與模組
xTool P2
55W使用的材料
1/4吋樺木
103
1901
教程
1
步驟1: 在你開始之前——很重要!!

預覽
先說幾點非常重要的說明!
- 這是用1/4吋的樺木做的。如果你在其他材質上做這件事,請注意刻字很深的設定可能會完全穿透。這可能會造成火災危險。所以,像任何專案一樣,尤其是這個專案,做這件事時要和你的機器好好。如果你看附上的照片,你會發現60速的齒輪已經穿過1/4吋樺木板的一半多一點。這表示它要麼已經穿透了1/8英吋的樺木,要麼幾乎已經穿透了。
- 這在任何機器上都可以做到,但切割設定可能需要調整才能切割三角形。每個雕刻設定都是獨立的,如果你調整了這些設定,記得在同一條線上調整其他設定,這樣整條線都能均勻雕刻。
- 這是一個起步工具。換句話說,除非你真的看到那個音色,否則不要指望它能給你想要的刻字。
- 雙方的選項都設定在中位數。這表示動力端會包含速度和LPC的中位數,速度端會包含功率和LPC的中位數,LPC則會包含功率和速度的中位數值。這也代表在中途點兩側各有一個相同的方塊。
這個檔案包含多種顏色。
黑色是字母,箭頭是雕刻。
淺藍色是三角形每條腿
線的不同刻紋,紫色是劃線,代表數字和中位數層
級,紅色是三角形正方形的切割線。
2
步驟2: 雕刻三角形
這個計畫裡有好幾十個設定,所以我會先在 xTool Studio 的右側查看,確保每個設定都設定好。務必確保你的產品組在機器中穩定。
註:我在 P2 上用蜂巢系統做過這件事。要麼把材料從蜂巢上抬高以防止過度燒傷,要麼確保托盤底部乾淨,避免雕刻穿透材質時引發嚴重的火災。(無論如何,確保托盤乾淨是個好主意!)
3
步驟3: 最後註記
我喜歡提供幫助其他雷射愛好者的工具。我希望這能像對我一樣幫助你。我參考這些三角形是為了幫助你找到新材料的良好起點,有時光看這個就能找到我需要的精確深度。
歡迎你用其他材料混合,並且記得分享到 Atomm 給我們社群中的其他雷射使用者。
如果你喜歡這個計畫,可以看看我其他的計畫。我有很多這些文章都發到 Atomm 上。有些是高級版,但大多數都是免費下載和使用的。
https://www.atomm.com/profile/15190?utm_source=Social_Share
祝手作愉快!
評論


