
![[Laser cut and engrave] Has The Cat Been Fed Interactive Kitchen Tracker Sign](https://image-res.atomm.com/resource/xtool/community/attachment/xtool-community/32eb2337-2cb2-4ba7-b836-ce21bfe7d527.jpeg?x-oss-process=image/resize,w_1200,h_900,limit_0/interlace,1/format,webp/auto-orient,1)
![[Laser cut and engrave] Has The Cat Been Fed Interactive Kitchen Tracker Sign](data:image/png;base64,iVBORw0KGgoAAAANSUhEUgAAAAoAAAAKCAYAAACNMs+9AAAAAXNSR0IArs4c6QAAABdJREFUKFNjZCASMBKpjmFUId6QIjp4AAppAAuXjCs4AAAAAElFTkSuQmCC)
![[Laser cut and engrave] Has The Cat Been Fed Interactive Kitchen Tracker Sign](https://image-res.atomm.com/resource/xtool/community/attachment/xtool-community/32eb2337-2cb2-4ba7-b836-ce21bfe7d527.jpeg?x-oss-process=image/resize,w_200,h_150,limit_0/interlace,1/format,webp/auto-orient,1)
![[Laser cut and engrave] Has The Cat Been Fed Interactive Kitchen Tracker Sign](https://image-res.atomm.com/resource/xtool/community/attachment/xtool-community/e36fb44f-82fb-4458-acdb-9c35c210cfeb.jpeg?x-oss-process=image/resize,w_200,h_150,limit_0/interlace,1/format,webp/auto-orient,1)
![[Laser cut and engrave] Has The Cat Been Fed Interactive Kitchen Tracker Sign](https://image-res.atomm.com/resource/xtool/community/attachment/xtool-community/0f69f219-3780-405c-b5c2-f5495cd726e6.jpeg?x-oss-process=image/resize,w_200,h_150,limit_0/interlace,1/format,webp/auto-orient,1)
![[Laser cut and engrave] Has The Cat Been Fed Interactive Kitchen Tracker Sign](https://image-res.atomm.com/resource/xtool/community/attachment/xtool-community/c7160b36-81fb-4806-8755-cec5e8e48376.jpeg?x-oss-process=image/resize,w_200,h_150,limit_0/interlace,1/format,webp/auto-orient,1)
Has The Cat Been Fed Interactive Kitchen Tracker Sign
 Instruction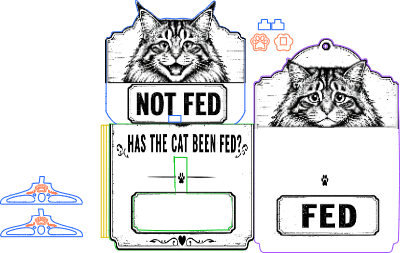


Information
The cat is ALWAYS conning ONE of us into feeding him a second meal when the other isn't around to confirm. I cooked up this little creation in the likeness of our Maine Coon Siberian Cat, BUSTER, to keep track of whether he has ACTUALLY been fed or not!
Instruction
Step1: Load plywood and cut out file

Load file, and cut out on a sheet of 1/8” birch or basswood plywood.
Step2: Layout and assembly Paw Slider Knob


Lay out the pieces and familliarize yourself with the assembly. Glue together the parts to make the Paw Slider Knob support and glue the face on the paw slider knob itself. Then glue base into knob.
Step3: Glue Space in Place


Lay a bead of glue on to each of the spacers and lightly glue them down on to the backing, even with the edge on the outside and right under the Fed box for the bottom piece.
Step4: Glue Paw Knob into Slider

Glue paw knob into Slider, making sure there is enough room for a piece of 1/8” material to easily slide between.
Step5: Glue on the Face


Apply a thin bead of glue to the front of each of the three spacers. Try to keep the glue toward the outside of the spacers so that it doesn’t squish inward toward the slider piece. Place slider piece between spacers just into backing for spacing and glue the face plate on. Don’t press too firmly. Let gravity pull it down so there is a little extra room for the slider and no glue seepage inside. As glue is setting, give the slider and occasional up and down movement to make sure movement is free.
Step6: Glue on Legs (if using)

Slide the a lot of each leg into the bottom void of the sign and glue into place. Allow to set.
Remixes
License




You may also like

Laser Cut Wooden Cat Welcome Sign with Paw Prints


'/%3e%3cdefs%3e%3clinearGradient%20id='paint0_linear_1433_15752'%20x1='12.5'%20y1='5'%20x2='12.5'%20y2='19.2596'%20gradientUnits='userSpaceOnUse'%3e%3cstop%20stop-color='%232F7FFF'/%3e%3cstop%20offset='1'%20stop-color='%232661F1'/%3e%3c/linearGradient%3e%3c/defs%3e%3c/svg%3e)
 Template
Dog House Sign


 Template
Pet House Sign


Bordje zittend plassen. Please sit to pee Cat Toilet Sign with Color Engraved Text


Quirky laser cut wooden Farm Signs for around the kitchen

 Template
Louis's door sign


Dog Sign


Restroom Door Sign


Laser Engraved Personalized Kitchen Sign Claudia's Küche

Welcome sign


3-in-1 Laser Cut Pet Welcome Sign Bundle with Dog and Cat Designs


Laser Engraved Wooden Horse Name Sign


2 Layer Bone Shaped Pet Name Sign with Paw Print

 Template
Cat bowl panel


Beware of Dog She Bites Sometimes Wooden Warning Sign


Wooden sign with engraved 'Wipe Your Paws' and paw prints


Cats Leaping Beware Novelty Garden Sign

Happy Dog Tag - Attenti a Gas
