
A PNG can hold transparency, which is why it is the format people reach for when a background has to go. Saving as PNG does not remove anything on its own, though — the background has to be deleted first, and then the file kept as PNG so the transparency survives.
This guide covers why you would want a transparent PNG, what you need, four ways to make one, and which route suits which situation.
Remove a background and download a transparent PNGFree, online, no signup — upload any JPG, PNG, or WEBP and get a clean cutout.Try it freeKey Takeaways
- Removing the background and saving as PNG are two separate steps. Both are required.
- A cutout saved as JPG loses transparency permanently and comes back with a white box.
- For most images an automatic remover is enough; reach for an editor only when the edge defeats it.
Why Remove a PNG Background?
A transparent cutout is reusable in a way a rectangular photo is not. Once the background is gone, the same subject drops into any layout without carrying its original setting along.

Product listings
Marketplaces want the product isolated, either on transparency or on plain white. A cutout gives you both from one file.
Logos and overlays
A logo with a white box behind it cannot sit on a coloured header, a photo, or a printed garment. Transparency is what makes it placeable.
Print and cut work
A cutter needs to know where the subject ends. Transparency defines that boundary, which is why sticker and transfer workflows start here.
Design flexibility
Swap the backdrop, add a colour fill, or composite several subjects — none of which is possible while the original background is still attached.
What You Need
Very little, and nothing paid for the common case.
A source image
Any JPG, PNG, or WEBP. It does not have to be a PNG already — the format matters on the way out, not on the way in.
A subject that reads clearly
Automatic tools detect the subject by contrast against its surroundings. A dark coat against a dark wall is the hard case, whatever tool you use.
A tool that exports PNG
This is the part to check. Some free tiers only offer JPG output, which makes them useless for this job however good the cutout looks on screen.
Enough resolution
Free tiers often cap export size. If the cutout is going to print, confirm the download resolution before you build anything around it.
Four Ways to Remove a PNG Background
Four routes, ordered by how fast they get you a usable file. The first covers most images; the others matter when it does not.
Method 1: How to Remove a PNG Background With the Atomm Background Remover
The Atomm Background Remover is a free browser tool that detects the subject and separates it from its background, then hands back a transparent PNG. No account, no install, and no watermark.
The export is what earns it the first slot. Full resolution rather than a capped preview is precisely what most free tiers withhold, and a downscaled cutout is useless the moment the file has to be printed.

Step 1: Open the background remover
It runs in a browser, so there is nothing to install and no account to create first.
Step 2: Upload the image
JPG, PNG, or WEBP up to 10 MB. The source does not have to be a PNG already — the format matters on the way out, not on the way in.
Step 3: Check the detected edge
A few seconds is enough for the subject to be separated. Look along hair and anywhere the subject is close in tone to what is behind it, since those are the areas that fail.
Step 4: Download the transparent PNG
It saves at full resolution with no watermark. Confirm the file really is a PNG before you build anything around it.
Method 2: How to Remove a PNG Background With Preview or Windows Photos
macOS Preview and the Windows Photos app both remove backgrounds now, with no download at all. Open the image, use the background-removal command, and save a copy.
It is genuinely convenient and the edge quality is respectable on clear subjects. Two limits: there is no control over the result, and you need to confirm the saved copy is a PNG rather than a re-encoded JPG.
Method 3: How to Remove a PNG Background in Photoshop or GIMP
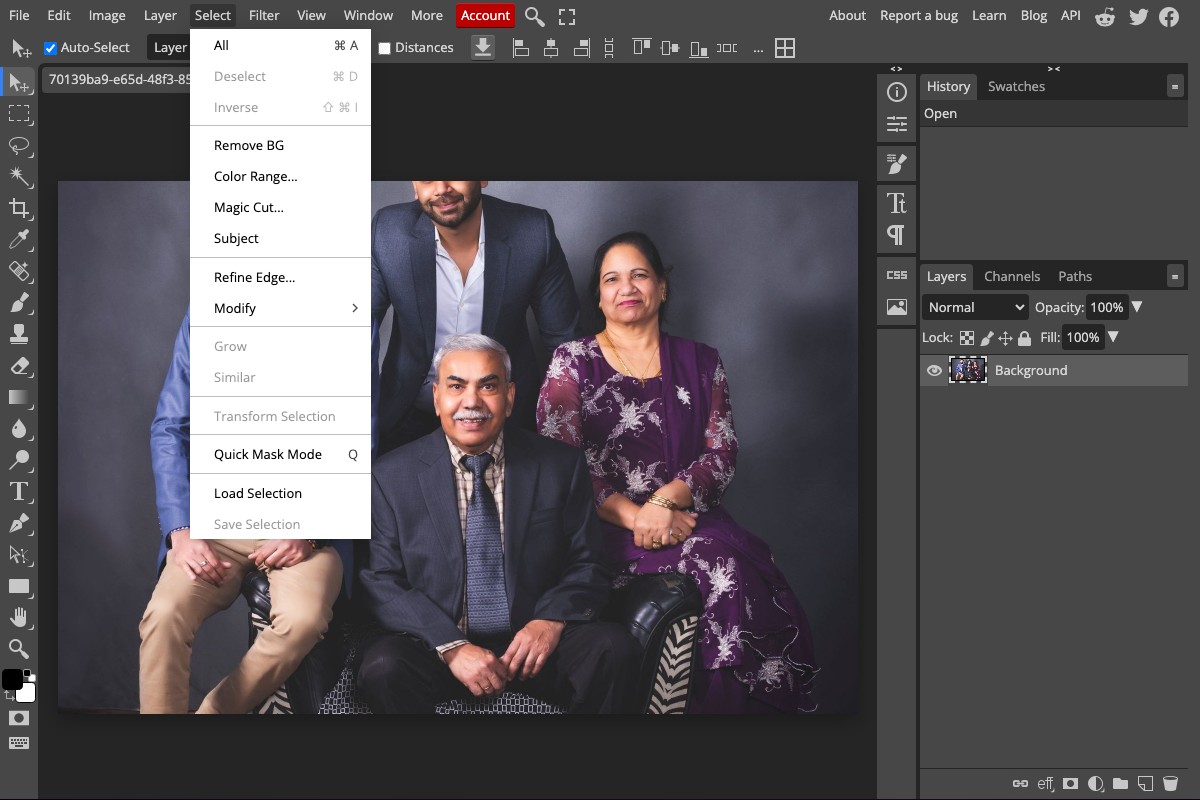
Photoshop, Affinity Photo, and the free GIMP all do this by selection: pick the subject automatically, then refine the edge by hand. Photopea does the same in a browser.
Slower than anything automatic and the only route with complete control. It is what you use when the AI keeps eating part of the subject and re-uploading changes nothing.
Export via Save As PNG rather than Export As JPEG. This is the single most common way a good cutout gets ruined at the last step.
Method 4: How to Remove a PNG Background With a Web Tool

Services such as remove.bg, Erase.bg, and BgEraser specialise in this one job. Where they differ from a general tool is batch handling — several images in one drop.
Read the free tier carefully. Some return a low-resolution preview and charge for the full file; others require an account before any download. Our roundup of the best background removers compares the limits.
What Is the Best Way to Remove a PNG Background?
The right answer depends on how many images you have and where the file is going. Four common situations:
| Method | Speed | Edge control | Batch | Best for |
|---|---|---|---|---|
| Atomm | Seconds | Automatic | No | Most images, full-resolution PNG |
| Built-in tool | Instant | None | No | One quick cutout, offline |
| Desktop editor | Minutes | Complete | Scriptable | Fine hair and difficult edges |
| Web tool | Seconds | Automatic | Often yes | Folders of product photos |
For beginners making one cutout, an automatic online remover is the whole answer — no install, no account, and a full-resolution PNG at the end.
When the edge has to be perfect — hair, fur, a subject the same colour as its background — run it automatically first, then fix only the failed areas in an editor. That is far quicker than selecting by hand.
Sellers with a catalogue should choose on batch support rather than edge quality. Twenty product shots processed in one drop beats a marginally cleaner outline done twenty times.
Working offline or with private images?
The built-in tool on your computer uploads nothing. For client work under confidentiality, that matters more than any feature.
Tips and Common Mistakes

Tip 1: Confirm the download is really a PNG
The most common failure is not a bad cutout, it is a good cutout saved as JPG. JPG cannot store transparency, so the file comes back with white behind the subject and nothing can recover it.
Tip 2: Do not judge the result on a white page
Transparency is invisible against white. Open the file on a coloured background, or look for the checkerboard pattern, before deciding the edge is clean.
Tip 3: Keep the subject away from the frame edge
Anything touching the border of the photo comes out with a flat, cut-off boundary rather than a natural one, because there is no edge for the tool to find.
Tip 4: Check the resolution, not just the look
A cutout that looks perfect at screen size can be a 720-pixel export. If it is going to print, verify the pixel dimensions before building a design around it.
Fix a haloed edge instead of starting over
A pale fringe around the subject is left-over background pixels, not a failed cutout. Most editors can contract the selection by one or two pixels, which removes the halo without redoing the work.
Conclusion
Two steps, not one: delete the background, then save as PNG so the transparency survives. Skipping the second undoes the first.
For most images an automatic remover finishes the job in seconds at full resolution. An editor is for the cases where the subject and its background are genuinely hard to tell apart.
Related jobs are covered separately: removing a background from a logo, from a signature, and cutting a subject out of a picture.
Frequently Asked Questions about PNG Backgrounds
Does saving as PNG remove the background?
No. PNG can store transparency, but it does not create it. You have to delete the background first and then save as PNG so the transparency is preserved in the file.
Why is my PNG background still white?
Either the background was never removed, or the file was re-saved as JPG at some point and the transparency was flattened. Check the file extension and re-export as PNG.
Can I remove a PNG background for free?
Yes. Automatic online tools do it free, and macOS Preview and the Windows Photos app include the feature. Check the export resolution, since free tiers often cap it.
Which format is best for transparency?
PNG for general use, since it opens everywhere. WEBP is smaller and also supports transparency but is less universally accepted. SVG suits flat artwork rather than photos.
How do I fix a rough edge on a cutout?
Contract the selection by one or two pixels to remove the pale halo of leftover background, then feather very slightly. On hair, an editor with a refine-edge tool does far better than any automatic pass.
Will removing the background reduce image quality?
Not in itself, but the export can. Free tiers frequently downscale the download, so compare the pixel dimensions of the result against the original before using it for print.
Get your transparent PNG now
Upload an image, remove the background free, and download a clean PNG with no watermark.
