


舉報
![[Laser cut and engrave] Our Journey Customizable Map](https://storage-us.atomm.com/resource/xtool/community/attachment/xtool-community/e2fa5547-0ac9-4c05-8eeb-ca4fb1f0fb23.jpg?x-oss-process=image/resize,w_1200,h_900,limit_0/interlace,1/format,webp/auto-orient,1)
![[Laser cut and engrave] Our Journey Customizable Map](data:image/png;base64,iVBORw0KGgoAAAANSUhEUgAAAAoAAAAKCAYAAACNMs+9AAAAAXNSR0IArs4c6QAAABdJREFUKFNjZCASMBKpjmFUId6QIjp4AAppAAuXjCs4AAAAAElFTkSuQmCC)
![[Laser cut and engrave] Our Journey Customizable Map](https://storage-us.atomm.com/resource/xtool/community/attachment/xtool-community/e2fa5547-0ac9-4c05-8eeb-ca4fb1f0fb23.jpg?x-oss-process=image/resize,w_200,h_150,limit_0/interlace,1/format,webp/auto-orient,1)
![[Laser cut and engrave] Our Journey Customizable Map](https://storage-us.atomm.com/resource/xtool/community/attachment/xtool-community/32c34fa9-4c1a-4349-8677-87187b29f573.jpg?x-oss-process=image/resize,w_200,h_150,limit_0/interlace,1/format,webp/auto-orient,1)
![[Laser cut and engrave] Our Journey Customizable Map](https://storage-us.atomm.com/resource/xtool/community/attachment/xtool-community/21f8b70f-9e19-4323-9f23-32b740738be5.jpg?x-oss-process=image/resize,w_200,h_150,limit_0/interlace,1/format,webp/auto-orient,1)
![[Laser cut and engrave] Our Journey Customizable Map](https://storage-us.atomm.com/resource/xtool/community/attachment/xtool-community/25519a53-ba5d-47fe-b573-7924f91ce484.jpg?x-oss-process=image/resize,w_200,h_150,limit_0/interlace,1/format,webp/auto-orient,1)
我們的旅程可自訂地圖


Our Journey Map
.xcs
應用場景
激光加工
機器與模組
xTool S1
40W兼容的 · 13
使用的材料

3mm椴木膠合板
22
526
教程
1
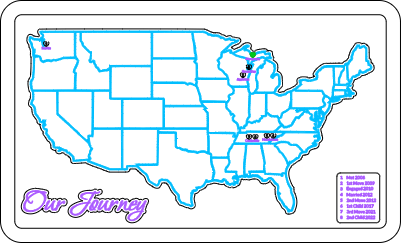
步驟1: 自訂檔案

預覽

預覽
你可以在檔案中自訂地點和事件細節。 打開檔案後,將綠色心形移到你想要的地圖位置。 選擇城市標籤,然後雙擊 。你現在可以輸入你想新增的城市名稱。 對每個城市都輸入這個步驟,然後移動到對應的心形。 現在, 你需要調整地圖鍵。 選擇該框並解除群組。 你現在可以選擇每一行並更改文字內容。 還有額外的愛心和較大的鑰匙,如果你需要添加任何一個。 你可以根據需要調整它們。 如果你調整地圖鍵的大小,務必調整或刪除對應的分數線。
2
步驟2: 製程材料

預覽
這個專案使用3mm的椴木夾板。 黑色代表切割,綠色代表刻痕,紫色和藍色代表雕刻。 藍色層需要是相當淺的雕刻,並且確保它能先 雕刻。處理你的材料。
3
步驟3: 組裝

預覽

預覽

預覽

預覽
必要時輕輕打磨。 底座上用深色染色劑。 這個專案用深胡桃木染色劑。 用膠水固定框架。 用刻線黏合地圖、地圖標示和「我們的旅程」 。接著,依照刻線將每個心形黏到正確位置。 最後塗上透明漆或選擇的聚氨酯。
評論


