
รายงาน
![[Laser cut and engrave] Rotating Wheel Calendar](https://image-res.atomm.com/resource/xtool/community/attachment/xtool-community/df1b5382-e4ad-4c93-86f4-03fa5ef81aba.jpeg?x-oss-process=image/resize,w_1200,h_900,limit_0/interlace,1/format,webp/auto-orient,1)
![[Laser cut and engrave] Rotating Wheel Calendar](data:image/png;base64,iVBORw0KGgoAAAANSUhEUgAAAAoAAAAKCAYAAACNMs+9AAAAAXNSR0IArs4c6QAAABdJREFUKFNjZCASMBKpjmFUId6QIjp4AAppAAuXjCs4AAAAAElFTkSuQmCC)
![[Laser cut and engrave] Rotating Wheel Calendar](https://image-res.atomm.com/resource/xtool/community/attachment/xtool-community/df1b5382-e4ad-4c93-86f4-03fa5ef81aba.jpeg?x-oss-process=image/resize,w_200,h_150,limit_0/interlace,1/format,webp/auto-orient,1)
![[Laser cut and engrave] Rotating Wheel Calendar](https://image-res.atomm.com/resource/xtool/community/attachment/xtool-community/c321a992-0bb1-4203-b201-be05905066f5.jpeg?x-oss-process=image/resize,w_200,h_150,limit_0/interlace,1/format,webp/auto-orient,1)
ปฏิทินวงล้อหมุน
 คำแนะนำ
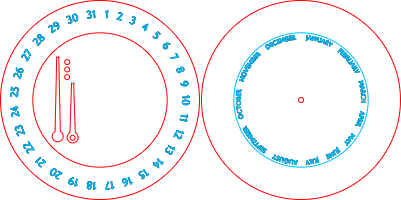
Uhren Kalender
.xcs
สถานการณ์การใช้งาน
การประมวลผลเลเซอร์
เครื่องจักร & โมดูล
xTool S1
40Wเครื่อง xTool ที่รองรับ
ใหม่
M2
10W, 20WF2 Ultra UV
5WF1 Ultra
20WM1
5W, 10WD1
5W, 10W, 20WD1 Pro
5W, 10W, 20W, 40WP2
55WF1
10WS1
10W, 20WM1 Ultra
10W, 20WP2S
55Wวัสดุที่ใช้
แผ่น MDF ขนาด 1/8" (3 มม.)

34
1269
ข้อมูล
ปฏิทินวงล้อหมุนนี้ได้รับการออกแบบเหมือนนาฬิกา โดยเข็มใหญ่ระบุวันและเข็มเล็กแสดงเดือน เมื่อประกอบเสร็จแล้วจะกลายเป็นชิ้นส่วนที่ใช้งานได้และตกแต่งซึ่งคุณสามารถใช้เป็นปฏิทินตั้งโต๊ะแบบสแตนด์อโลนได้ สร้างง่าย ปรับแต่งสนุก และเหมาะสําหรับใช้ในชีวิตประจําวันหรือเป็นของขวัญตัดด้วยเลเซอร์ที่ไม่เหมือนใคร
คำแนะนำ
1
ขั้นตอน1: ตัดทุกส่วน

ดูตัวอย่าง
เลือกวัสดุของคุณและตัดส่วนประกอบทั้งหมดที่จําเป็นสําหรับปฏิทินด้วยเลเซอร์ รวมถึงวงแหวนวัน แผ่นเดือน เข็มนาฬิกา และชิ้นส่วนเชื่อมต่อ
2
ขั้นตอน2: ติดแผ่นเดือนเข้ากับวงแหวนวัน

ดูตัวอย่าง
กาวแผ่นฐานที่มีเดือนที่ด้านหลังของวงแหวนที่มีวันกํากับไว้ ตรวจสอบให้แน่ใจว่าอยู่ตรงกลางและอยู่ในแนวเดียวกัน
3
ขั้นตอน3: เพิ่มวงกลมตัวเว้นวรรคให้กับมือขนาดใหญ่

ดูตัวอย่าง
กาววงกลมเล็ก ๆ สองวงลงบนมือขนาดใหญ่เพื่อสร้างระยะห่างและการหมุนที่ราบรื่น
4
ขั้นตอน4: ประกอบและติดตั้งมือทั้งสองข้าง

ดูตัวอย่าง

ดูตัวอย่าง
วางมือขนาดใหญ่ไว้บนมือเล็กแล้วสอดทั้งสองผ่านรูตรงกลางเข้าไปในตัวปฏิทิน
5
ขั้นตอน5: ตัวเลือก: เพิ่มสีเพื่อเน้น

ดูตัวอย่าง

ดูตัวอย่าง
คุณสามารถพ่นหรือทาสีเข็มนาฬิกาหรือแหวนเพื่อทําให้เครื่องหมายโดดเด่นยิ่งขึ้น
ความคิดเห็น
ดัดแปลง
ใบอนุญาต

โครงการที่เกี่ยวข้อง


คุณอาจชอบสิ่งนี้ด้วย

ปฏิทินตั้งโต๊ะไม้ถาวรตัดด้วยเลเซอร์พร้อมเดือนและตัวเลขที่เปลี่ยนได้

9
31

'/%3e%3cdefs%3e%3clinearGradient%20id='paint0_linear_1433_15726'%20x1='12'%20y1='5.25'%20x2='12'%20y2='18.75'%20gradientUnits='userSpaceOnUse'%3e%3cstop%20stop-color='%23FFC654'/%3e%3cstop%20offset='1'%20stop-color='%23FF8D12'/%3e%3c/linearGradient%3e%3c/defs%3e%3c/svg%3e)
ปฏิทินถาวรไม้ตัดด้วยเลเซอร์ 2026 พร้อมเกียร์อะคริลิค

140
454

เลเซอร์ตัดเคลื่อนย้ายไม้ถาวร 2026 ปฏิทินพร้อมฐานรังผึ้งและการออกแบบผึ้ง

14
36

ปฏิทินถาวรรูปพัดสไตล์เมืองตัดด้วยเลเซอร์

32
72

ปฏิทินถาวรไม้ตัดด้วยเลเซอร์พร้อมลิ้นชักเก็บของและที่ใส่ปากกา

31
93

ปฏิทินถาวรทําจากอะคริลิกและไม้ – ดีไซน์แฮนด์เมดและใช้งานได้จริง

31
191

ปฏิทินถาวรไม้ตัดด้วยเลเซอร์พร้อมแถบเลื่อนวันที่และเดือนที่เคลื่อนย้ายได้ (ITA)

10
87

$2.40
$2.40
$8.00
เครดิต240
ปฏิทินถาวรไม้พร้อมเฟืองหมุน

18

2026 ปฏิทินตั้งโต๊ะมินิมอลพร้อมขาตั้ง

28
133

ปฏิทินถาวรที่หรูหรา

30
96

ปฏิทินตั้งโต๊ะไม้ 4 มม. จาก JUSTRIGHTCLUB

51
278

ปฏิทินถาวรไม้ตัดด้วยเลเซอร์ (Chat-lendrier) ในภาษาฝรั่งเศสและอังกฤษ

19
157

ยกระดับปีของคุณ: ปฏิทินสถาปัตยกรรมพีระมิด 2026

8
70

ปฏิทินถาวรพร้อมที่ใส่ปากกาและนาฬิกาแกะสลัก

25
103

'/%3e%3cdefs%3e%3clinearGradient%20id='paint0_linear_1433_15675'%20x1='12'%20y1='3.25'%20x2='16.6891'%20y2='20.75'%20gradientUnits='userSpaceOnUse'%3e%3cstop%20stop-color='%23FF5D80'/%3e%3cstop%20offset='1'%20stop-color='%23FF0035'/%3e%3c/linearGradient%3e%3c/defs%3e%3c/svg%3e)
ปฏิทินตั้งโต๊ะไม้ตัดด้วยเลเซอร์ 2026 พร้อมลวดลายเรขาคณิต
136
552

Calendario perpetuo de madera cortado con láser con decoración floral - ปฏิทินถาวรไม้ตัดด้วยเลเซอร์พร้อมการตกแต่งดอกไม้
60
238

เลเซอร์ตัดไม้ปฏิทินถาวรการออกแบบสวิง

23
134

$2.85
$2.85
เครดิต285
ปฏิทินตั้งโต๊ะไม้ตัดด้วยเลเซอร์ (หนา 3 มม.) - AI, DXF, EPS, SVG, CDR -Digital Download

1